Chapter 1: Welcome
Congratulations on your subscription!
If you are creating traffic control or site plans as part of your business, rest assured that you have made the right decision in subscribing to RapidPlan Online. It is, without doubt, the easiest and fastest way to create plans for your works - from any platform. Read on below to learn a little more about Invarion, and our plans for RapidPlan Online.
1.1 About Invarion
Since our inception in 2001, it has been our singular focus to be the best in the market with our traffic planning software solutions, now used by over 6,000 customers in 27 countries. Every one of our customers is valuable to us, which is why we offer unrivaled ongoing support from initial setup through to plan creation.
1.2 Our plans for RapidPlan Online
We are committed to the continual improvement of RapidPlan Online, and we actively encourage feedback from users around the world who would like to see improvements, additions or modifications to the system. It's this feedback that helps us shape our future releases for our customer base. If you have an idea for a new feature, or a suggestion for an improvement or change to the current version of RapidPlan Online you are using, please submit feedback via the ''Contact support'' option in the Main Menu.
1.3 If you need support
If you require assistance, just contact the Technical support team, they are available 24 hours, 5 days a week to assist you. Visit the Invarion Website for contact details in your region.
Chapter 2: Getting Started
2.1 Logging in to Invarion Cloud
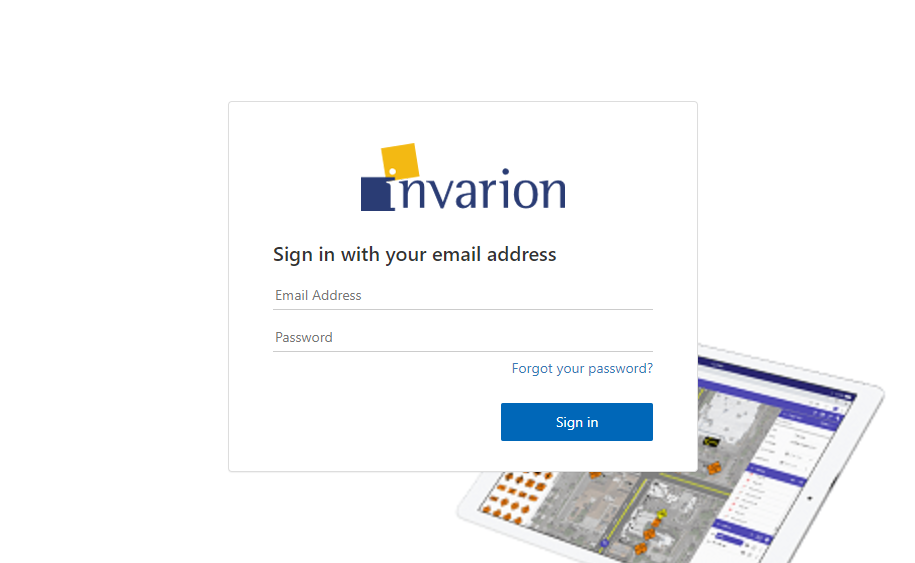
To start using RapidPlan Online, first log into your Invarion Cloud account. Log in here using the username and password provided in your 'Welcome' email.
Please visit Mobile device options for further guidance on using RapidPlan Online on a mobile/touch device.
2.2 Creating your first plan
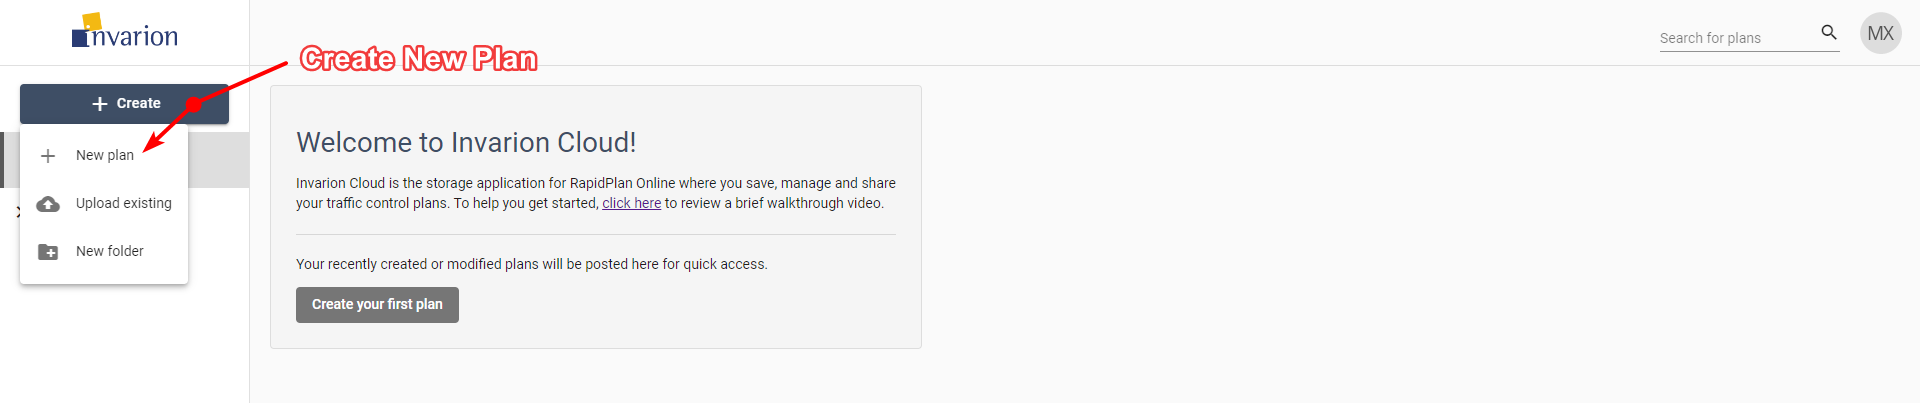
To create your first plan click on Create button and choose New plan from menu. You will be automatically taken to the RapidPlan Online.
After you finish, you can find your plan in the Plans sections inside Invarion Cloud.
2.3 My Account
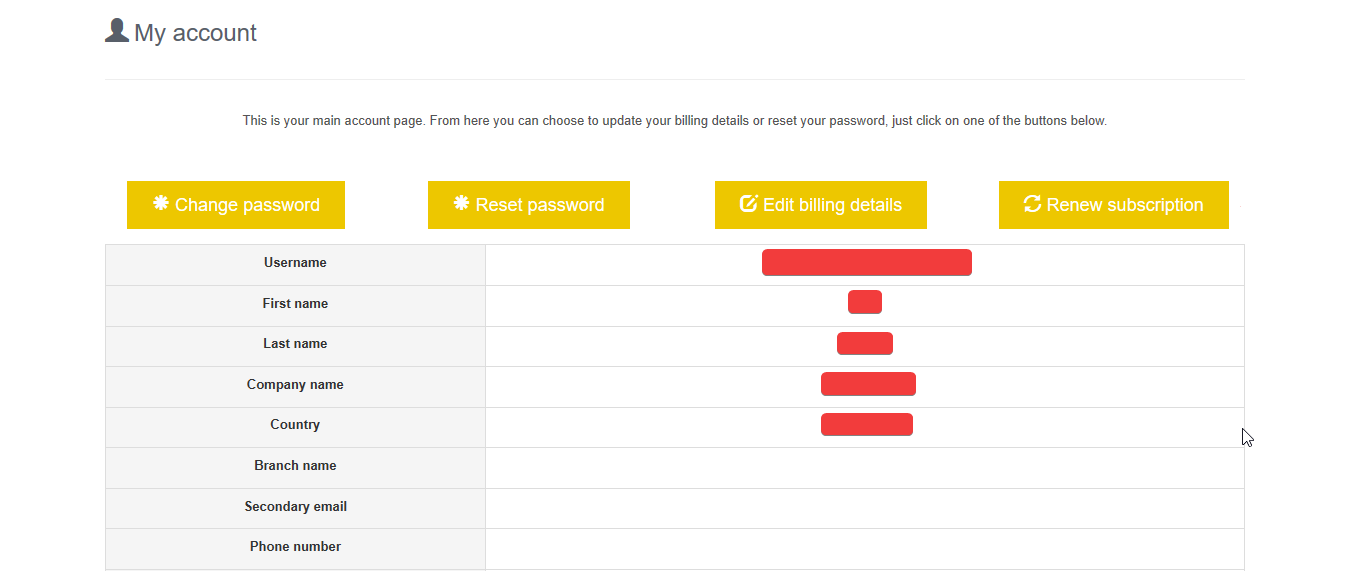
If you ever need to update your subscription, Log in here and navigate to the My Account page.

Here, you can change your billing details, cancel or renew your subscription, or change your account password.
If you are renewing your subscription, you will be taken to the following page, shown in Resources/Billing Information.png. Here you can verify or change your payment method. Once complete, just select Accept and continue to resume your subscription.

Chapter 3: Using Invarion Cloud
Invarion Cloud is an online application for storing all your plans and related documents. It is also the entry point to the RapidPlan Online and other web-based Invarion applications.
Note: Invarion Cloud has superseded our old storage application, the RapidPlan Cloud.
3.1 Layout
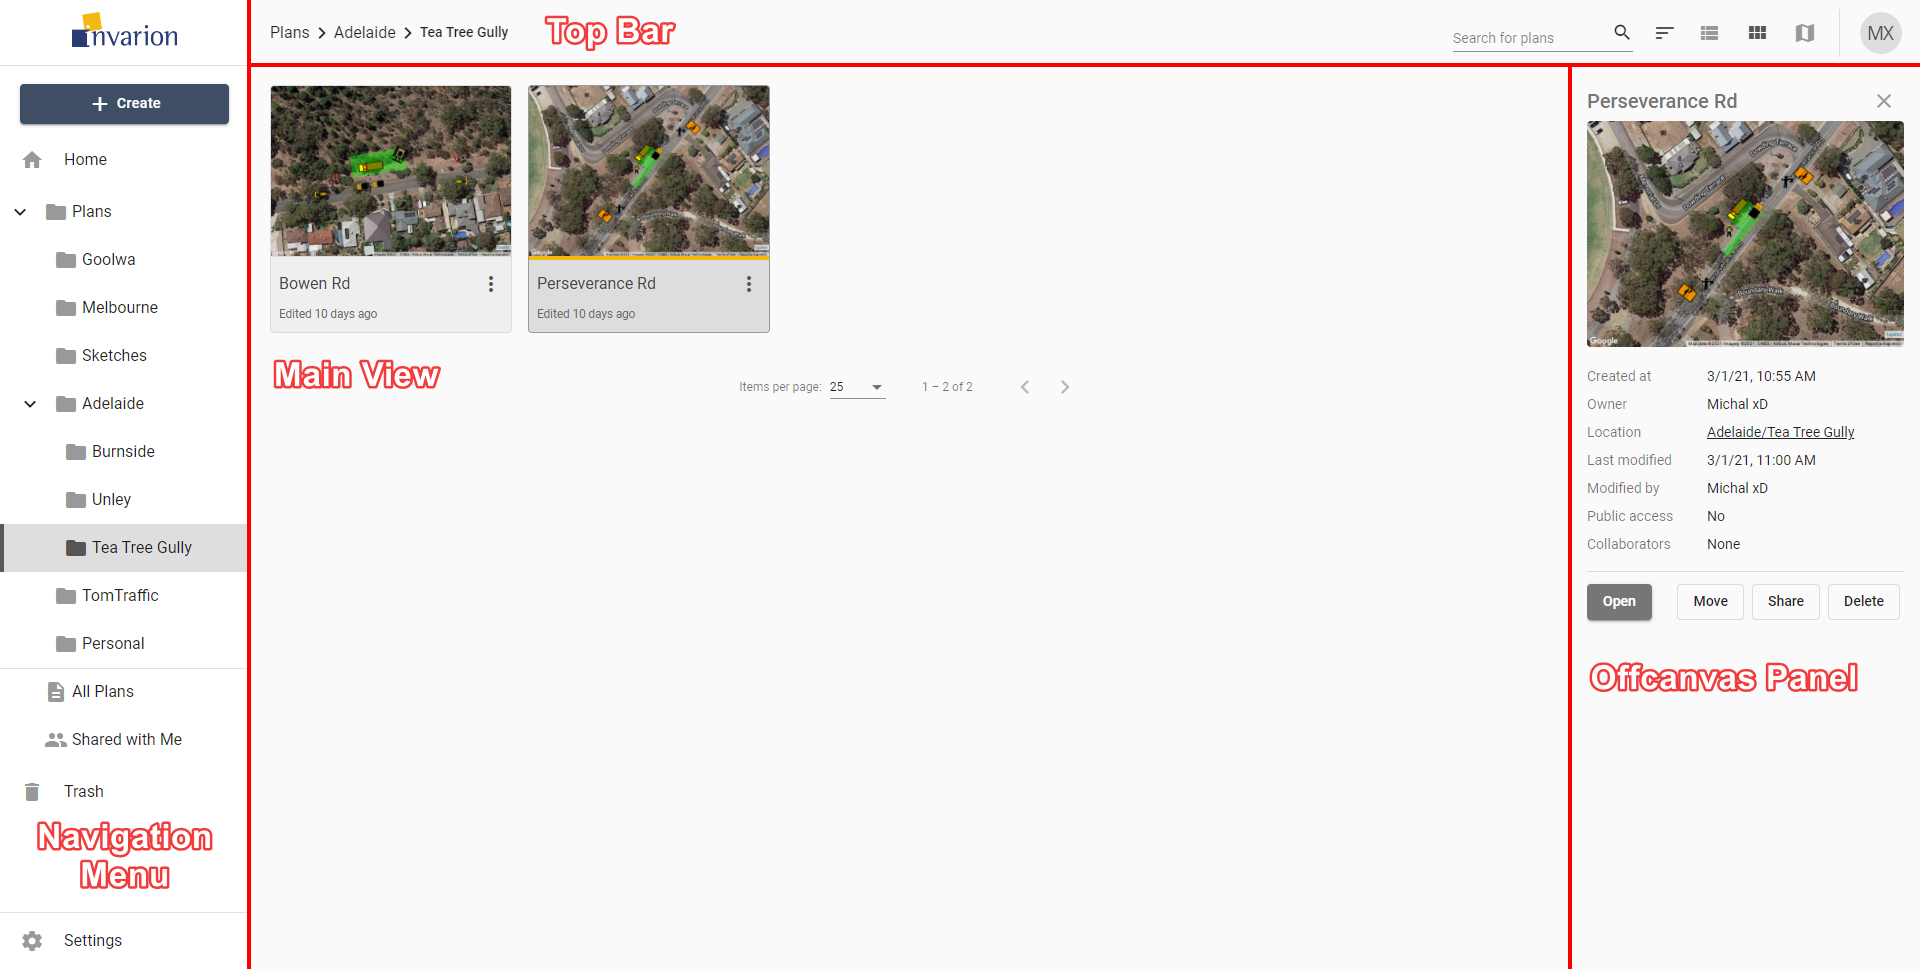
Invarion Cloud is a dynamic web-application that consists of for main elements:
| Element | Description |
|---|---|
| Navigation Menu | Navigation menu located on the left side of the screen is used to navigate through different sections of the Invarion Cloud such as "Plans", "Trash" or "Shared with Me". Navigation menu also holds "+ Create" button for creating new plans, folders or uploading existing plan from your computer. |
| Top Bar | At the top of the page, on the left side you can find an interactive path to your current location. Right part of the top bar is populated by a search input for searching folders and plans, toggle buttons for switching the type of view and your initials button that holds a link to account settings, support page and logout option. |
| Main View | Main view of the page showing selected folder or section. |
| Offcanvas Panel | Panel on the right side of the screen used for displaying details of selected plan or folder. |
Note: Even though Invarion Cloud is a single page application, it stores your current folder location in your web browser search bar. Thanks to that, you can successfully create browser bookmarks for your favourite or commonly used sections.
3.2 Sections
Invarion Cloud consists of different sections. You can switch between sections using the navigation menu on the left side of the screen.
3.2.1 Home
When you first open the Invarion Cloud, the Home section is where you land. Here you can see your recently created/modified plans but also plans that have been shared to you recently. Home is divided into three parts:
- Quick Access - most recently created, modified or shared to you plans.
- This Week - plans that were active this week.
- This Month - plans that were active this month.

3.2.2 Plans
Plans is the main directory, containing all of your folders and files. Click on the arrow next to the plans to expand the folder tree and see your whole folder structure.
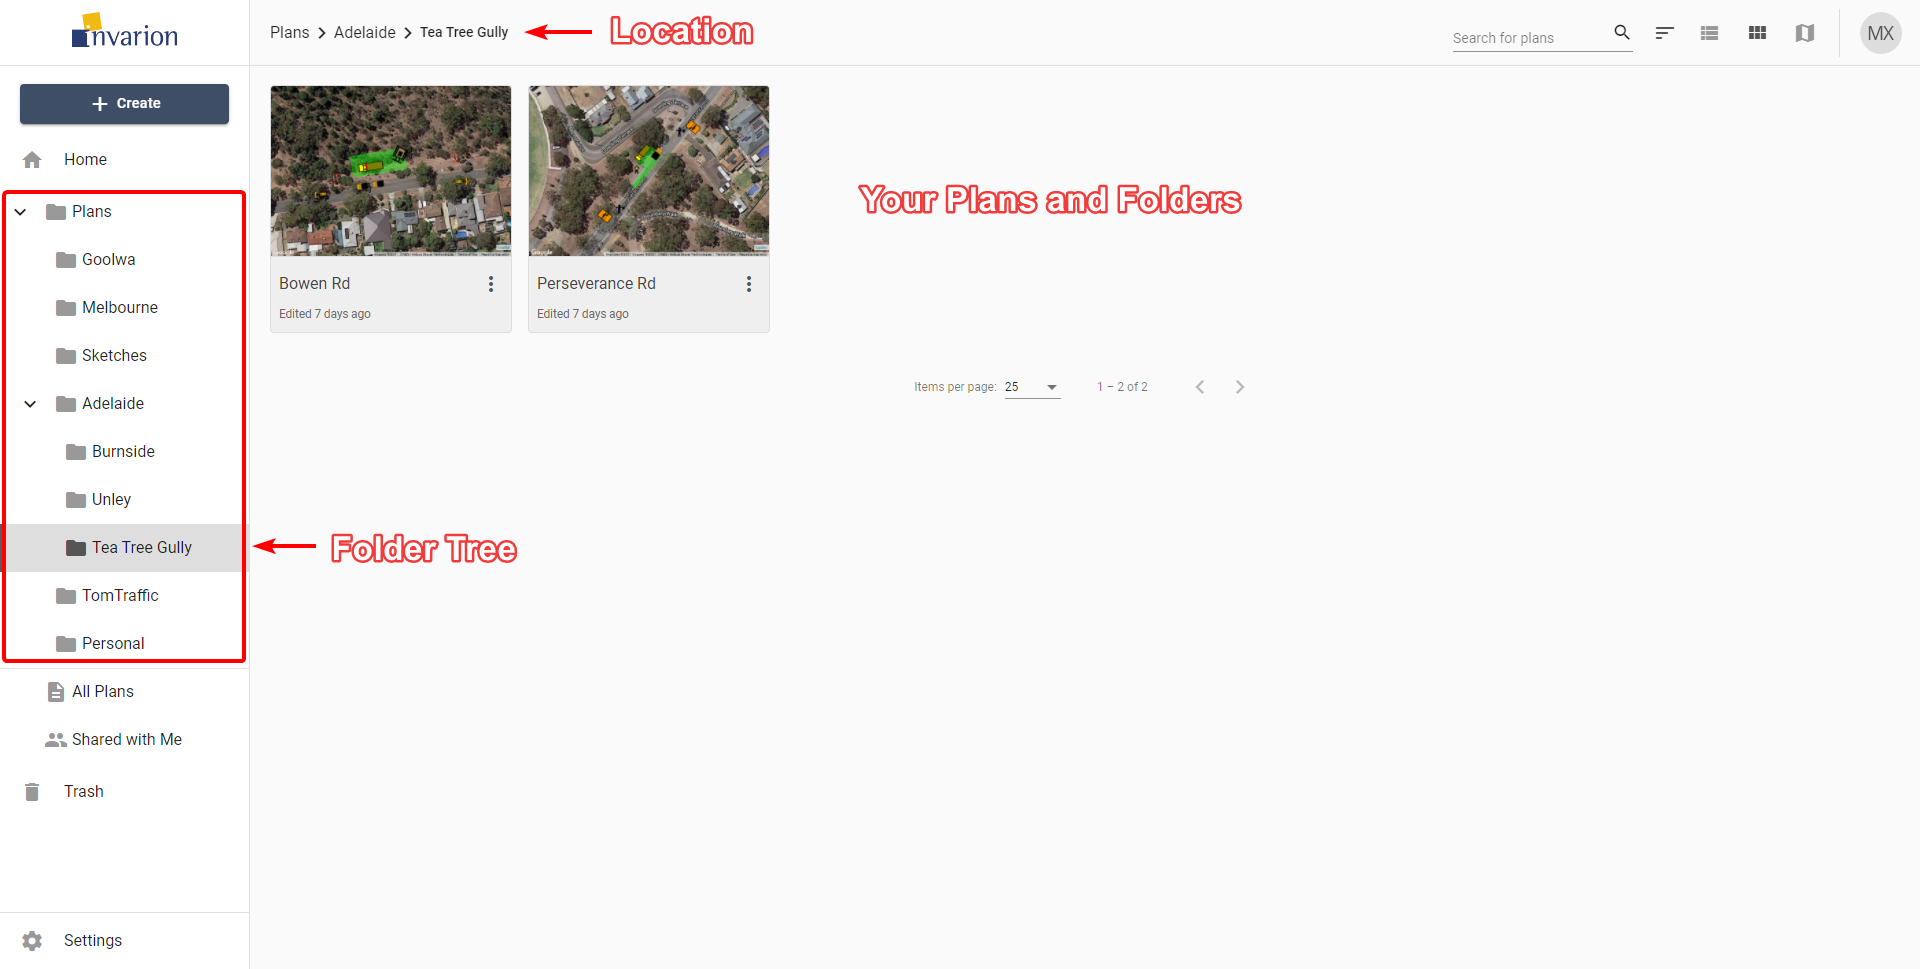
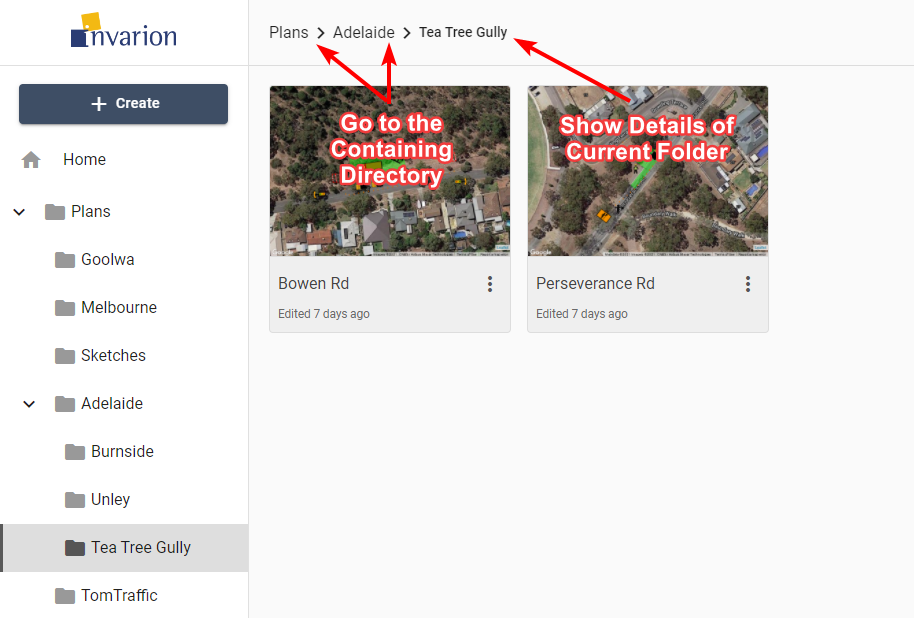
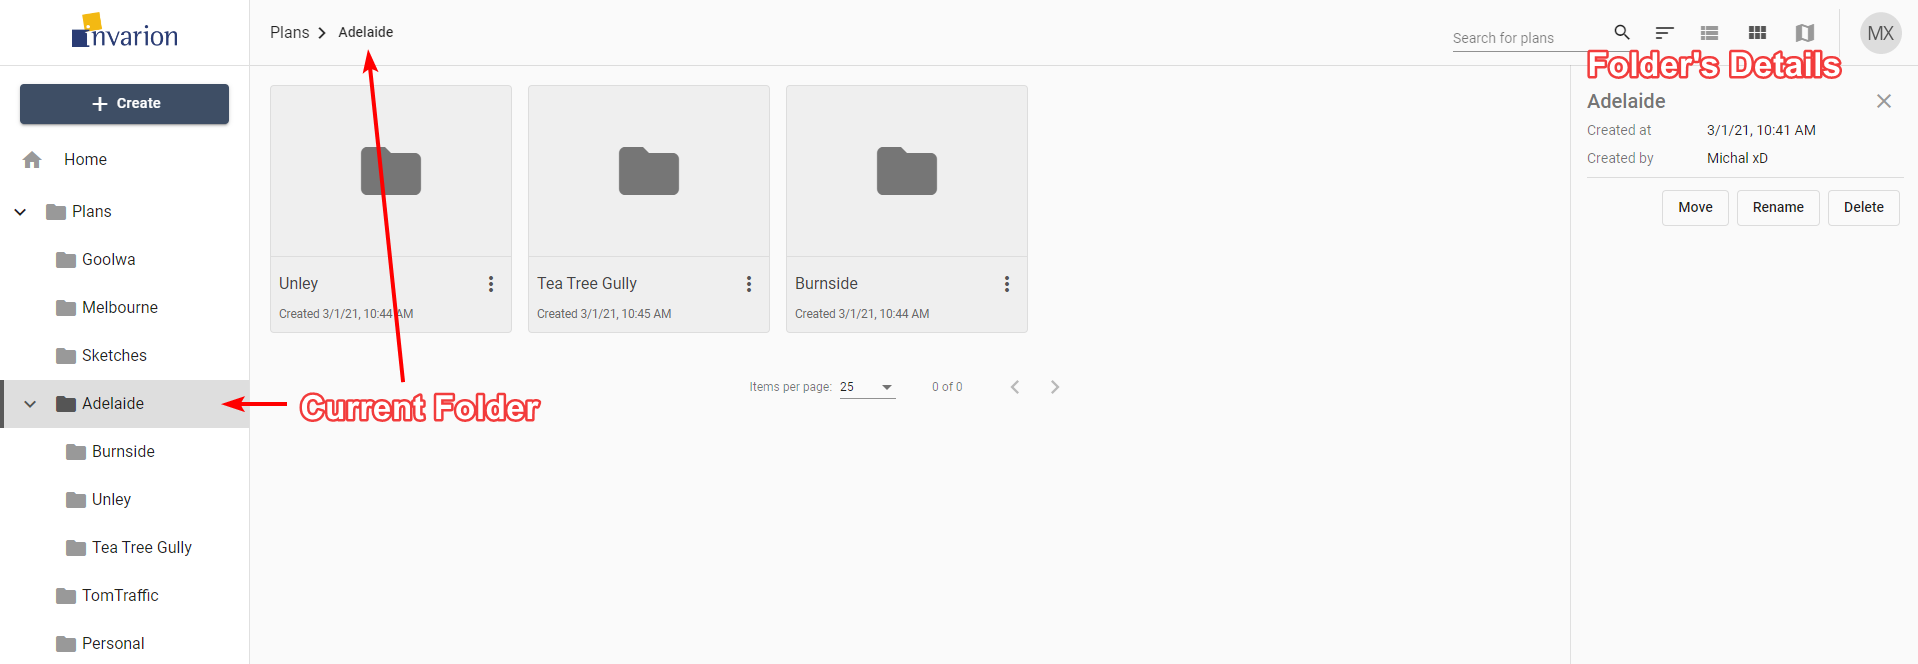
Clicking on the folder will take you straight to that location. Your current location is also displayed on the top bar in the form of a path. Each element of the path is clickable:
- Click on the folder's name that is before the current directory to go back.
- Click on the folder's name that is your current directory to display folder's details in the hideable panel on the right side.
3.2.3 All Plans
All Plans is an special section that shows all plans that you have access to. That includes plans shared with you by other users. This section doesn't show folders. Plans are displayed regardless of their containing folder.
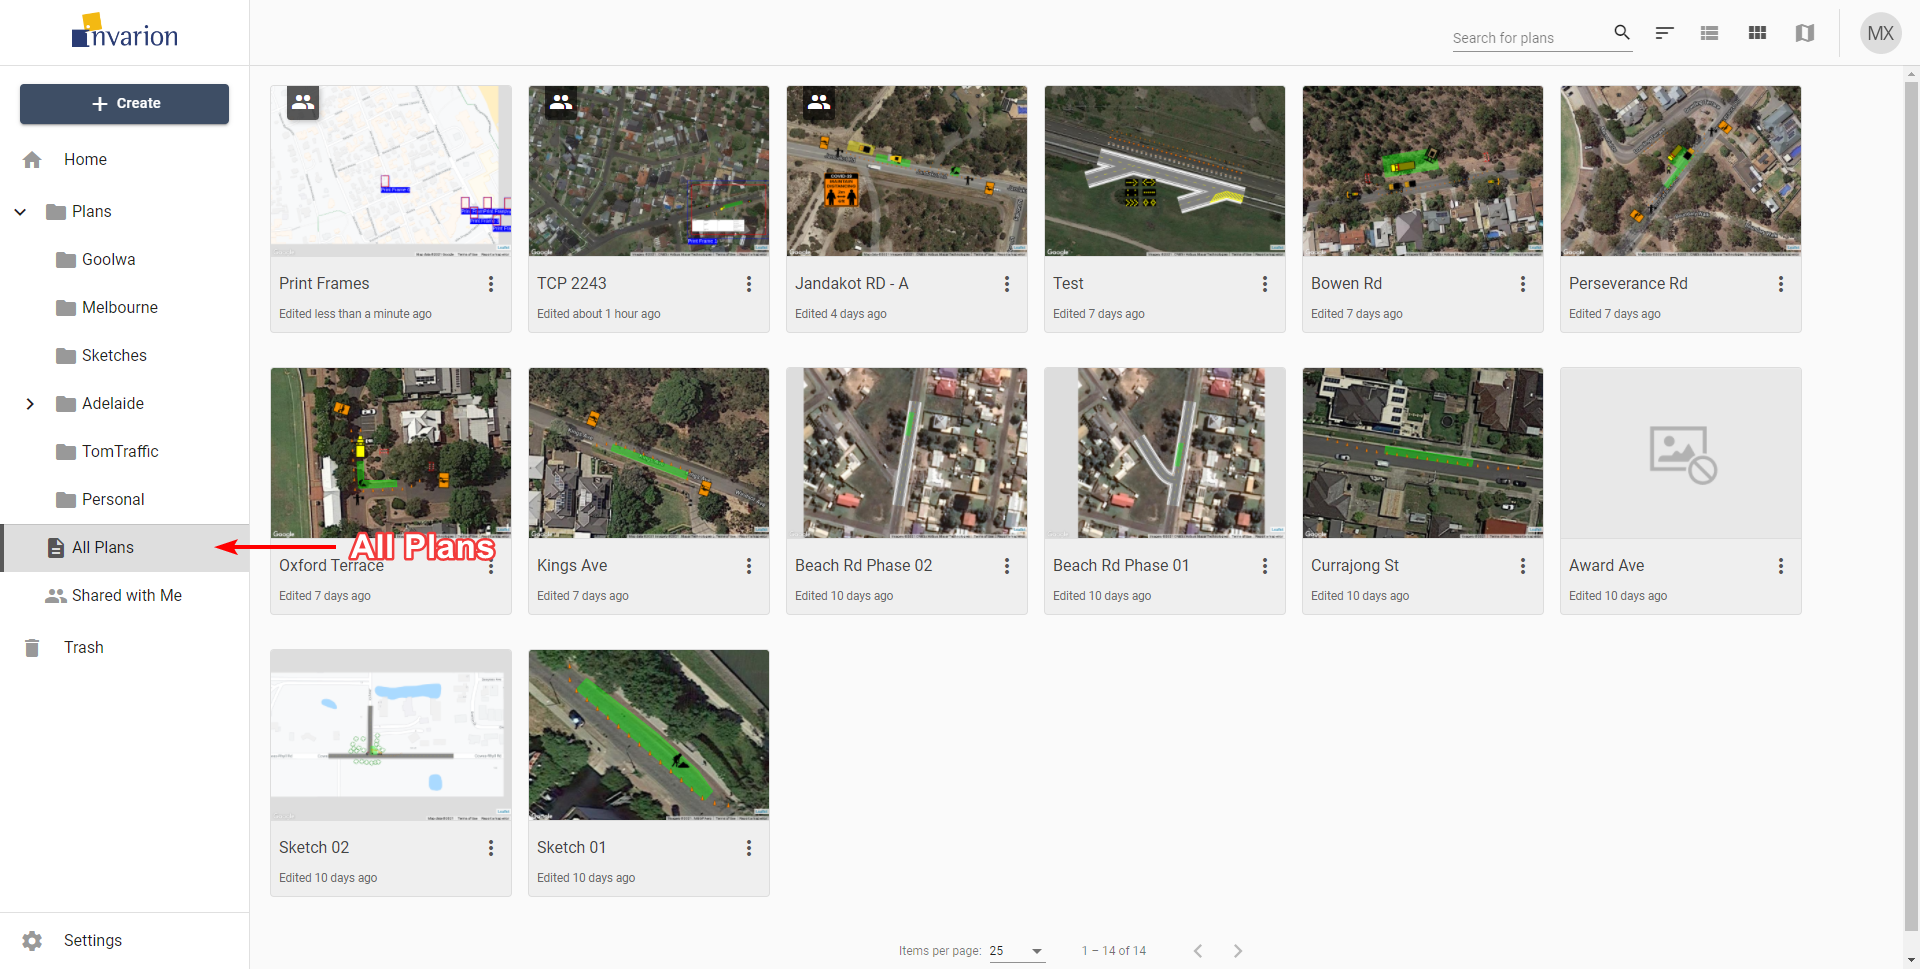
Tips:
- You can see plan location in plan's details. To do this simply click on the plan, the panel with extra information will show up on the right side of the screen.
- All Plans section was designed to let users quickly find the plan they are interested in.
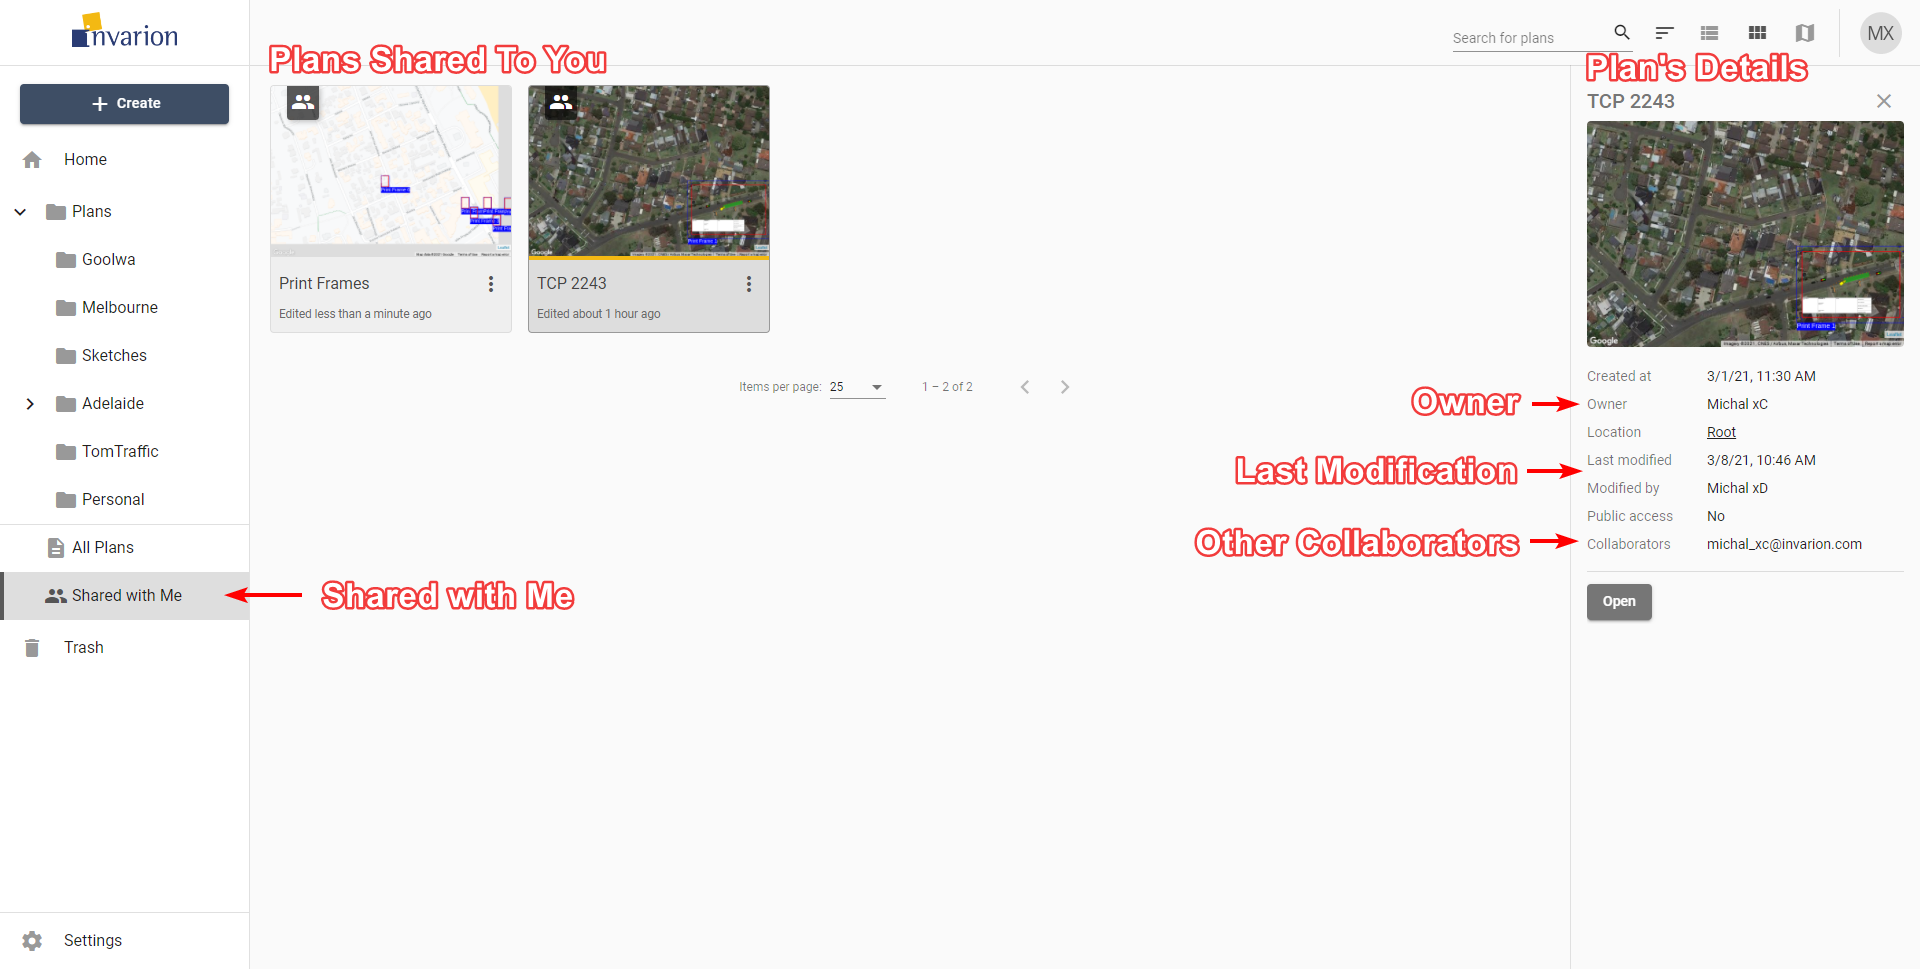
3.2.4 Shared with Me
In this section you can see all the plans that were shared with you by other RapidPlan Online users.
3.2.5 Trash
Inside the Trash section you can find all your deleted plans and folders. Plans and folders in the trash will be automatically deleted after 30 days.
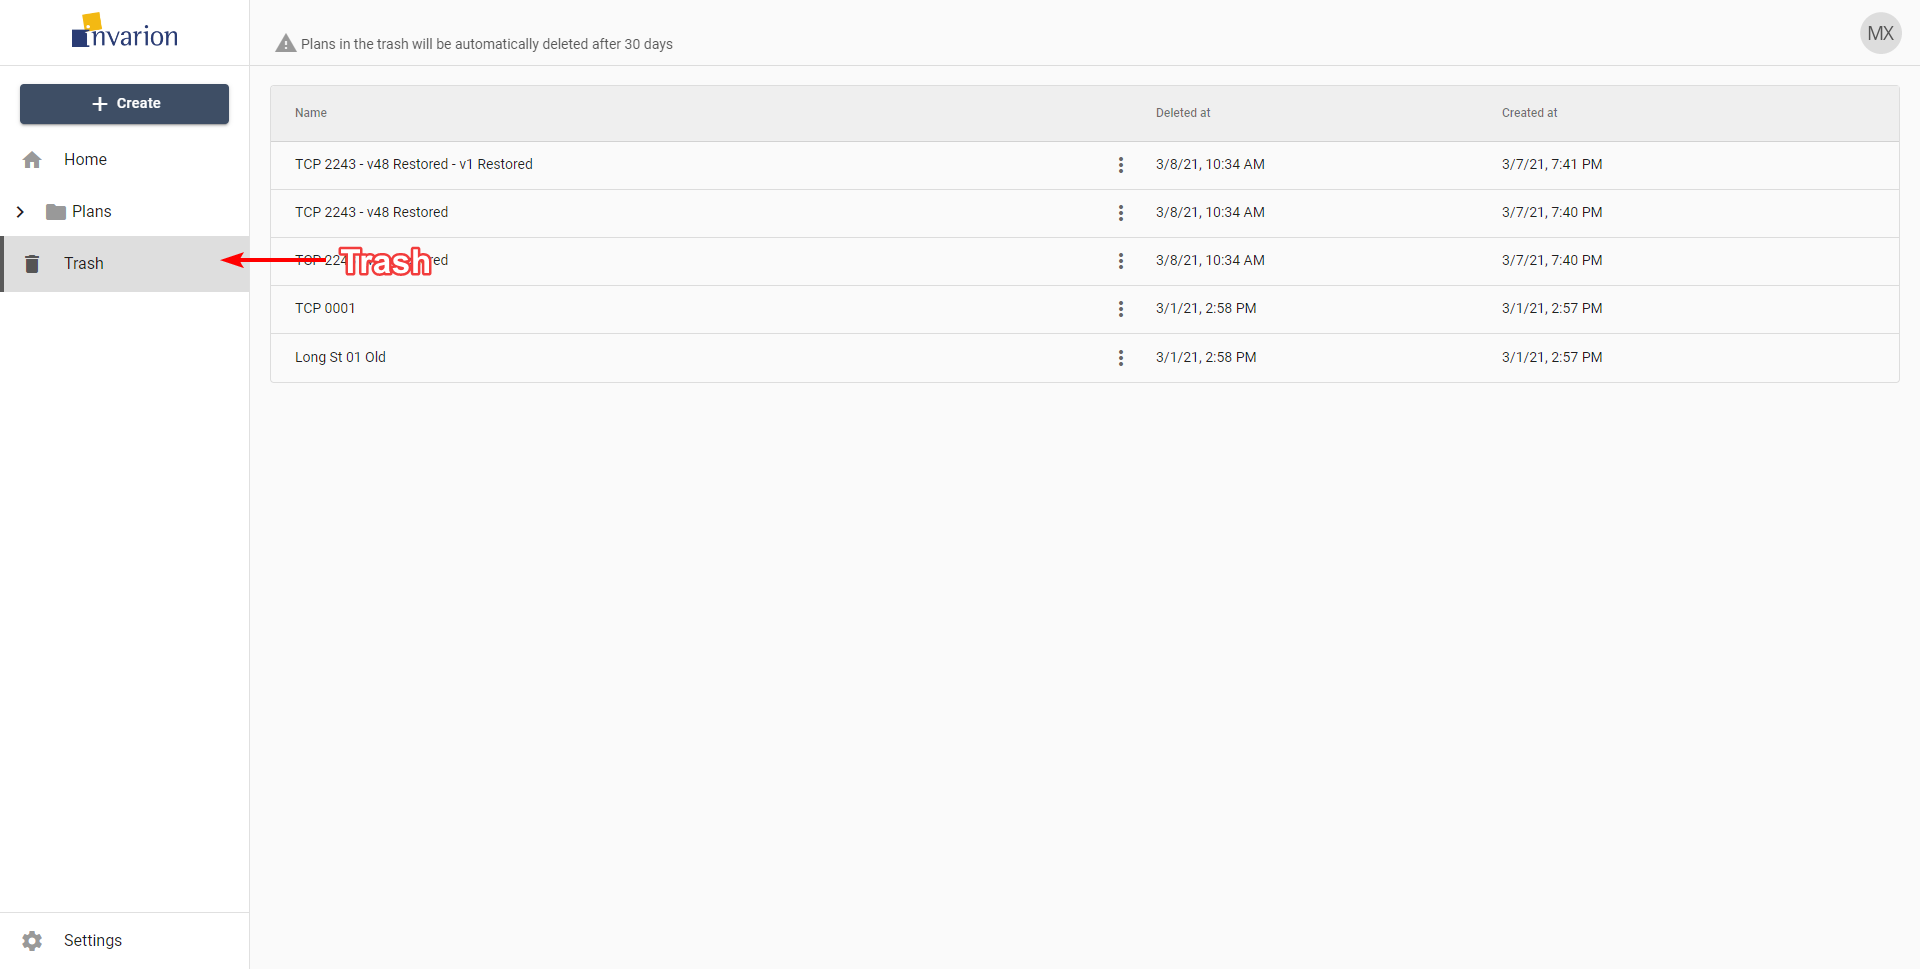
You can restore the plan or a folder by choosing "Restore" option in the plan's or folder's context menu. If you want to clean up your trash manually, choose the "Delete forever" option from the same menu.
3.3 Plans
3.3.1 Creating New Plan
To create a new plan simply click on the "Create" button in the navigation menu and choose "New plan" from the menu. The plan will be created in the folder you are currently in, and you will be taken automatically to RapidPlan Online.

3.3.2 Opening Plans
To open the plan click on it. This will open the panel with plan's details. Look for it on the right side of the screen. Inside the panel click on the "Open" button to open the plan in RapidPlan Online.
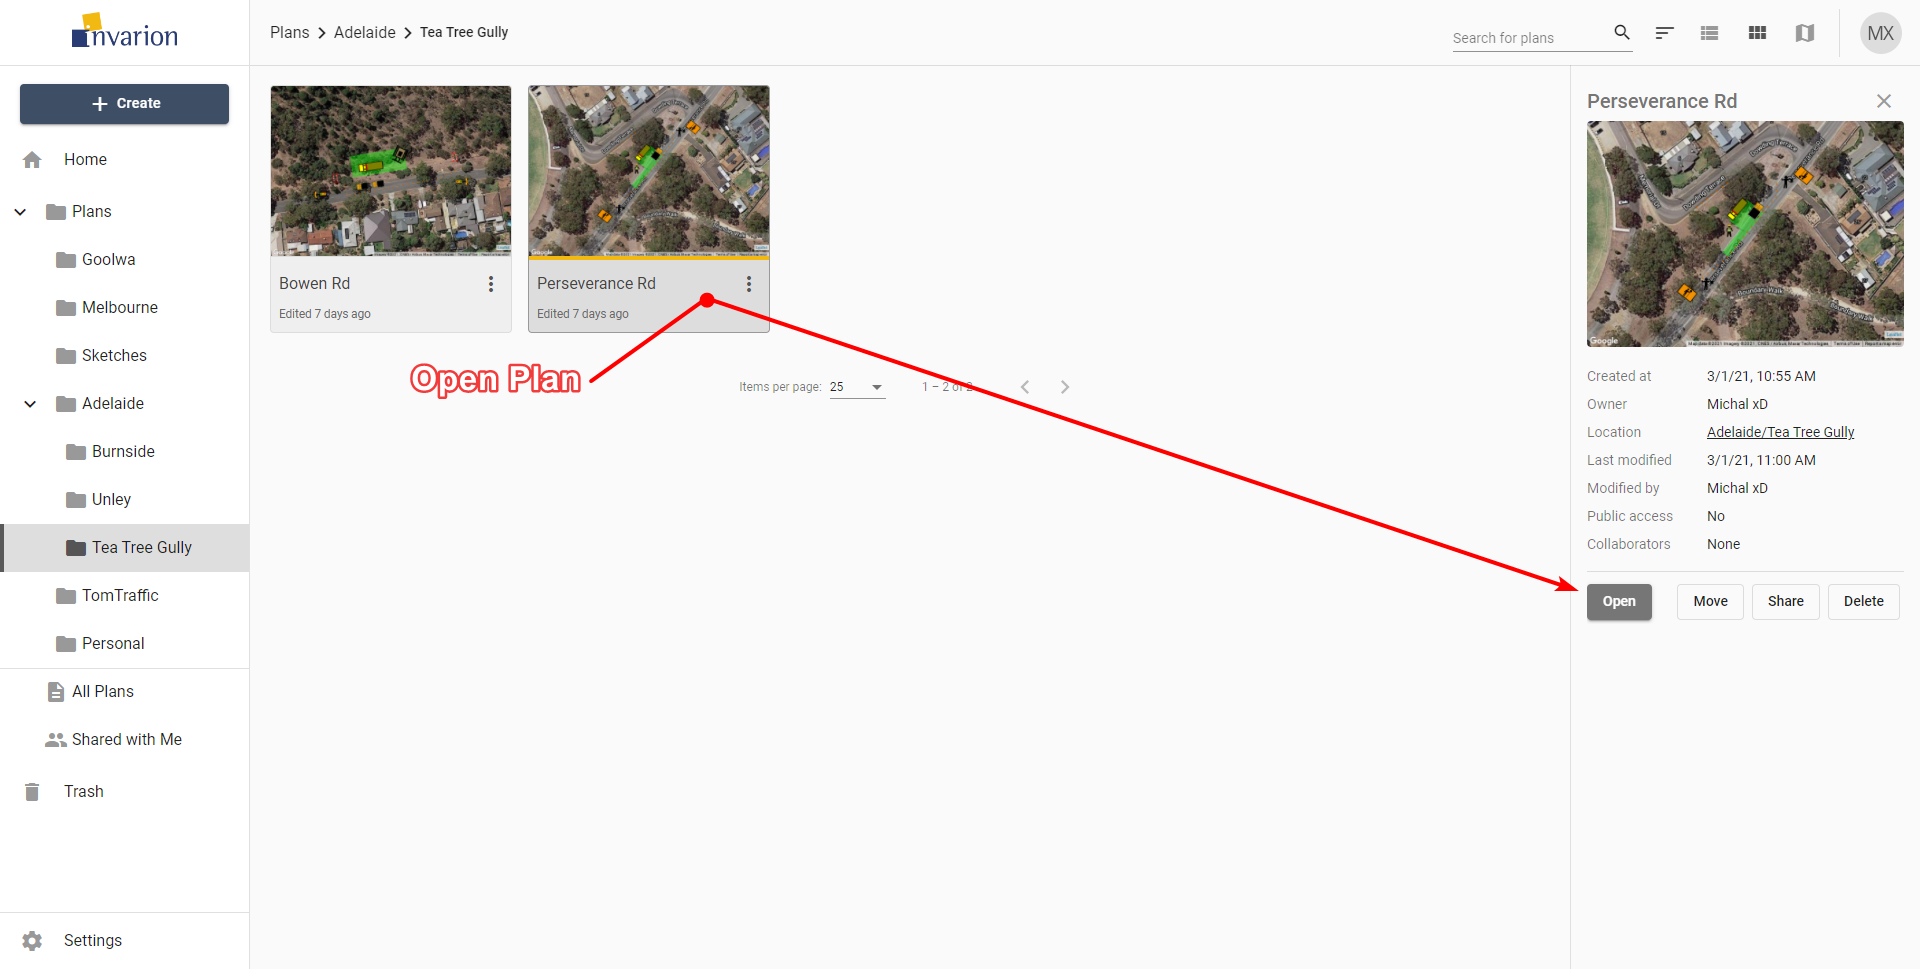
Tip: To open the plan in a separate tab or window, right click on "Open" and choose the desired option from the context menu.
Note: Depending on the current view (3.6 Different Views) plans can be represented by a rows in a table, tiles or pins on the map.
3.3.3 Uploading Existing Plan
You can upload the plan from your computer to your online storage. This may come useful when someone shares the RapidPlanOnline ".tcp" plan with you by other means than through the Invarion Cloud, for example as an attachment to an email.
To upload existing ".tcp" file to your storage click on the "Create" button in the navigation menu and choose "Upload existing" from the menu. The plan will be uploaded to the folder you are currently in.
3.3.4 Plans Actions
You can see available actions for the plan by clicking on the "three dots" button near its name. This will open plan's context menu with all options listed.
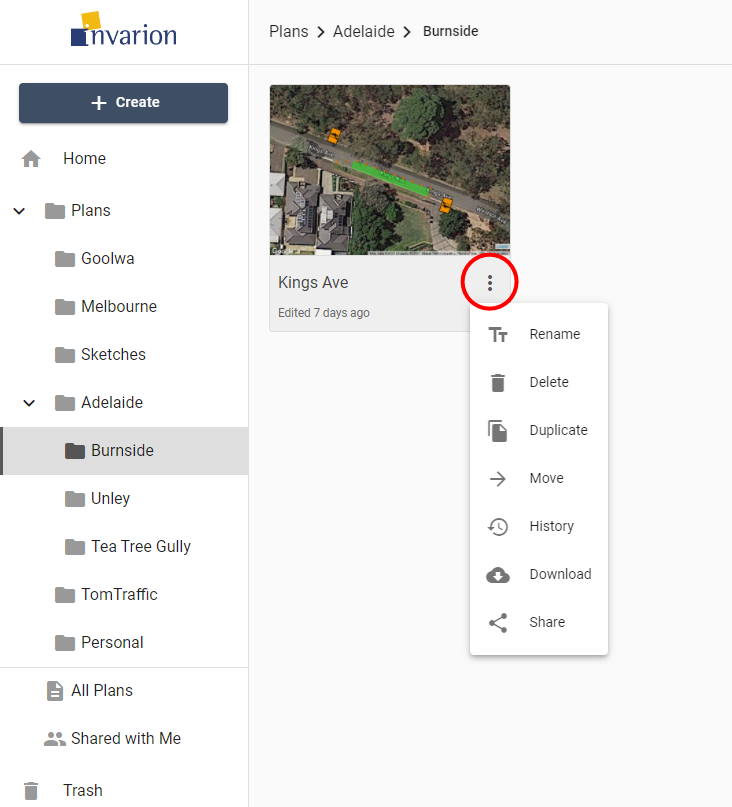
Different actions you can do on plans:
| Action | Description |
|---|---|
| Rename | Rename plan. |
| Delete | Move plan to trash. |
| Duplicate | Create a copy of the plan. Duplicate will appear in the same location as the original plan. |
| Move | Move plan to a different location. |
| History | Restore the previous version of the plan. Read more in chapter 3.9 Plan's History |
| Download | Download plan to your device. |
| Share | Opens window with sharing options for the plan. Read more in chapter 3.8 Sharing Plans |
3.4 Folders
Folders help you keep your files organized and separate inside your Invarion storage. They work the same way as they work on your computer.
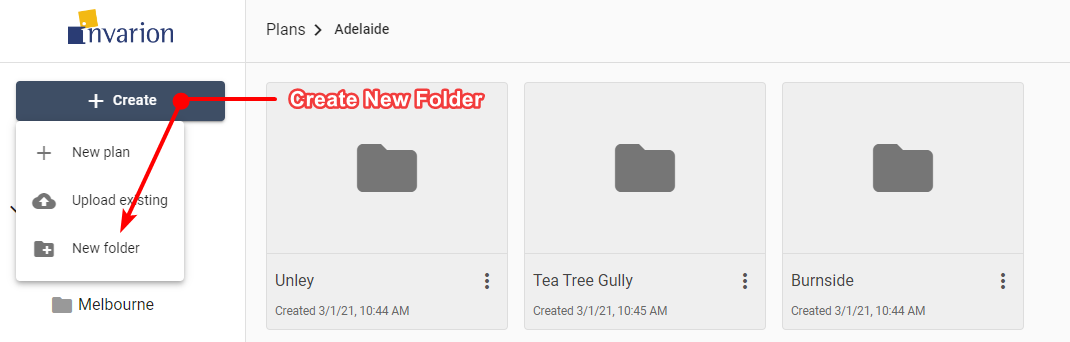
3.4.1 Creating New Folder
To create a folder click on "+ Create" a button and choose the "New folder" option. A window will appear with input for the new folder's name. Enter the desired name for the folder and click "Ok". New folder will appear in your current location, and you will be taken straight into it.
Notes:
- You can change folder's name at any time using rename option in the folder's context menu on folder's details.
- You can't create a folder inside Home, All Plans or Shared with Me section.
3.4.2 Folders Actions
You can see available actions for the folder by clicking on the "three dots" button near its name. This will open folder's context menu with all options listed.
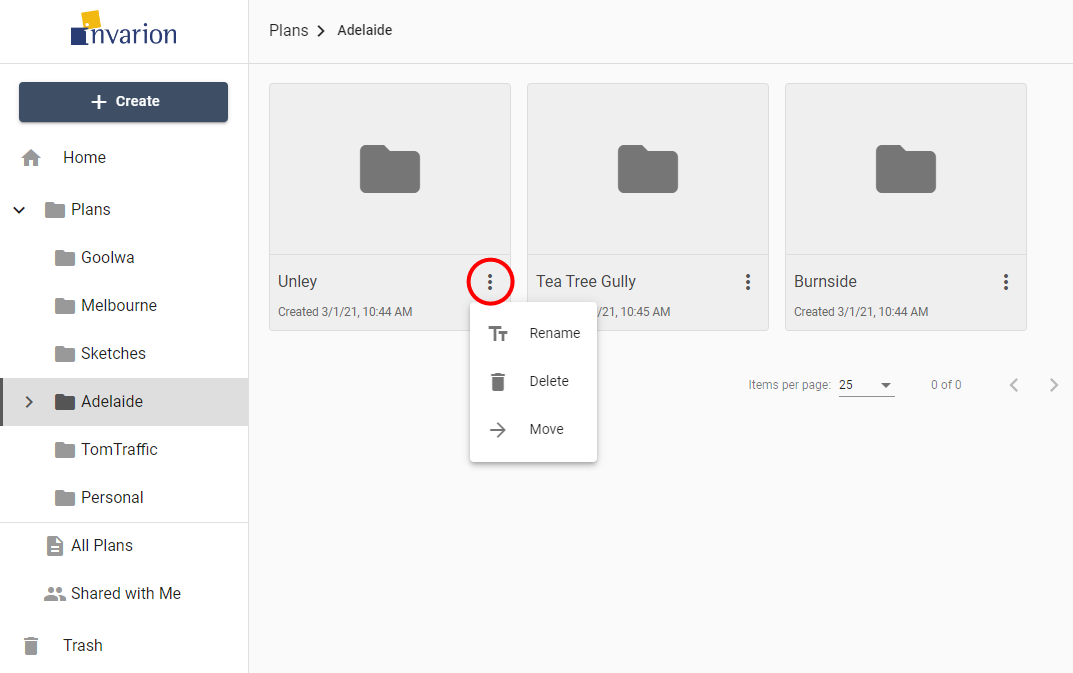
Different actions you can do on folders:
| Action | Description |
|---|---|
| Rename | Change name of the folder. |
| Delete | Move folder and its contents to trash. |
| Move | Move folder and its contents to a different location. |
3.5 Details Panel
Plan's or folder's details can be shown in the hideable panel on the right side of the screen. To see them click on a plan that interests you or open the folder. If you already are inside the folder which the details you want to see, click on the folder's name in the top bar.
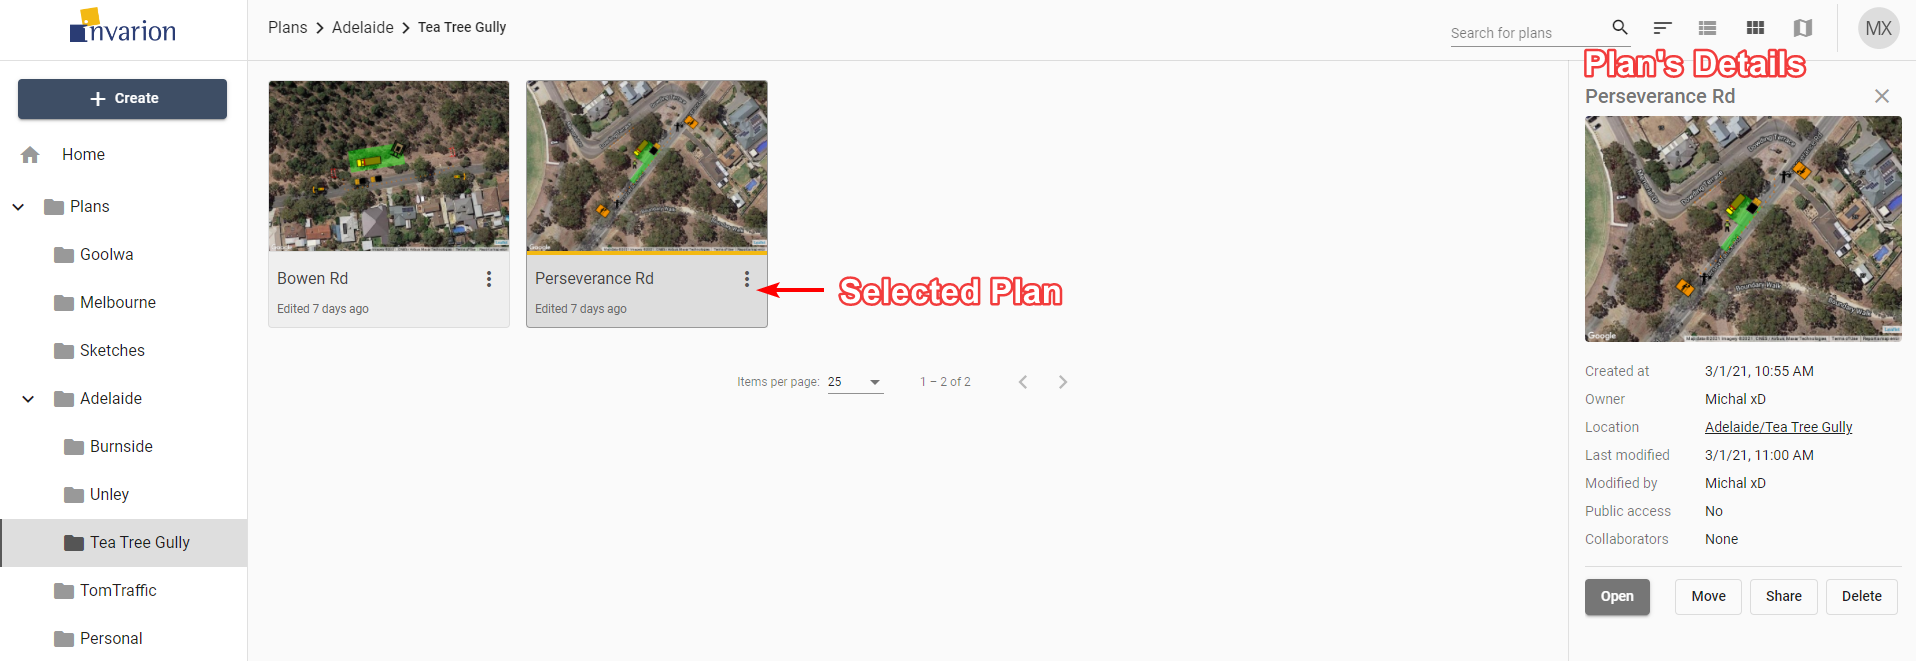
| Plan's Details | |
|---|---|
| Created at | Creation time and date |
| Owner | Plan's owner |
| Location | Location of the plan in the Invarion Cloud. Clicking on it will take you to the containing folder. |
| Last modified | Time and date of the last modification made to the plan. |
| Modified by | User responsible for the last modification. This is especially useful when collaborating with others. |
| Public access | Shows whether the plan has enabled sharing via public link. |
| Collaborators | List of the other collaborators invited to the plan. |
| Folder's Details | |
|---|---|
| Created at | Creation time and date |
| Created by | Folder's owner |
Additionally, the details panel includes buttons for basic option such as "Open", "Move", "Share", "Delete" for plans, and "Move", "Rename", "Delete" for folders.
Tip: Click on plan's or folder's name to rename this plan or folder.
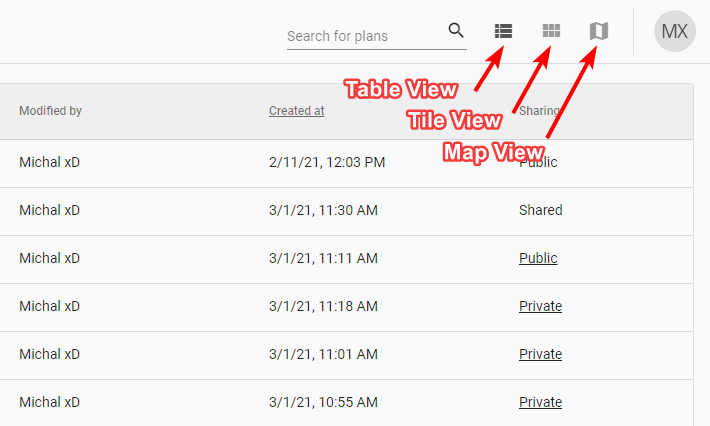
3.6 Different Views
Invarion Cloud lets you view your plans in three different ways:
| View | Description |
|---|---|
| Table View | The Table view presents all of your plans in a table. The table shows the document name, the date it was created, last modified and the editor's name. You can also see if a plan is public, private and or has been shared with a collaborator. You can sort your plans by clicking on column's heading to order by plan's name, creation date or last modified date. |
| Tile View | The tile view presents your plans as a series of thumbnail images. The tiles show a preview of the plan, for easy identification. Shared plans have special overlay icon that indicates that a plan has been shared. To sort in tile view click on "sort" button on the top bar and choose a desired sorting option. |
| Map | The map view displays your plans on a map. This can be useful when searching for a plan at a specific location, or for visualizing clusters of projects within a particular region. Plans displayed on the map will show depending on the folder you are currently in. To see all of your plans on the map, open map view while in the "All Plans" section. |
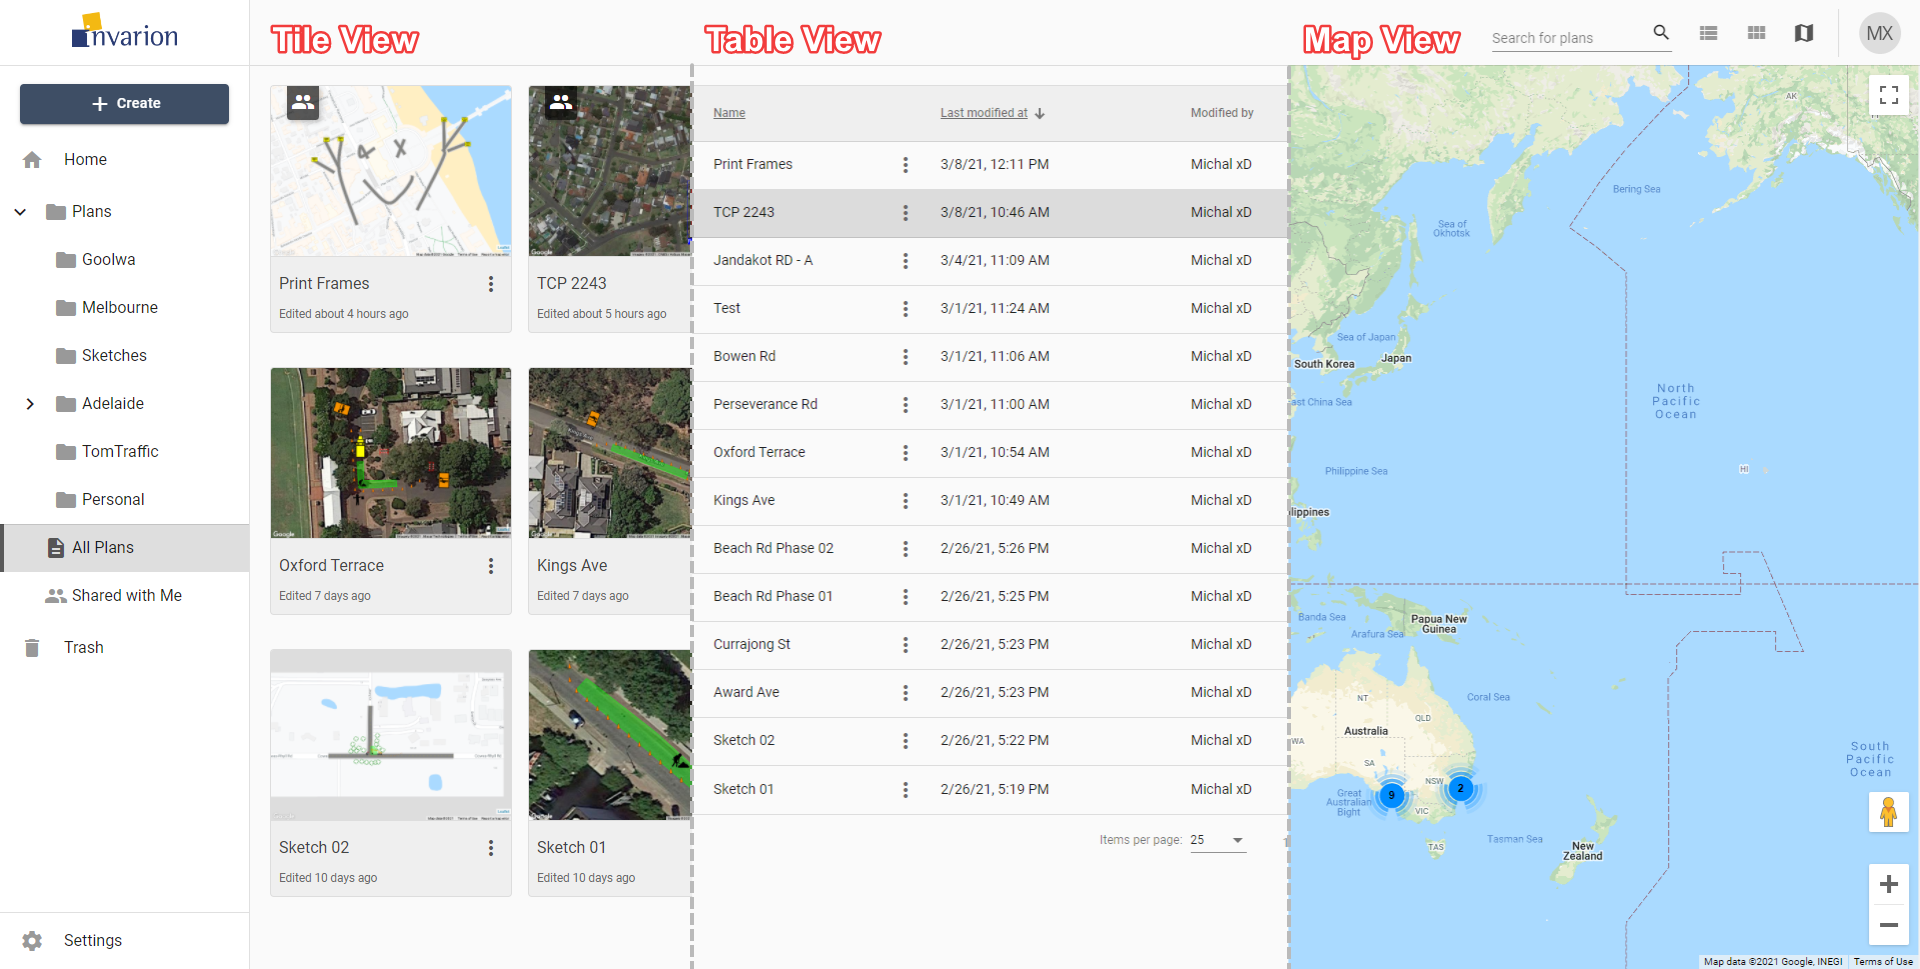
To change the view use the appropriate buttons on the top bar.
You can change the view at any moment. It won't reset your current location or search results. The view you last selected will be saved in your browser as your default view. So next time you enter Invarion Cloud your preferred view will be shown.
3.7 Searching
In the top right corner of the page you will find search input for searching your plans or folders. Searching will search in the current location (folder). If you want to search in all of your plans, switch to the "Home" or "All Plans" section.
3.8 Sharing Plans
Invarion Cloud features two options for sharing your plans with others.
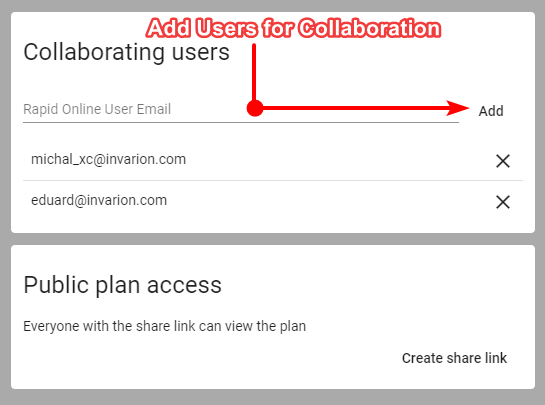
3.8.1 Sharing with Other RapidPlan Online Subscribers
Sharing plan with other RapidPlan Online subscribers will allow for a collaboration in creating the plan. To add collaborators to your plan click on the "Share" option in the plan's context menu or on the plan's details panel. New dialog box will appear. In the top section of the dialog enter RapidPlan Online user's email and click "Add".
Invited user will be notified about this fact in email, and the shared plan will appear in his or her "Shared with Me" section. In your storage this plan will be marked as "shared" and collaborators will be listed in the plan's details. You can add multiple collaborators to a single plan. To remove the collaborator click the "X" button near the email of the user you want to delete.
List of things collaborators can do:
- edit your plan,
- rename your plan,
- duplicate your plan,
- restore the previous version of the plan.
List of things collaborators can't do:
- further share your plan with other people or users,
- move your plan to a different location,
- delete your plan.
You can track the activity on your shared plan using the plan's details where the last modification date and person responsible for the change are listed. Collaborators are also listed in the plan's history where you can restore any previous version of the plan (3.9 Plan's History).
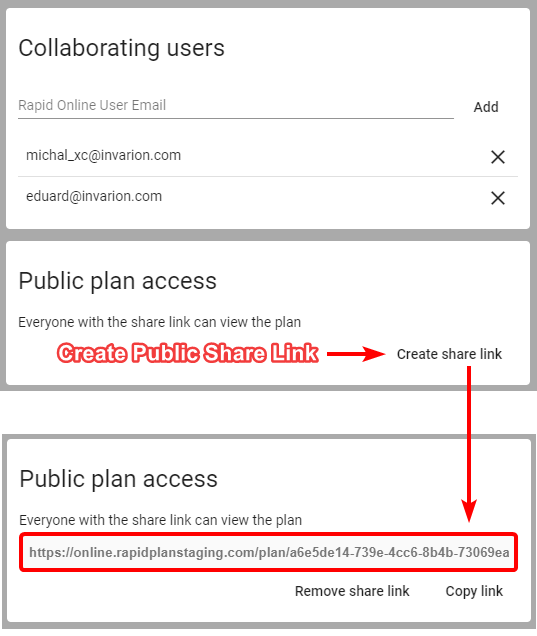
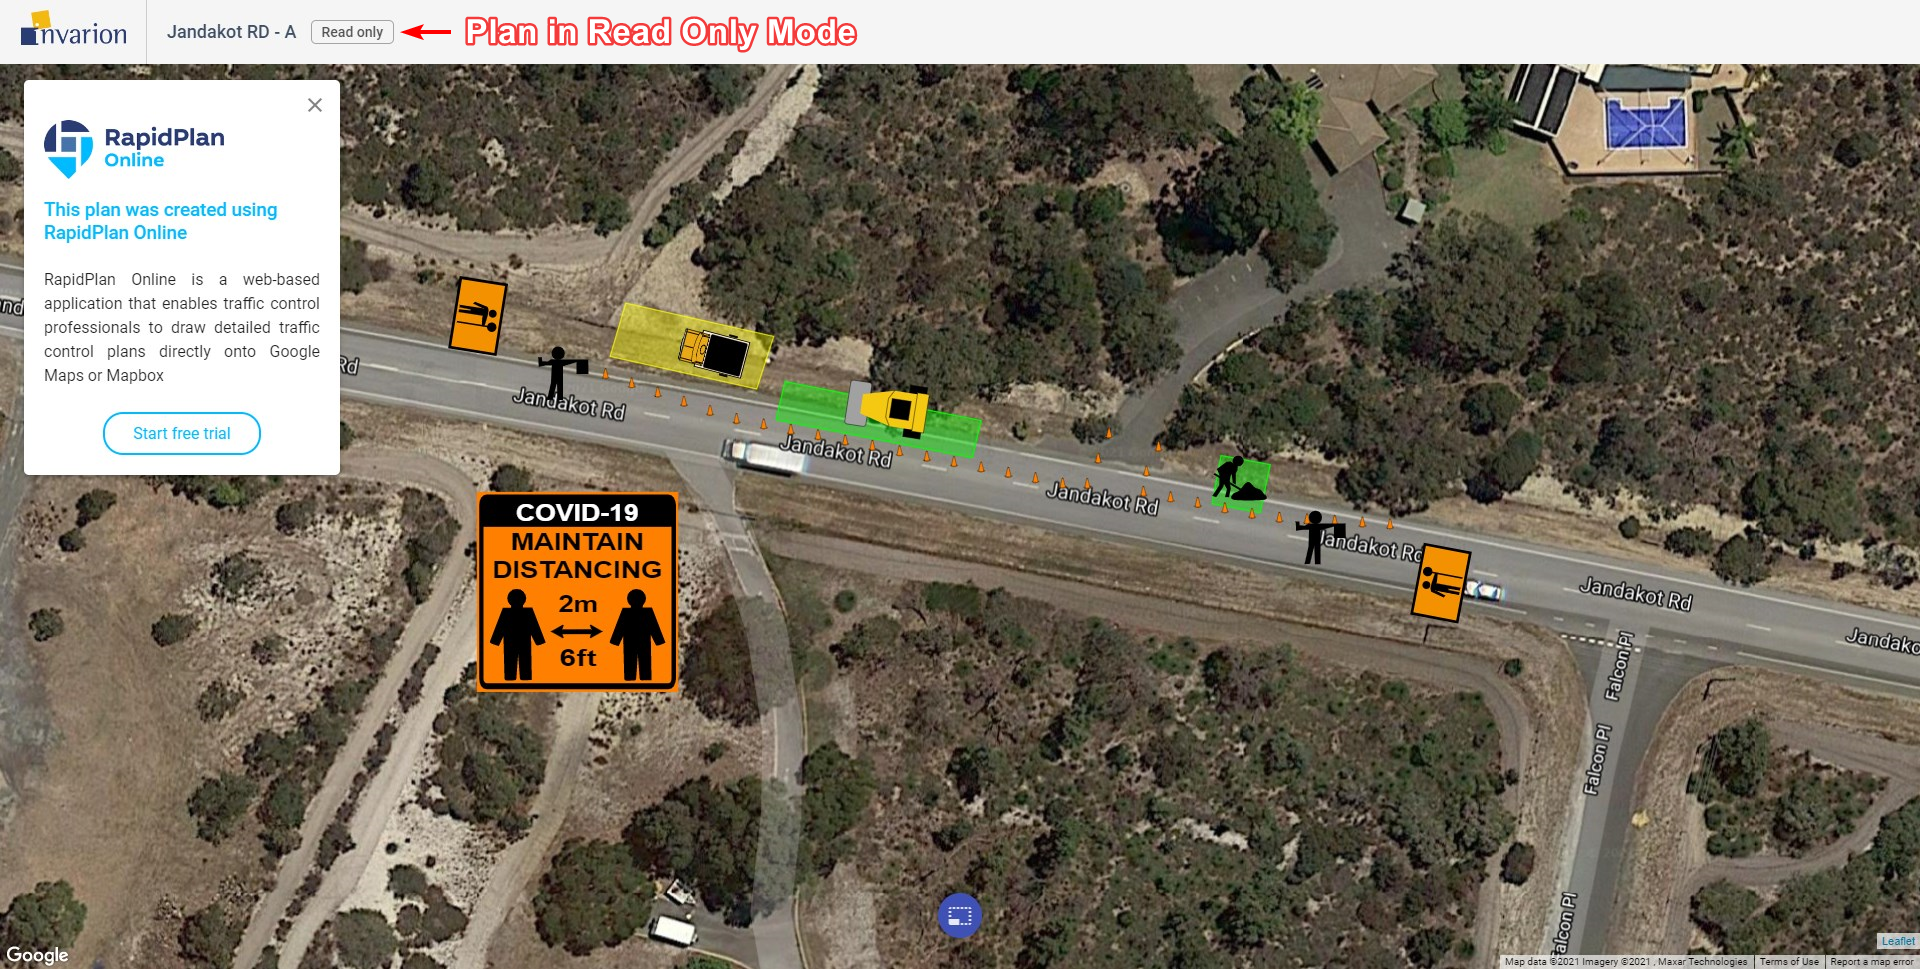
3.8.2 Sharing via Public Link with Anyone
You can share your plan with anyone (including people who don't have RapidPlan Online subscription) via a unique link. A Person who has the link can view the document but cannot edit it. This applies to both RapidPlan Online subscribers and non users. If you want to share a plan with the editing privilege use the method mentioned in the previous point (3.8.1 Sharing with Other RapidPlan Online Subscribers).
To create a sharable link click on the "Share" option in the plan's context menu or on the plan's details panel. A new dialogue will appear. In the bottom section of the dialogue click the "Create share link" button. You can then copy the link and share it with anyone you want. From now on this plan will be marked as "public". You can stop sharing at any time using "Remove share link" option in the same dialogue.
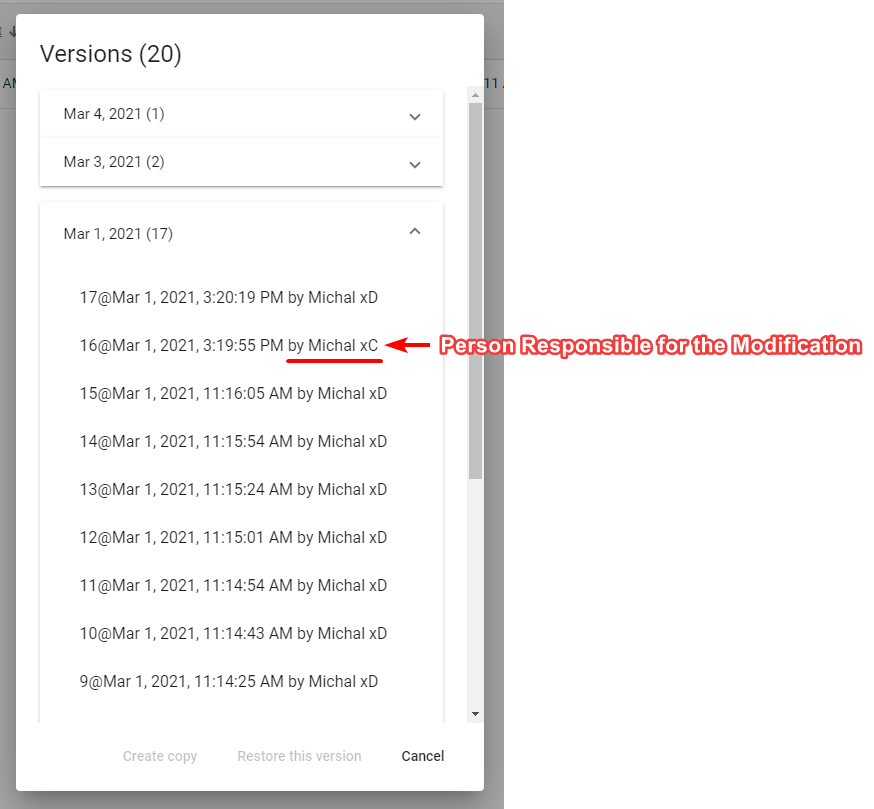
3.9 Plan's History
Invarion Cloud keeps track of every modification made to the plan. Anytime the plan autosaves a new recovery point is made. Thanks to this you can easily go back to any previous version of the plan undoing some unwanted changes made by yourself or other collaborators. It is like turning back the clock.

To use recovery options select "History" from the plan's context menu. A new dialogue will appear listing all the possible recovery points for this plan. Select the one you are interested in and choose one of two options, "Restore this version" or "Create copy". The former restores the original plan to the selected previous version. The latter creates a new plan from information saved in the selected recovery point. Recovery points listed in the "History" dialogue are divided by date. Additionally to that each one has unique number, timestamp and user responsible for the modification made to the plan.
Note: If you restore a previous version of the plan, you will still have access to the later versions of the document. So, no risk is involved.
Tip: Plan's history may also come in handy when something unexpected happens to your plan. You can then retrieve last correctly working version of the plan.
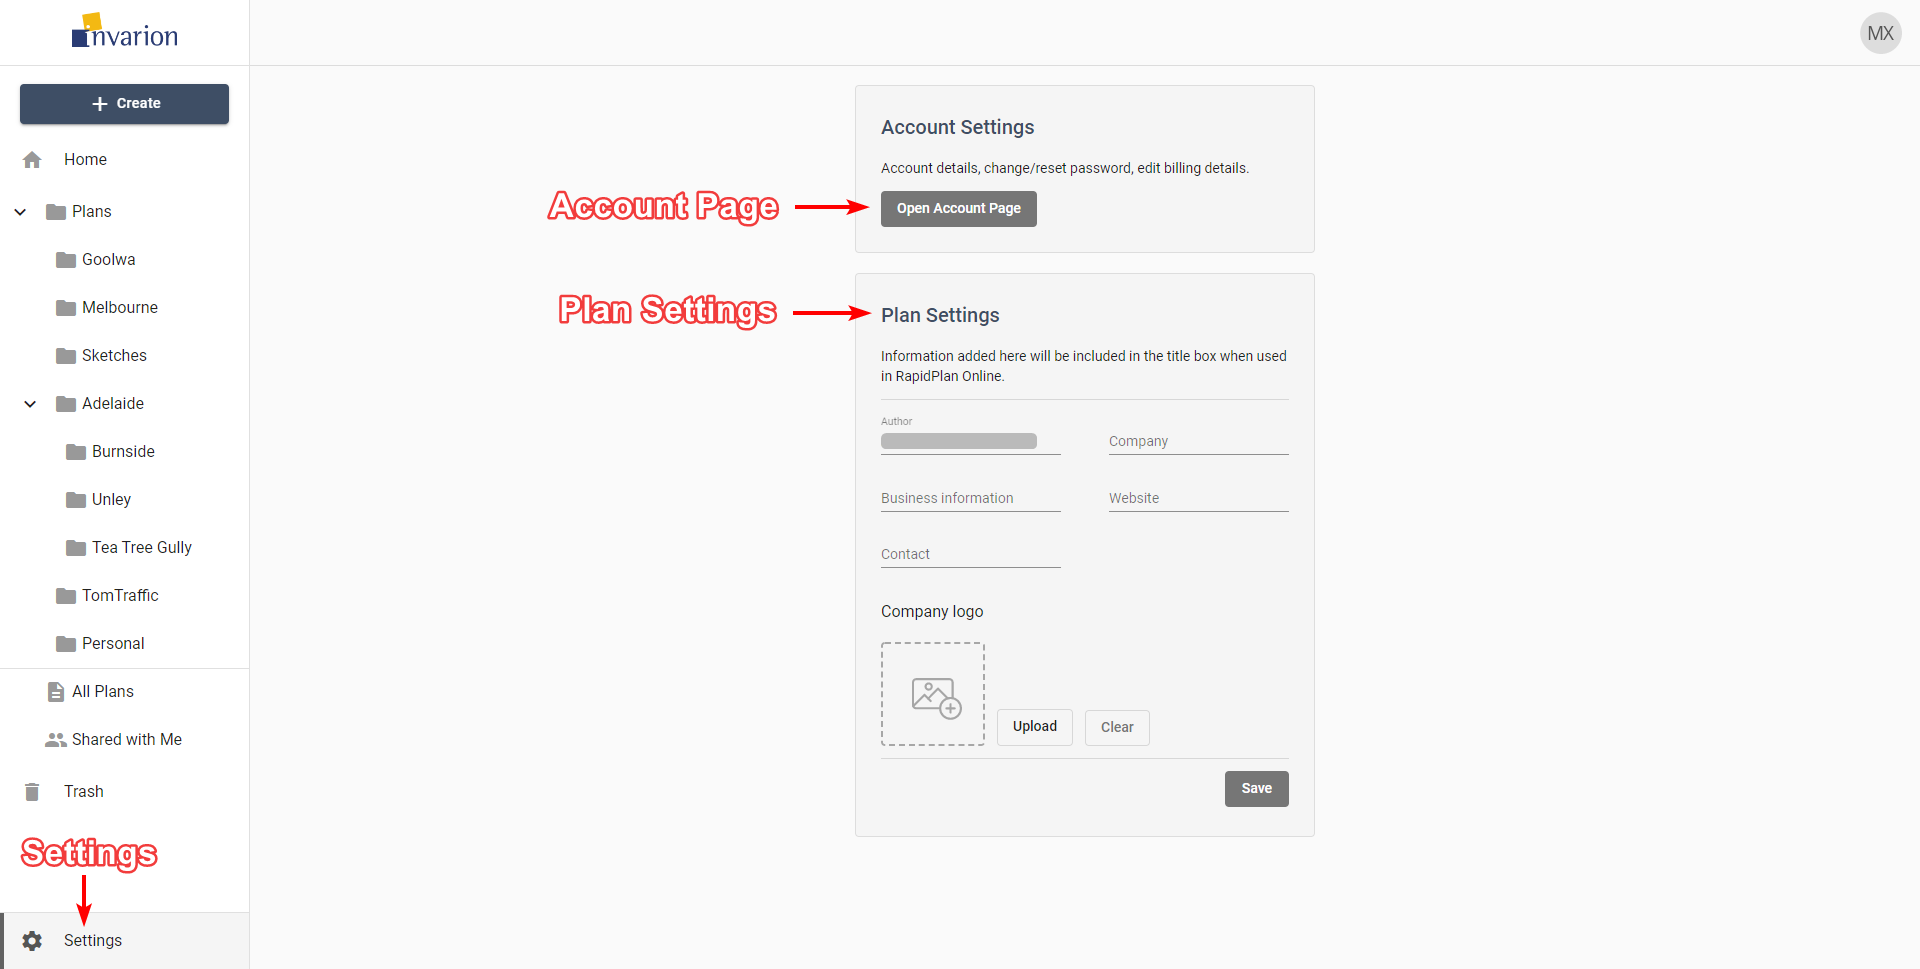
3.10 Settings
To enter settings use the "Settings" button at the bottom of the navigation menu. From here you can visit your account page to change your password or edit your billing details. You can also change your default plan settings such as author and company name, your website or upload a company logo. This information will be used to populate the title block when used in RapidPlan Online.
3.11 Logging Out and Contact
To Log out of the Invarion Cloud click on the "your initials" button in the top-right corner of the screen and choose "Logout".
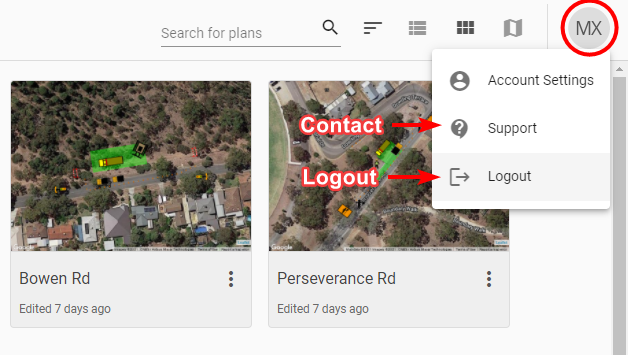
If you have any questions about Invarion Cloud, or you would like to see a particular feature added, please feel free to contact us. To open contact page click on the "your initials" button in the top-right corner of the screen and choose "Support".
Chapter 4: RapidPlan Online Workspace
Before starting to create plans, we recommend getting to know your way around the workspace. It has been designed to be intuitive, easy to follow and to allow you the maximum available working space to create your traffic plan.
There are four main components of the RapidPlan Online workspace:
These workspace components are highlighted in Resources/RapidPlan_Online_Workspace.png below.
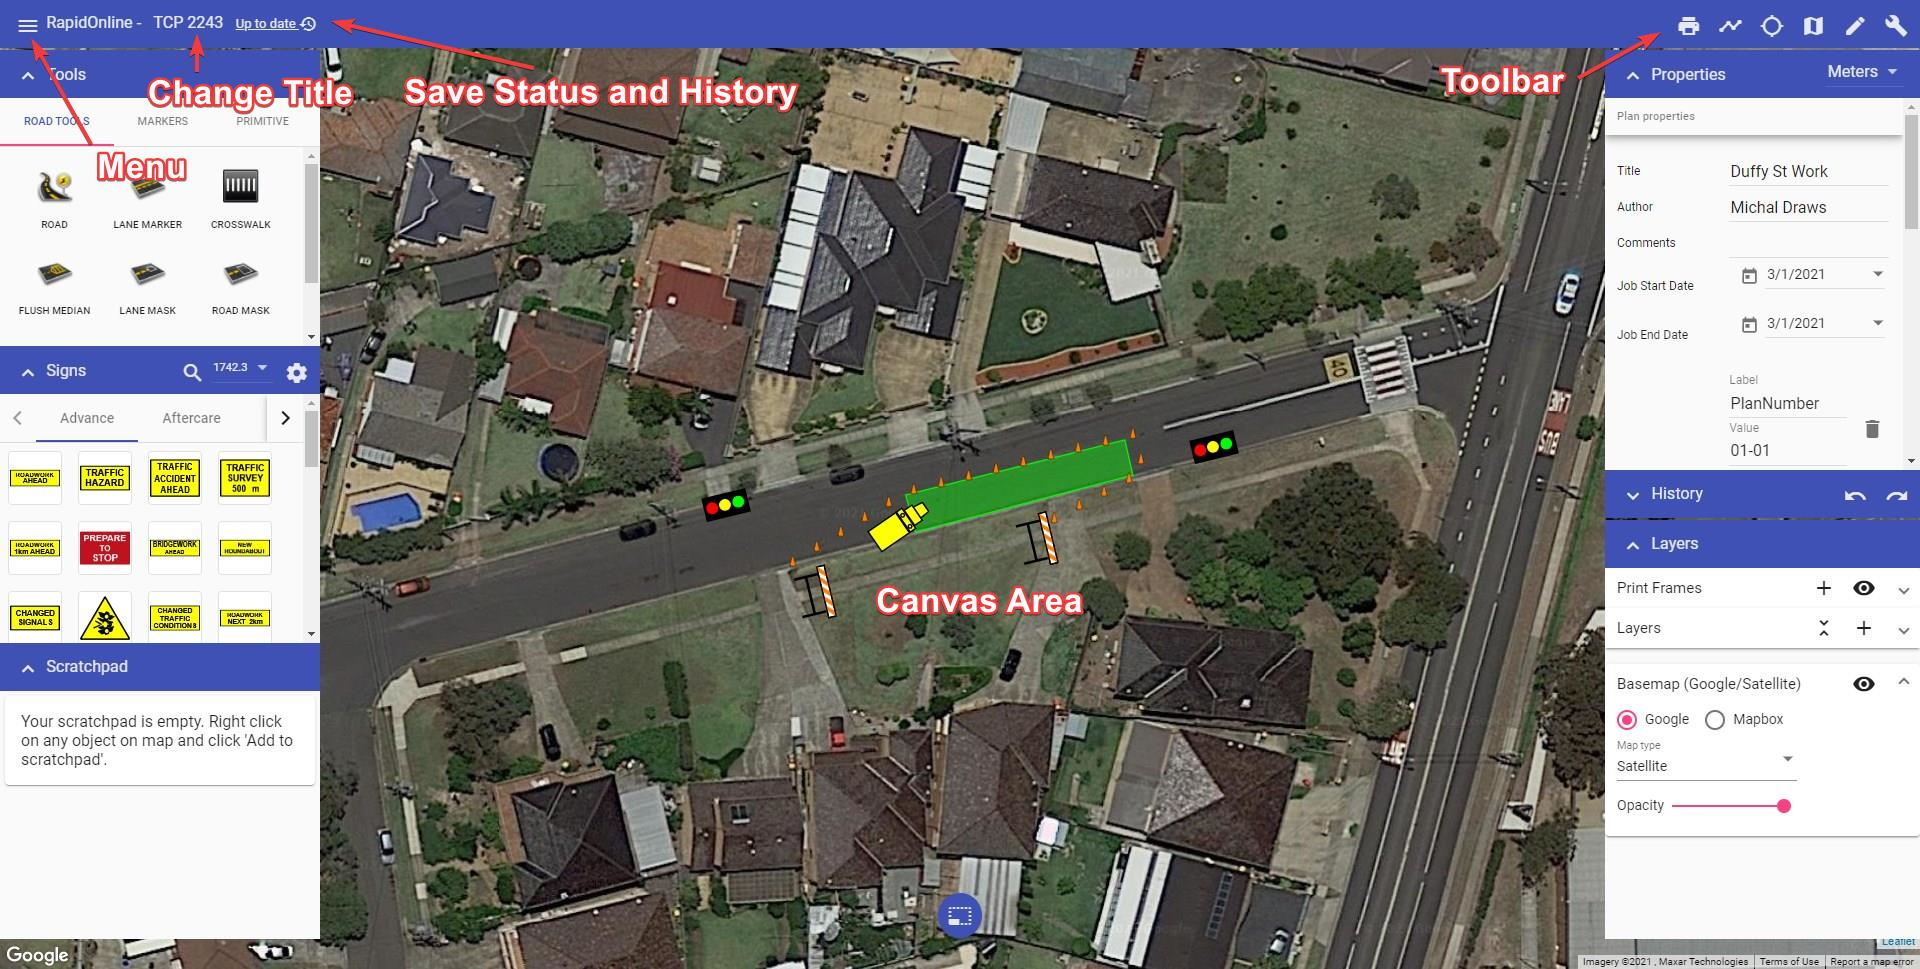
To name your plan, simply click where it mentions ''No Title'', highlighted in Resources/The_Canvas_Button.png below. Once renamed the plan will autosave.
The plan author, comments and job work dates can be adjusted in Plan properties (highlighted in Resources/The_Canvas_Button.png).
The following sections steps through each of component of the workspace.
4.1 Canvas area
The Canvas area is where your traffic plan is created. When you open a new plan, a Google Maps (satellite view) of your worksite location is displayed on the canvas background. Changing the background (Map provider and view) is discussed later in this Chapter.
Another feature of the canvas area is the Canvas button, highlighted in Resources/The_Canvas_Button.png below.
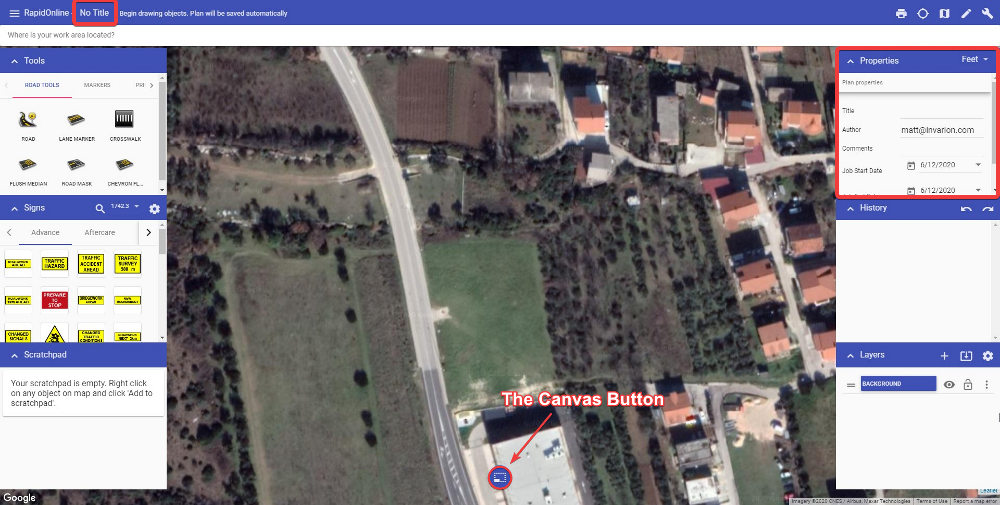
The Canvas button allows you to simply toggle between the Select (See Chapter 4.2.1) and Pan/zoom (See Chapter 4.2.2) tools. This button can also has a confirm action function, which is particularly useful for tablet users. When using most tools, a check will appear on the canvas button. Select it confirm an object creation/change on your plan and finish using the currently selected tool.
Quick tip: While using the Select tool, hold down the Spacebar key (if you're using a desktop), then left mouse click and drag to pan across the canvas area.
| Canvas button selection | Function |
|---|---|
 |
Select tool |
 |
Pan/zoom tool |
 |
Confirm action |
4.2 Main Menu
The Main menu contains a number of options to assist plan creation. Resources/Main_Menu.png below shows the main tools of the RapidPlan Online menu.
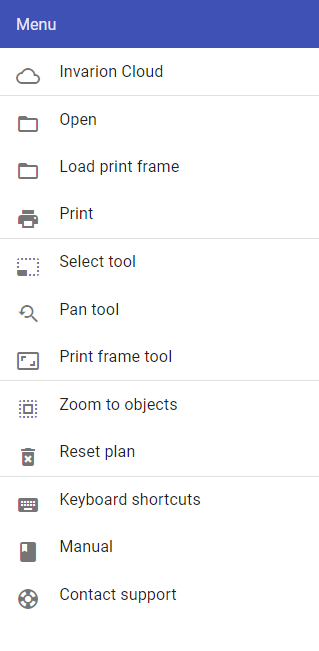
Table 4.1 describes the function of each option in the Main menu.
| Menu Selections | Description |
|---|---|
| RapidPlan Cloud | Navigates to RapidPlan Cloud. |
| Go to Cloud Project | Navigates to the Project page that the current plan is stored in. |
| Go to Cloud Plan | Navigates to the Plan page |
| This option opens the Print dialogue box. Refer to Chapter 9.1 for more on printing and exporting plans. | |
| Select tool | This option enables the Select tool, allowing you to select objects on the canvas area. refer to Chapter 4.2.1 for more on selecting objects. |
| Pan/zoom tool | This option enables the pan/zoom tool which allows you to zoom or pan the canvas area. See Chapter 4.2.2 for more on panning and zooming. |
| Print frame tool | This option enables the Print frame tool, to then be placed on the canvas area. See Chapter 4.2.3 for more using on using Print Frames. |
| Zoom to objects | Selecting this option will return your view to where the objects are situated on your plan. This feature is especially helpful if you lose your bearings on the unrestricted canvas and wish to return to the plan's point of origin. |
| Restore plan | RapidPlan contains an auto-save feature. Selecting Restore plan opens a dialog which allows you to restore a plan back to any save point (auto or manual). |
| Reset plan | This option erases all objects, signs, layers, plan location and history within a plan. Plans accidently reset can be restored by selecting Restore plan. |
| Keyboard shortcuts | Opens a dialogue box that lists the RapidPlan Online keyboard shortcuts. |
| Manual | Links directly to this RapidPlan Online User Manual |
| Leave feedback | Opens a dialogue box where feedback can be sent to the Invarion team. |
4.2.1 Select tool
When drawing on the canvas area, your mouse can perform a number of functions. It can select objects, pan across the workspace and zoom in and out (using a mouse wheel). RapidPlan Online offers two options for alternating between these functions - canvas button, tool selection in the main menu.
The Select tool is principally used to drag and drop objects onto the canvas area. It also has a special drag-select function, used when selecting multiple objects. Clicking (tap and hold on mobile devices) and dragging your mouse creates a selection window. The direction you drag the mouse creates a different colored window.
If you drag to the right, the window is purple. This selects objects that are completely within the purple window.
If you drag to the left, the window is green. This selects all objects touching the green window.
Examples of this are shown in Resources/purple1.png below.
 |
Drag right (Purple) | 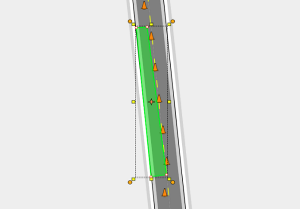 |
Object selection |
|---|---|---|---|
 |
Drag left (green) | 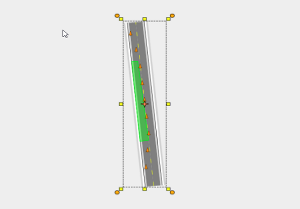 |
Object selection |
4.2.2 Pan/Zoom tool
The Pan/zoom tool enables you to pan across the canvas area, as well as zoom in and out. Similar to the Select tool, this can be enabled via the canvas button or in the main menu.
To zoom in and out, simply use the wheel on your mouse. If you are using a mobile device, pinch in and out on your touch screen.
To pan across the canvas area, simply left click and drag (tap, hold and drag on a mobile device) across the workspace while the tool is active.
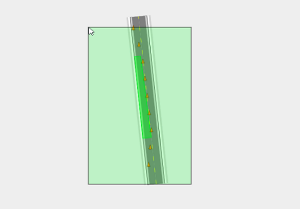
4.2.3 Print frame tool
Print frame allows to define the exact area that will be printed. Multiple print frames can be used for multi-page print.
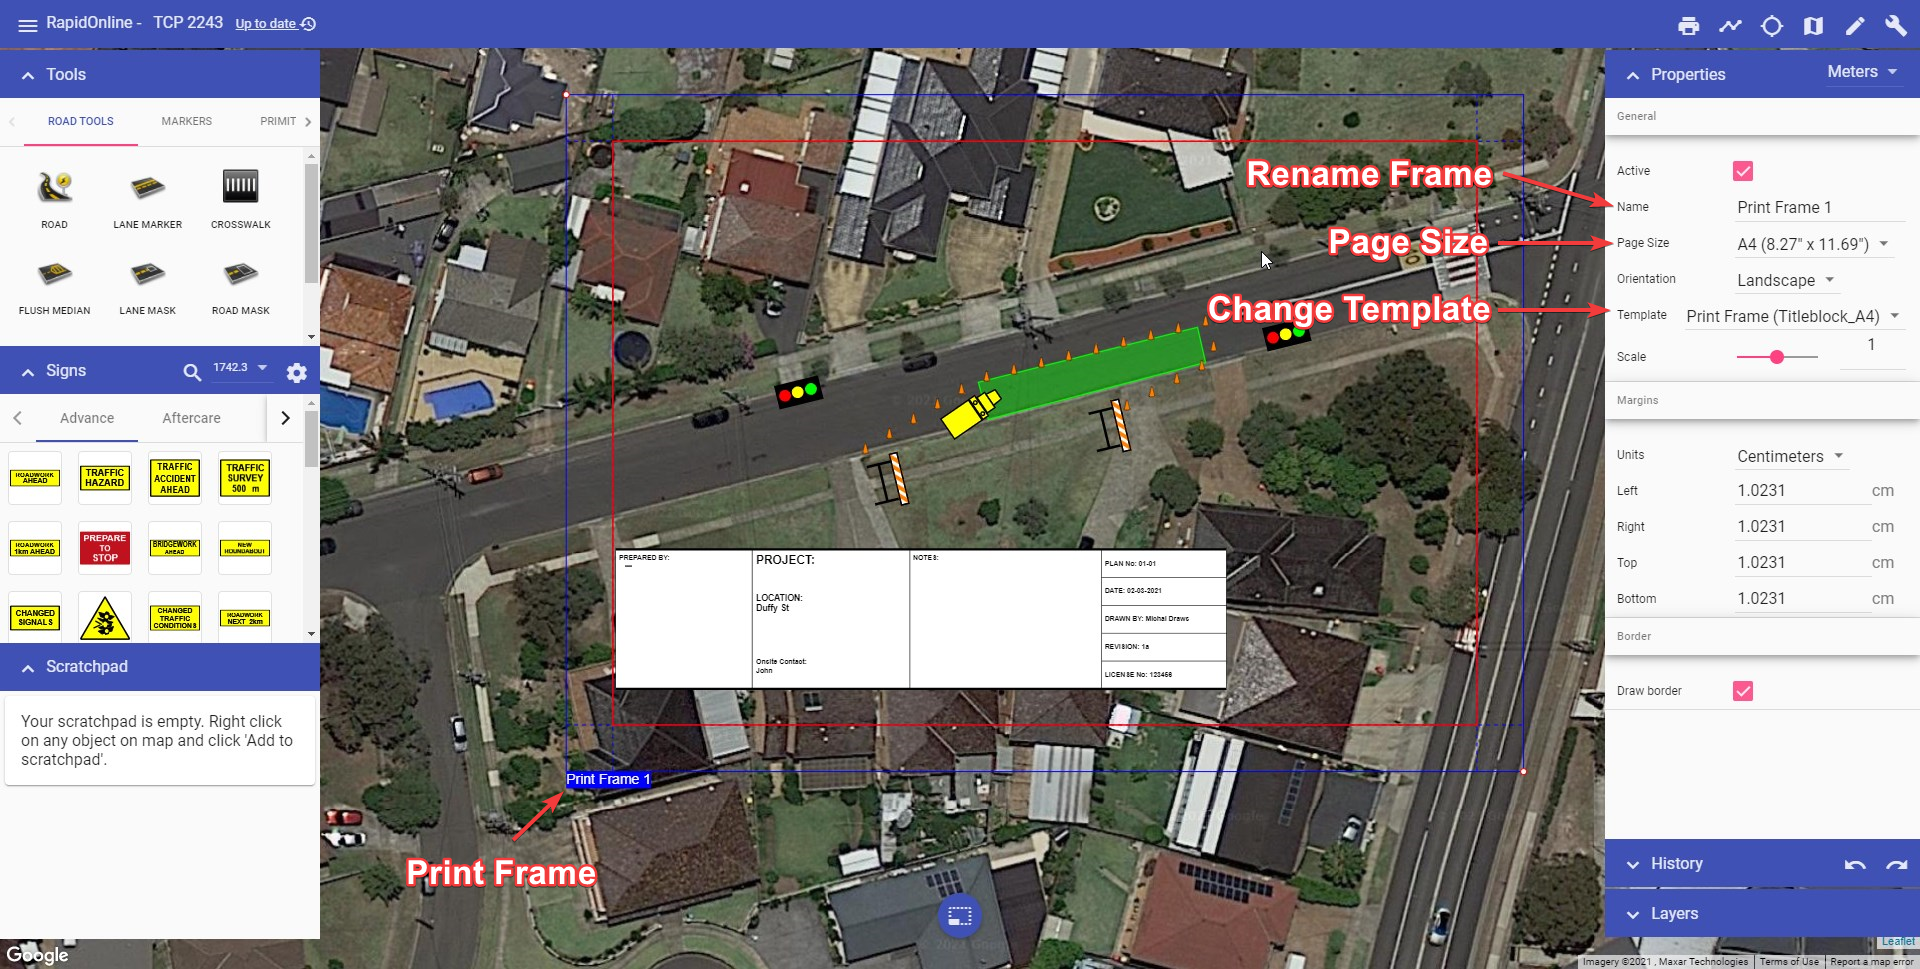
To add a Print frame to your plan, select the tool from the main menu and drop the frame onto the canvas area. The size of the Print frame can then be adjusted by selecting the frame on your canvas area, then clicking and dragging out it's control point in the bottom right corner.
Settings for paper size and page orientation for Print frame can be found in the Properties palette.
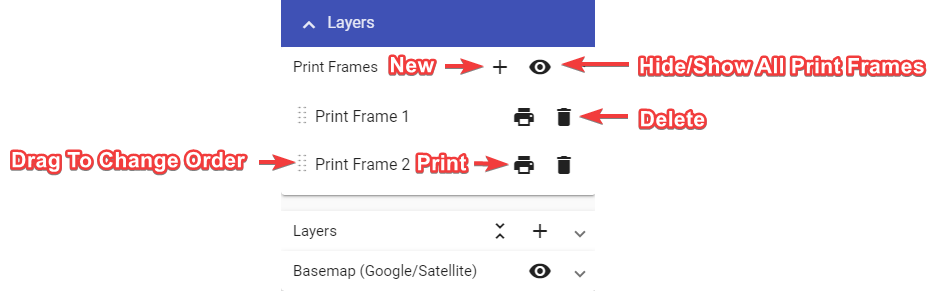
You can manage print frames added to the plan using "Print Frames" section in the "Layers" palette. Use "Print Frames" section to:
- hide/show all print frames,
- add new print frame,
- change print frames order (this will affect multi-page print),
- delete print frame, and
- quickly print chosen print frame.
Pre-loaded templates (which include generic plan titleblocks) can be added to a print frame via the Properties palette, as shown in Resources/Print_Frame.png.
There's currently two templates to choose from (titleblock, sideblock). When choosing a template, ensure you select the one matching your page size. The titleblock template for US letter page size is shown in the example below.
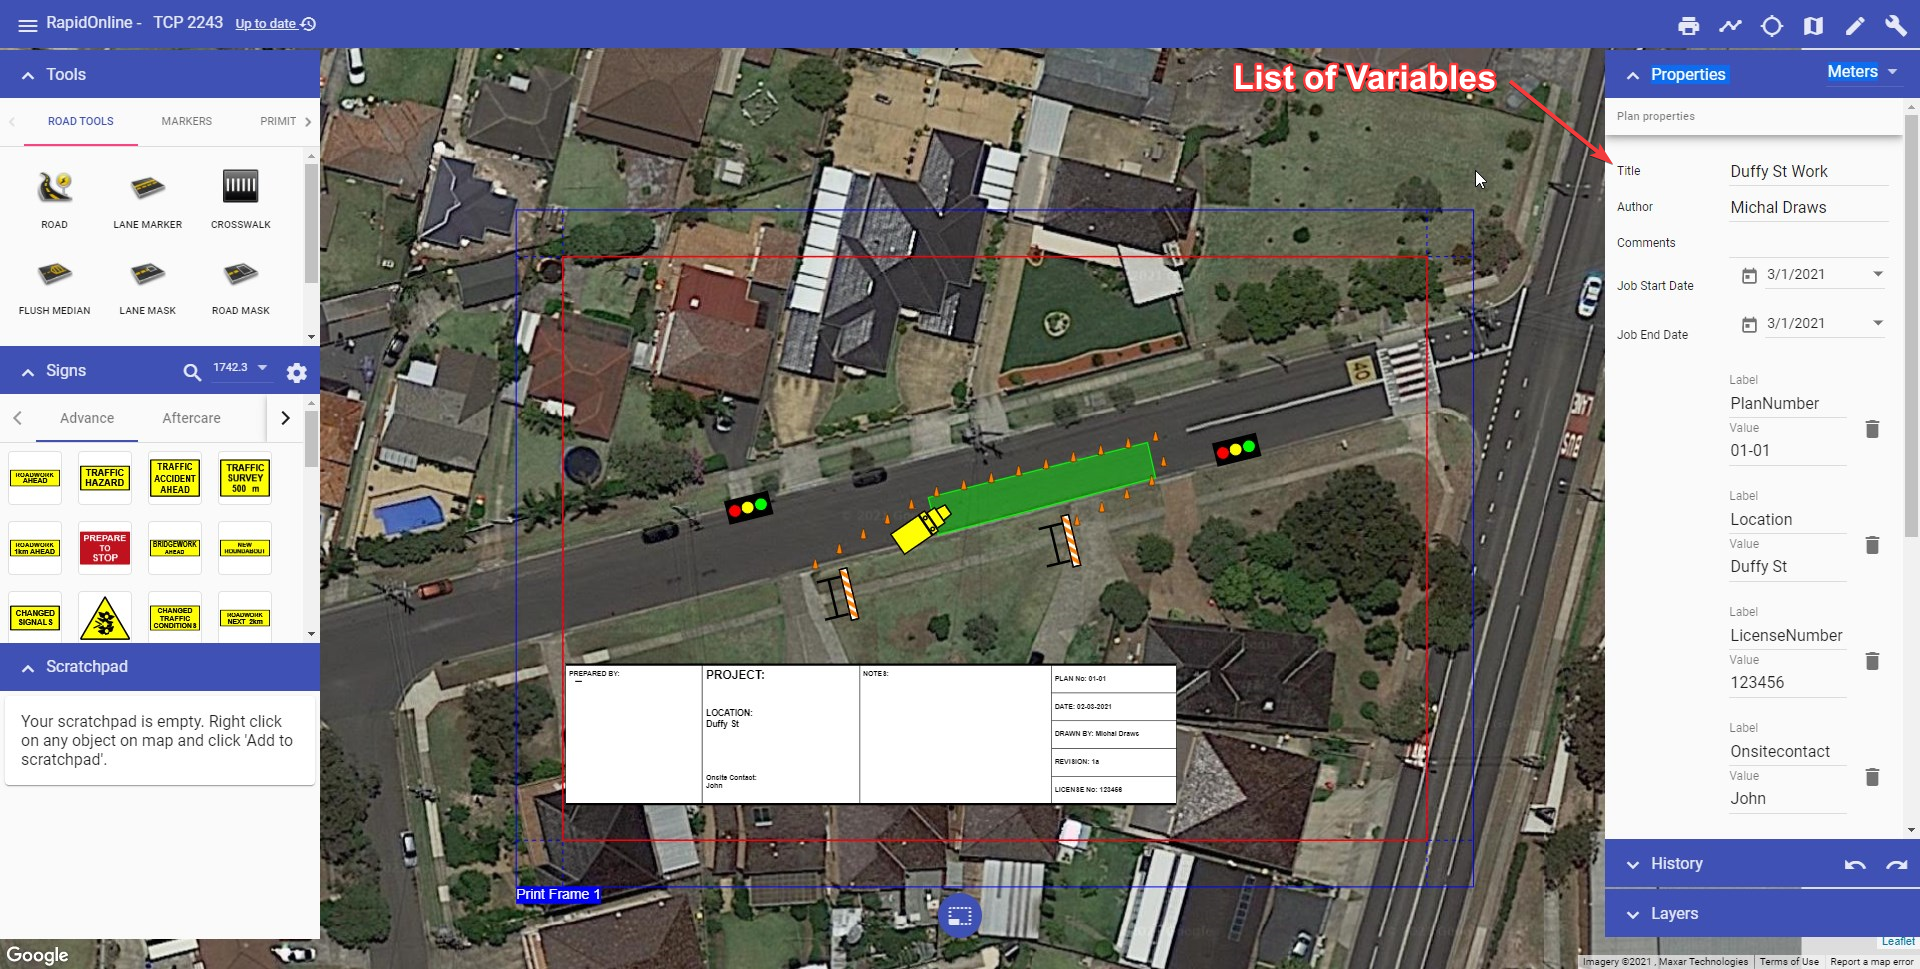
To add information to the titleblock, make sure nothing is selected on the canvas area, then scroll down to the variables section in your Plan properties (Properties palette), as shown in Resources/Plan_Variables.png. Enter the plan information and it will automatically populate the titleblock fields.
You can then Print or Export your plan via the Print dialogue. Printing or Exporting is covered in Chapter 9
4.3 Toolbar
The Toolbar, located in the top right corner of the workspace, contains a number of button available for quick access. Each button is described in Table 4.2
| Label | Button | Description |
|---|---|---|
 |
Open the printing dialogue to print or export a plan. | |
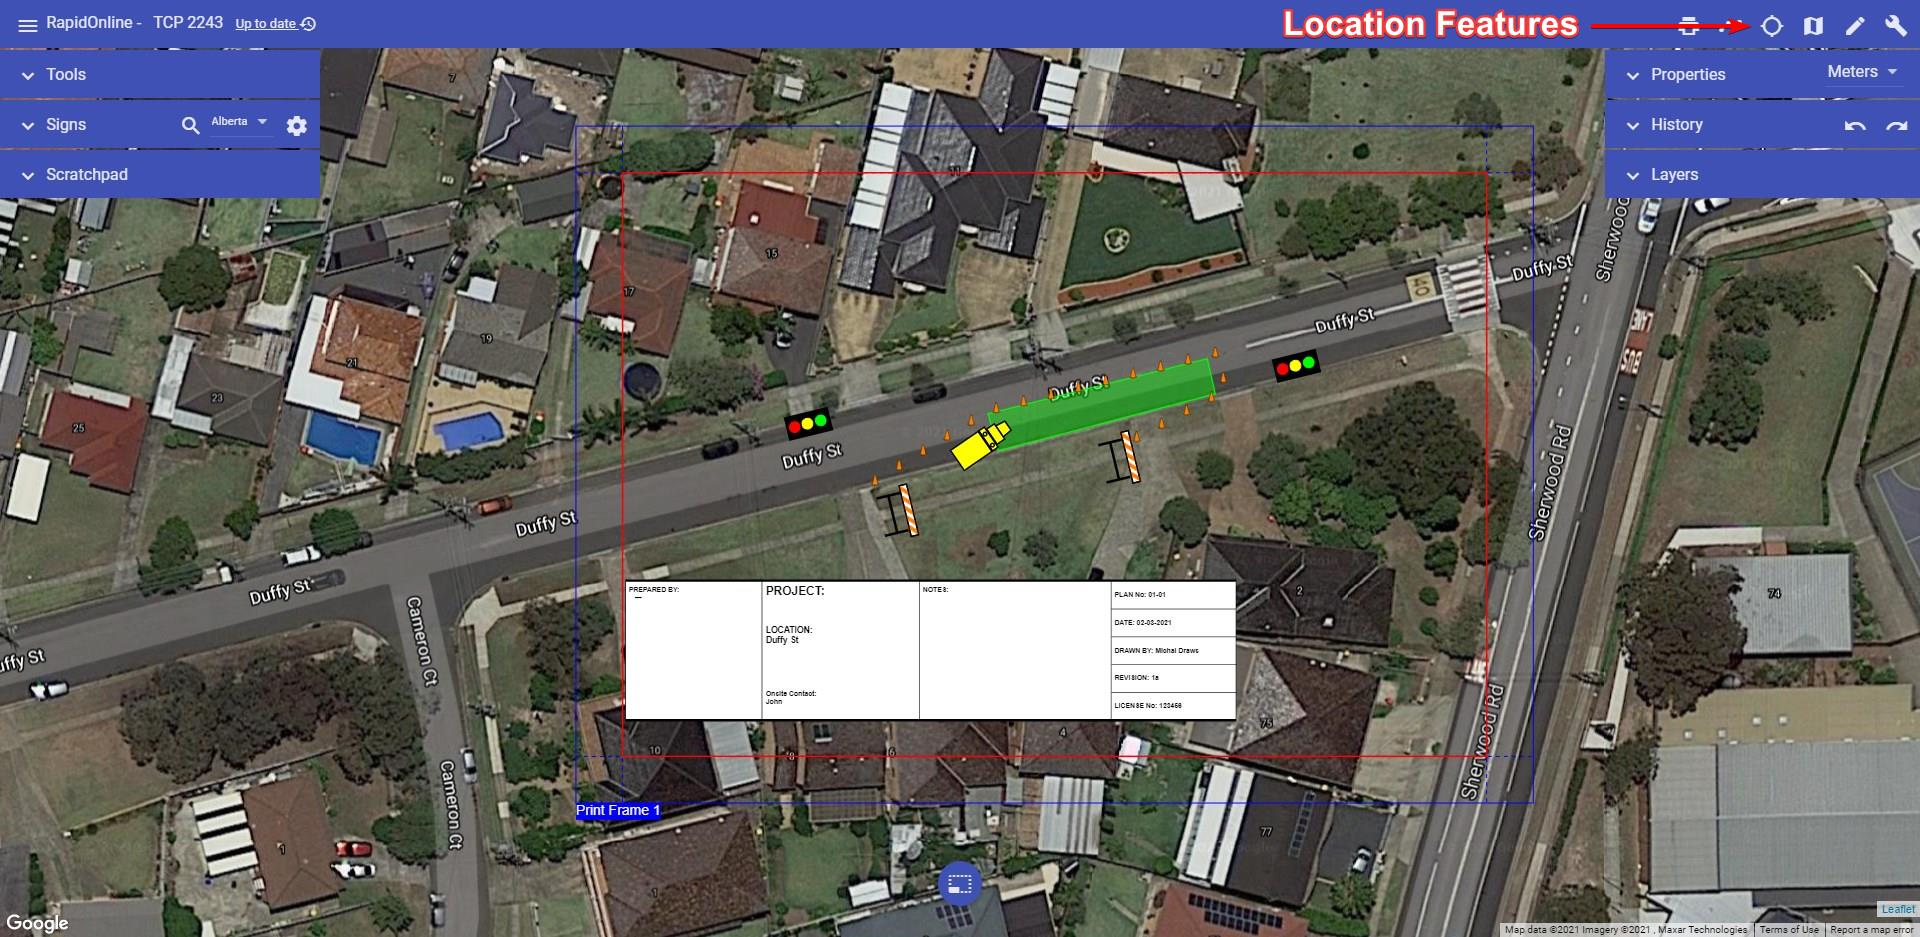
| Location features |  |
Location-based features, including: Go to location and Toggle location marker. |
| Map view |  |
Toggle between different map views, including: Satellite, Road, Hybrid and Terrain. |
| Tools |  |
Show/hide the Tools palette. |
| Operations |  |
Show/hide the Operations palette. |
4.4 Palettes
The palettes are located on the left (Tools) and right (Operations) of the canvas area. They can be shown/hidden by toggling corresponding button on the Toolbar. This can be helpful for with maximizing the canvas area when preparing larger scale plans.
The Tools palette includes:
Tools
Scratchpad; and
Signs.
The Operations palette includes:
Properties
History; and
Layers.
Each palette can be minimized by clicking the arrow icon at the top left.
The following sections describe the functions of each palette in detail.
4.4.1 Tools palette
The Tools palette contains most of the elements required to draw a plan. The tools are separated into three categories, detailed in the Tables below:
4.4.1.1 Road tools
| Label | Button | Description |
|---|---|---|
| Road tool |  |
Fully customizable road tool (increase lanes, widths etc) |
| Lane marker |  |
Create additional lane markers on road regions |
| Crosswalk |  |
Quick draw crosswalk tool |
| Flush median |  |
Draw a flush median to desired size |
| Lane mask |  |
Cover up lane markers on drawn roads using line or spline |
| Road mask |  |
Cover up lane markers on drawn roads using polygon |
| Chevron flush median |  |
Draw a chevron flush median to desired size |
4.4.1.2 Marker tools
| Label | Button | Description |
|---|---|---|
| Delineator |  |
Draw a delineator (e.g., cone, barrel) and change the type in Properties |
| Work area |  |
Draws a work zone polygon |
| Safety zone |  |
Draws a safety zone polygon |
| Title box |  |
Details plan information |
| Manifest box |  |
Itemizes the number of objects on a plan |
| Legend box |  |
Defines features and symbols used on a plan |
| Arrow marker |  |
Draws an arrow object |
| Angle marker |  |
Marks the angle between two points |
| North arrow bearing |  |
Place a north bearing marker on the canvas area |
| Arrow board tool |  |
Electronic arrow board marker |
| Train tracks |  |
Draws train tracks. This can be adjusted to tram tracks on the Properties. |
| Distance marker |  |
Mark the distance between two points |
| Combined distance marker |  |
Mark multiple distances separated into segments |
| Offset distance marker |  |
Mark the distance between two points and offset the marker |
| Multi-message sign (Australian version only) |  |
Opens the multi-message sign creator |
4.4.1.3 Primitive tools
| Label | Button | Description |
|---|---|---|
| Polyline |  |
Draws straight lines that can be connected in a series of segments |
| Polygon |  |
Draws a polygon shape that can be filled with a custom color |
| Spline |  |
Creates a curved line along path |
| Filled Spline |  |
Creates a curved line that can be connected and filled with a custom color |
| Bezier |  |
Create a curved line with greater precision using control points and curve handles |
| Filled Bezier |  |
Create a curved line with greater precision using control points and curve handles. Fill with custom colors |
| Text object |  |
Creates an object out of text that can be manipulated like any other object |
| Text box |  |
Creates a box that can be filled with text |
| Rectangle |  |
Draw rectangular shapes and fill with custom colors |
| Ellipse |  |
Draw elliptical shapes and fill with custom colors |
| Arc |  |
Draw a line in the shape of an arc |
| Arc Pie |  |
Creates an arc shape that can be filled with a custom color |
| Rounded Rectangle |  |
Creates rectangle with rounded edges that can be filled with a custom color |
| Insert Image |  |
Insert an image file (jpeg, png, gif) to drop onto the canvas area |
4.4.2 Signs palette
The sign palette is the repository for each of the signs in RapidPlan Online. Aside from the signs themselves, the signs palette has three main components (shown in Resources/Sign_Palette.png):
- Sign library - Drop down menu that allows you to select which signage pack you wish to use. In some cases you will only have one pack installed, but certain countries will have numerous state/region packs also installed;
- Sign categories - The signs are organized into tabs so that they are easy to find. Clicking through the tabs will reveal the signs for each category; and
- Sign search - Search the entire sign library by keyword, phrase, sign name or sign code.
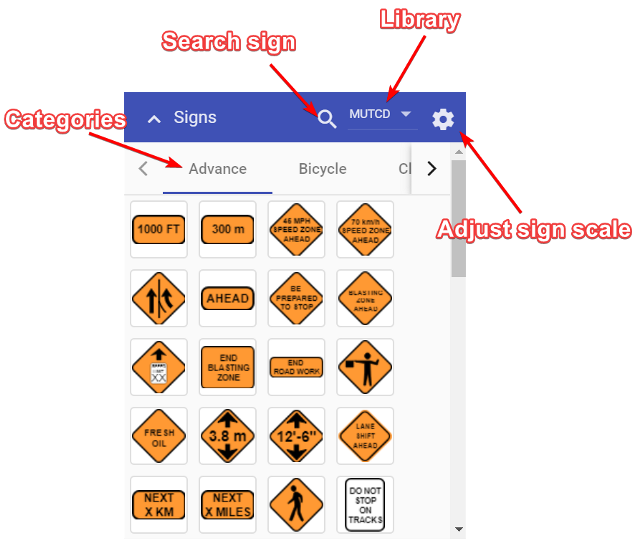
There is also an option where you can manually adjust the scale of the signs before dropping them on the canvas area.
4.4.2.1 Adjusting sign scale
All of the signs in the Signs palette have a default size, which is relative to the canvas area zoom level. In some instances you might need to adjust the scale of signs before placing them on the canvas area. To do this, click the gear icon on the Signs palette. This will open a scale slider. Simply move the slider to adjust the scale of the sign.
4.4.3 Scratchpad palette
The Scratchpad is used to store signs or custom objects that you commonly use to make them easily accessible.
To add an object to your Scratchpad, just right click the object on your canvas area (or tap and hold on a mobile device), then select "Add to scratchpad" from the menu (as shown in Resources/Add_To_Scratchpad.png). The object will then be added to your Scratchpad.
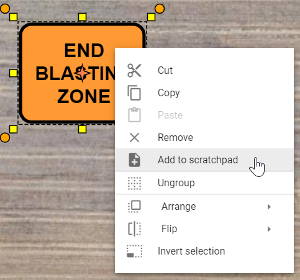
All objects added to your scratchpad are saved to your account, making them available to use on any new plans you create. To remove an object from your scratchpad, simply right click on the item and select "Delete item".
4.4.4 Properties palette
The Properties palette displays all the information pertaining to any selected signs, tools, markers or objects. This is where you can change fonts, colors, lane markers, etc - of a selected object.
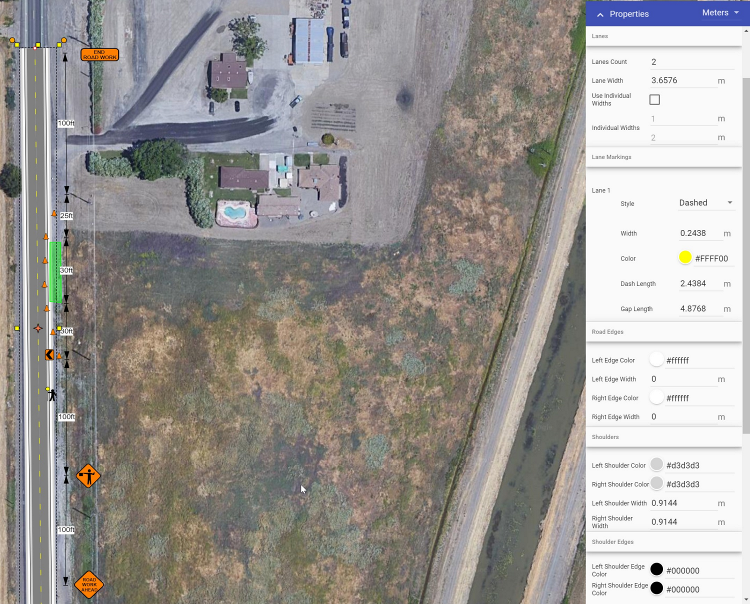
The Properties palette allows for full customization of objects on your plan. Select the object, and you can then adjust it's properties. For example you can customize any aspect of a road, as seen in Resources/Properties_Palette.png below.
This applies for all objects you place on your canvas area; each object has their own properties that you can edit and customize to suit your plan.
When an object is not selected, properties for the plan (e.g., title, author, work dates) are visible. These options also include resetting the plan location, defined when you first started the plan. Simply click the 'Set plan location' button and click to add the location marker on your plan. This will redefine the coordinates linked to your plan. Resetting the plan location is particularly helpful if your works are positioned at a location not defined by a physical address.
4.4.5 History palette
The History palette contains the list of changes that you have made on the plan. On the top right of the palette, there are two arrows that represent undo and redo operations.
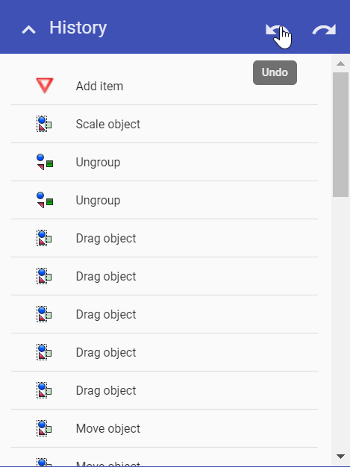
You can click on any of the changes made to take you back to that particular point in the plans creation.
4.4.6 Layers palette
There will be a lot of cases where you will need to create more than one plan for a job, such as when you have different stages of works. That's why RapidPlan Online enables you to place multiple layers on your plan.
Layers will, more importantly, help you keep things organized in your plan. You can have a separate layer for roads, signs and other plan objects. Layers will improve your workflow and allow for easier changes on a more complex plan.
By default, every plan starts with only one layer, the Background.
Layers palette is divided in two three sections:
- "Print Frames" for managing print frames,
- "Layers" for managing layers, and
- "Basemap" for basemap settings.
For more about "Print Frames" visit 4.2.3 Print frame tool.
Resources/Layers_Palette.png below highlights elements of the "Layers" section.
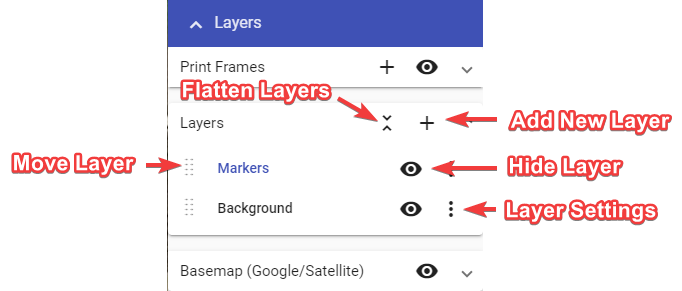
Elements in "Layers" section and their functions:
Add new layer - Creates a new layer, which is then visible in the layers list.
Flatten layers - Brings all of your current layers, and their objects, into a single layer.
Move layer - Dragging this icon allows you to adjust the sequence of the layers in the list. This determines order in which layers are drawn on the plan.
Hide layer - This icon toggles the visibility of the layer.
Layer settings - The 'More Options' icon allows you to rename the layer, adjust its opacity or delete that layer.
Adjust basemap to your needs in "Basemap" section of Layers palette.
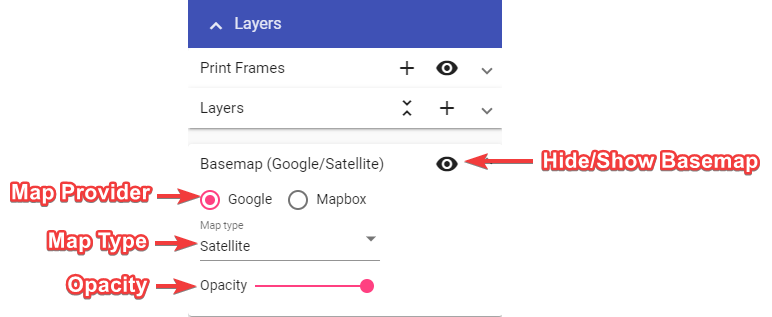
Elements in "Basemap" section and their functions:
Basemap Toggler - Turn basemap on and off.
Map Provider - Change map provider (Google, Mapbox).
Map Type - Change between different map types (road, satellite, hybrid, etc.).
Opacity - Change basemap opacity, you can make it a little transparent so the drawn objects stand out more.
4.5 Autosave feature
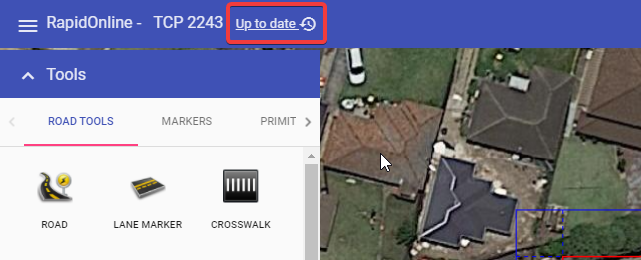
Changes made to a plan are saved automatically. The status bar (highlighted in Resources/Auto_Save.png below) located at the top of the page shows the autosave status. There are three stages which take about 4 seconds to cycle through:
Pending changes - The system is updating changes made to your plan. It is recommended you don't exit the page when changes are pending.
Saving - The file is saving to RapidPlan Cloud. It is recommended you don't exit the page while the plan is saving.
Up to date - Your plan is now saved. It is now safe to exit the page.
Resources/Auto_Save.png below shows you where the Autosave status bar is located.
Note: Panning across the map or changing plan location will not trigger the autosave function. You must draw or place an object on the canvas area to initial the autosave.
Chapter 5: RapidPlan Online Basics
5.1 Selecting objects and tools
RapidPlan Online uses drag-and-drop technology. To select an object or tool, just click on it with the left mouse button, or tap for mobile devices.
Tip: If using a tool, once finished with your last control point, right click to finish using that tool.
If you're selecting multiple objects on the canvas area, you can click on object and hold SHIFT key to preserve selected object or by pressing and holding left mouse button and then dragging mouse over objects that you want to select.
To learn more about the select tool, please visit Chapter 4.
Table 5.1 explains the features available once an object is selected.
| Selected object | Features |
|---|---|
 |
Bounding Box: When an object is selected, it is surrounded by the bounding box. |
 |
Resize Handles: The resize handles allow you to stretch or shrink the selected object. When selected, every object will have eight resize handles; three at the top, three at the bottom, and two on the lateral sides of the bounding box. |
 |
Rotation Handles: Click and drag a rotation handle to "free rotate" an item. This example has four rotation handles - an arrow in each corner of the bounding box. Drag the handle in any direction to rotate an item. |
 |
Control Points: Control points are special handles which allow you to alter the shape of an object. Many objects and road tools have control points and allow for the insertion of multiple control points anywhere along an item. |
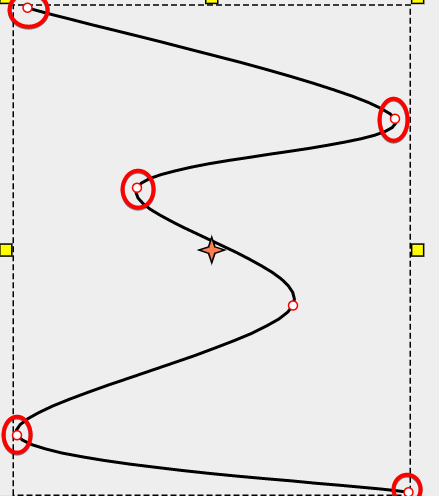
5.1.1 Control points
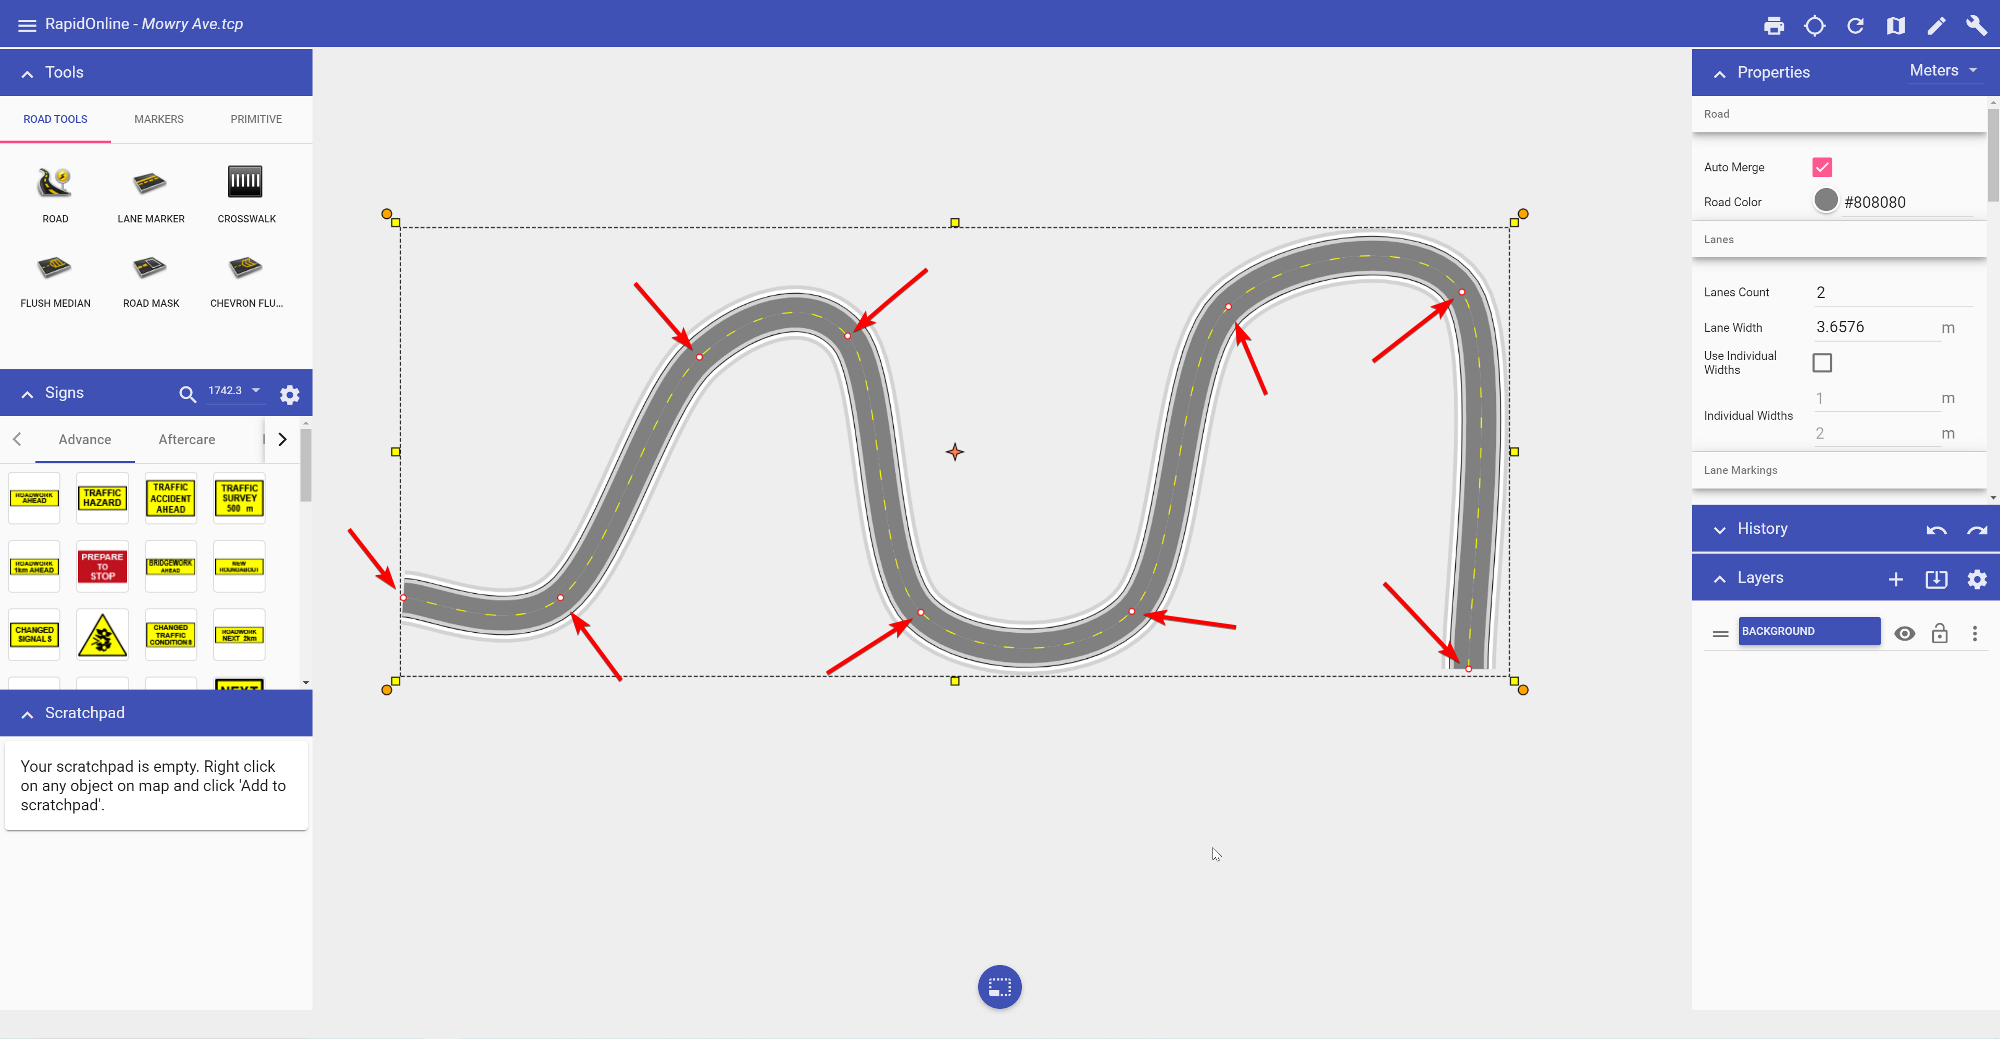
Almost every element in RapidPlan Online has at least one control point. A control point (represented by a small red circle) is a handle that allows you to alter the shape of an object.
Resources/Control_Points.png shows a road object. Each control point has been added via a mouse click, when drawing out the object. Clicking and dragging a control point will move it, adjusting the layout of the road.
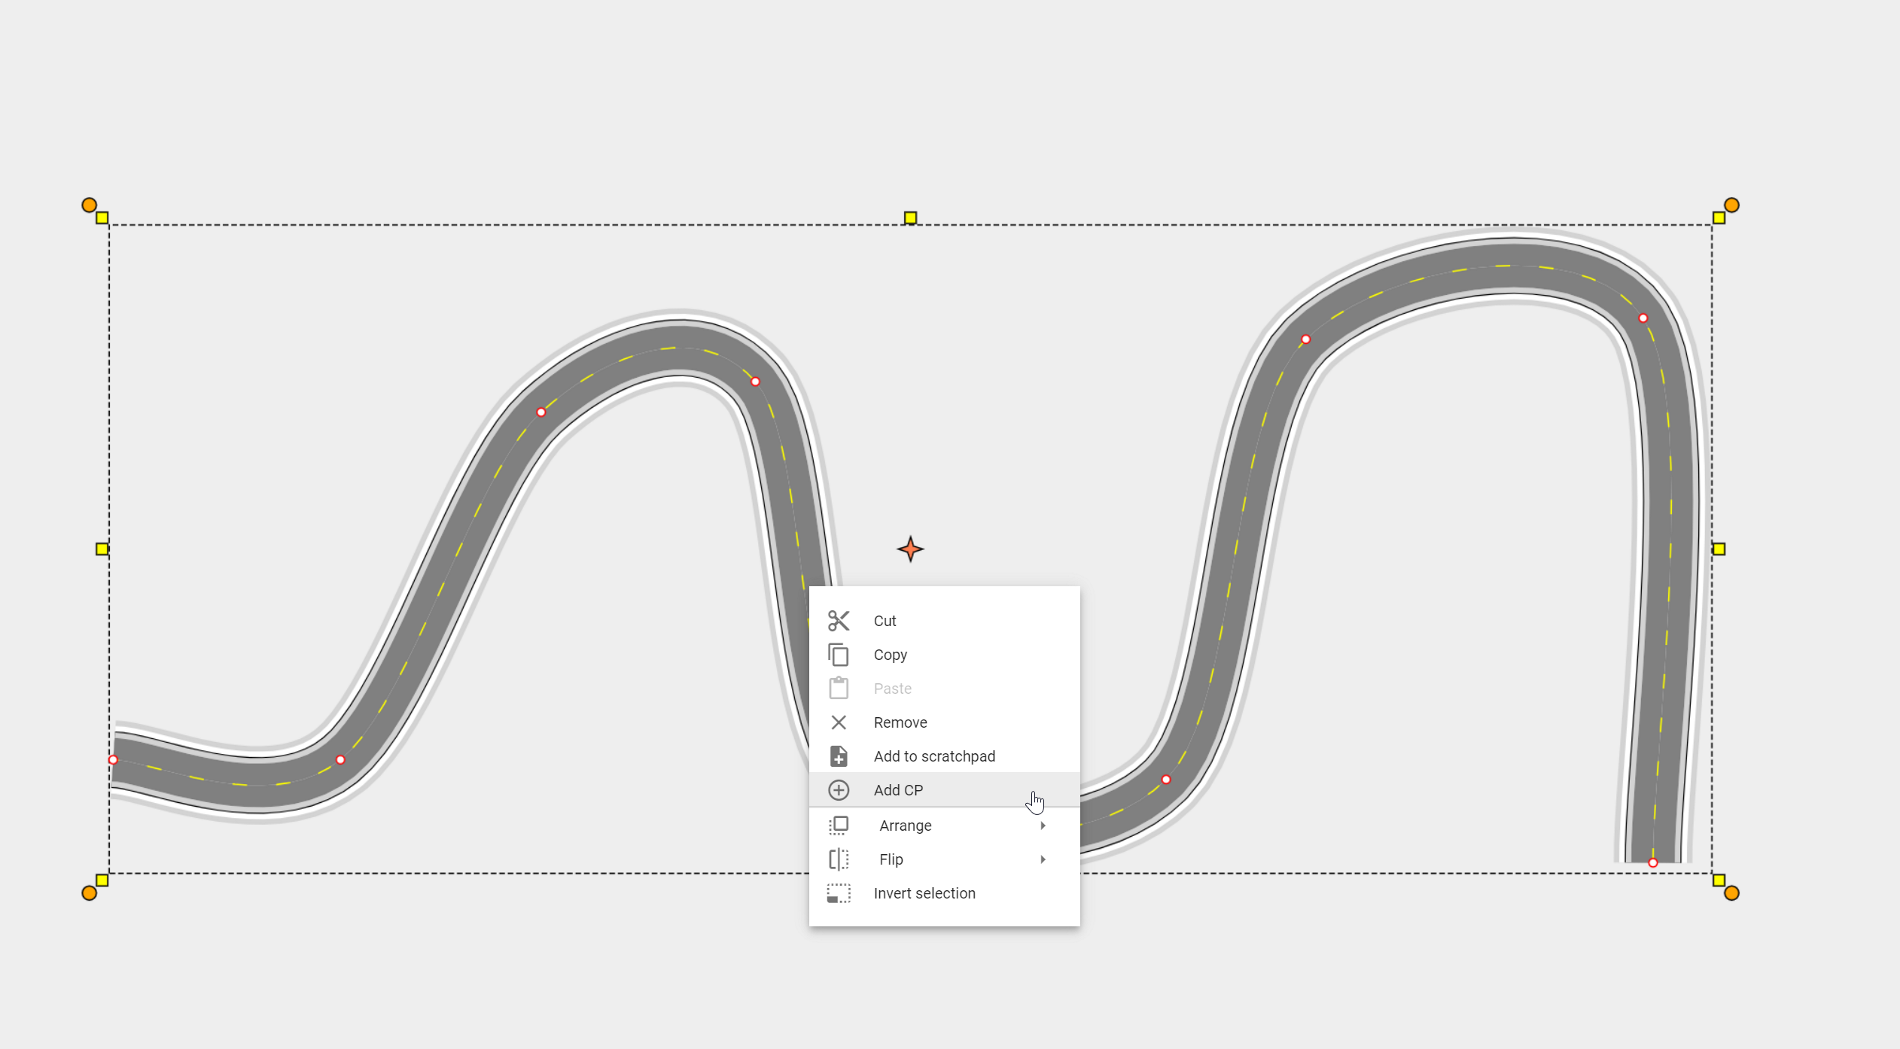
To add a control point to an existing object, simply right click on any point on the object to view the context menu. Selecting the Add CP option will add a control point at that point of an object.
Similarly, if you want to remove a control point, right click on the control point and select Remove CP from the context menu.
5.1.2 Context menu
Select an object and click the right mouse button to open a menu of additional options.
The options will vary based on the object that is selected, but the main options are:
- Cut
- Copy
- Paste
- Remove (delete an object)
- Add to Scratchpad
- Convert to sign
- Add/Remove a control point
- Arrange (bring object forward, send backward, etc.)
- Flip (flip an object horizontally or vertically)
- Invert selection
Quick Tip: To remove an object from the canvas area, select it and press the Delete key. Alternatively, you can right click and select Remove from the context menu.
5.1.3 Grouping and ungrouping objects
Grouping and ungrouping objects is an important technique to learn. The benefit of grouping objects is the ability to adjust several objects together, rather than individually.
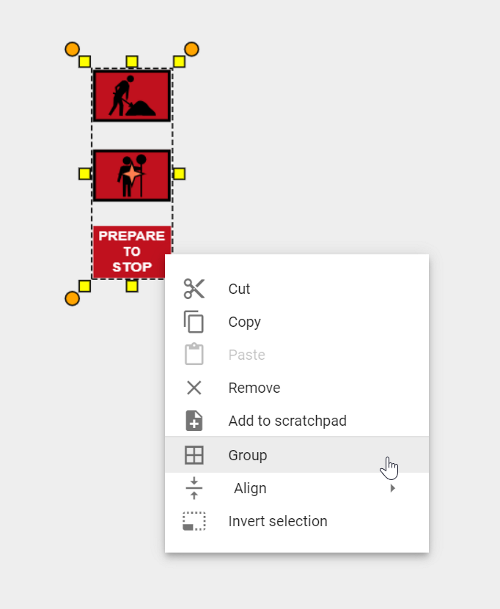
Group by holding down the Shift key and left clicking each object you wish to group. Once they are all selected, right click and select Group - as shown in Resources/Group_Objects.png
Alternatively, use a selection window (see Section 4.2.1) to select the desired objects, then right click.
Once grouped you can adjust the group of objects as one. You can also add the grouped objects to your Scratchpad for later use.
To Ungroup the objects, simply right click on the objects and select Ungroup.
Chapter 6: The Road Tool
Using the road tool is very simple. As you move the mouse after you have clicked to start drawing, the roadway will "snake" behind the cursor. Each time you click the mouse on the canvas, a new control point for the road is placed.
6.1 Components of a road
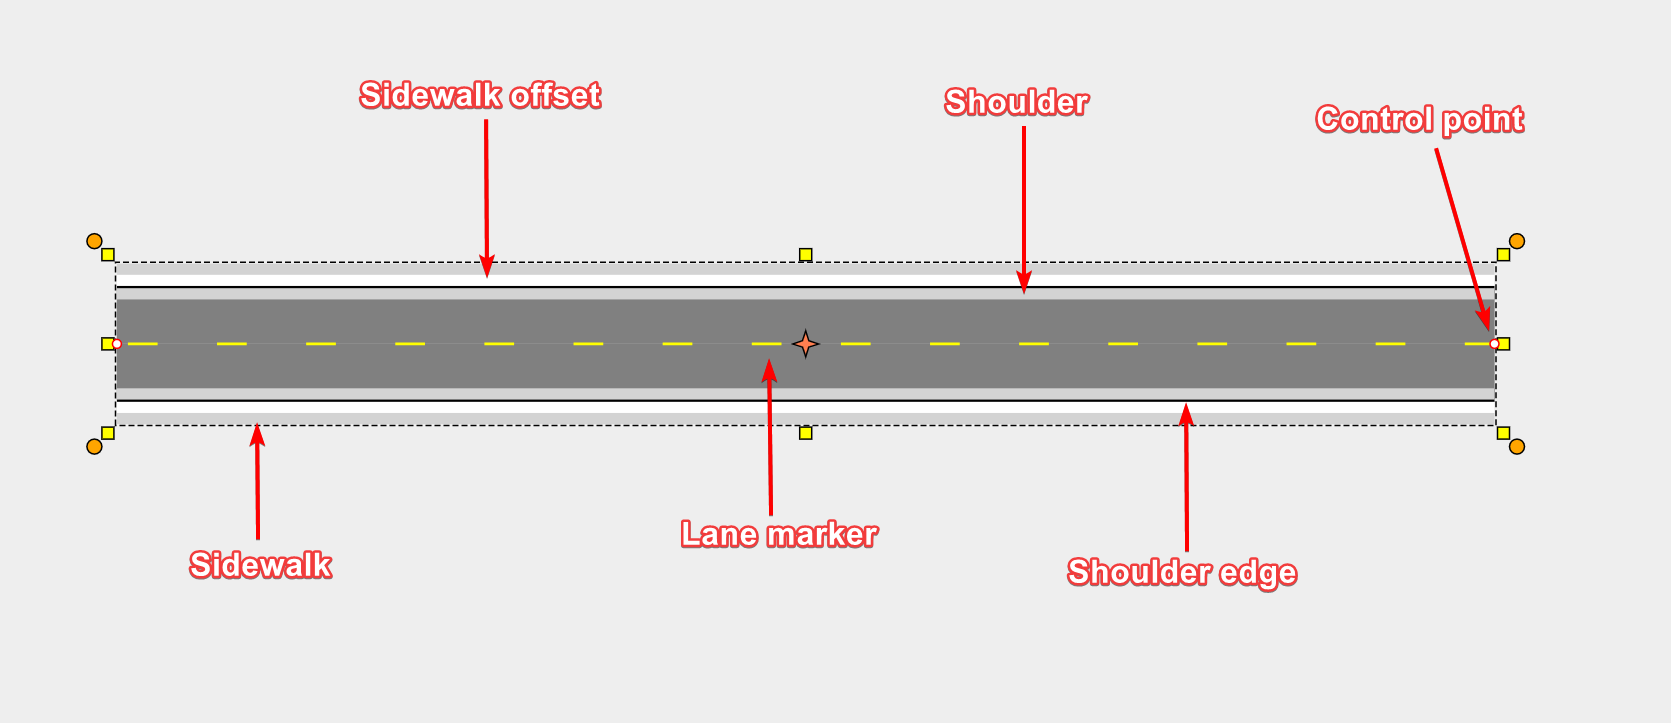
The road contains a number of elements, as shown in Resources/Road_Components.png below. Each of these can be adjusted in the Properties palette.
6.2 Drawing a road
- Select the Road from the Tools palette.
- Move your mouse to the canvas and click once to start drawing your road.
- Move the mouse around the canvas, clicking at each control (turning) point.
- When you have placed your final point, right click to stop drawing.
- If you don't want to draw another road, right click again to drop the road tool.
Tip: A simple shortcut allows you to draw perfectly straight roads. By holding Shift, the tool will make sure that each control point is placed in a perfectly straight line. Move the move left or right, and the straight section of road will 'jump' in 15 degree increments.
6.3 Editing the road
Like any other object in RapidPlan Online, the shape of the road can be edited by shifting it's control points.
To edit the roads shape:
- Select the road by clicking on it. This will make it's control points visible.
- Drag any of the control points until you have the desired shape of the road.
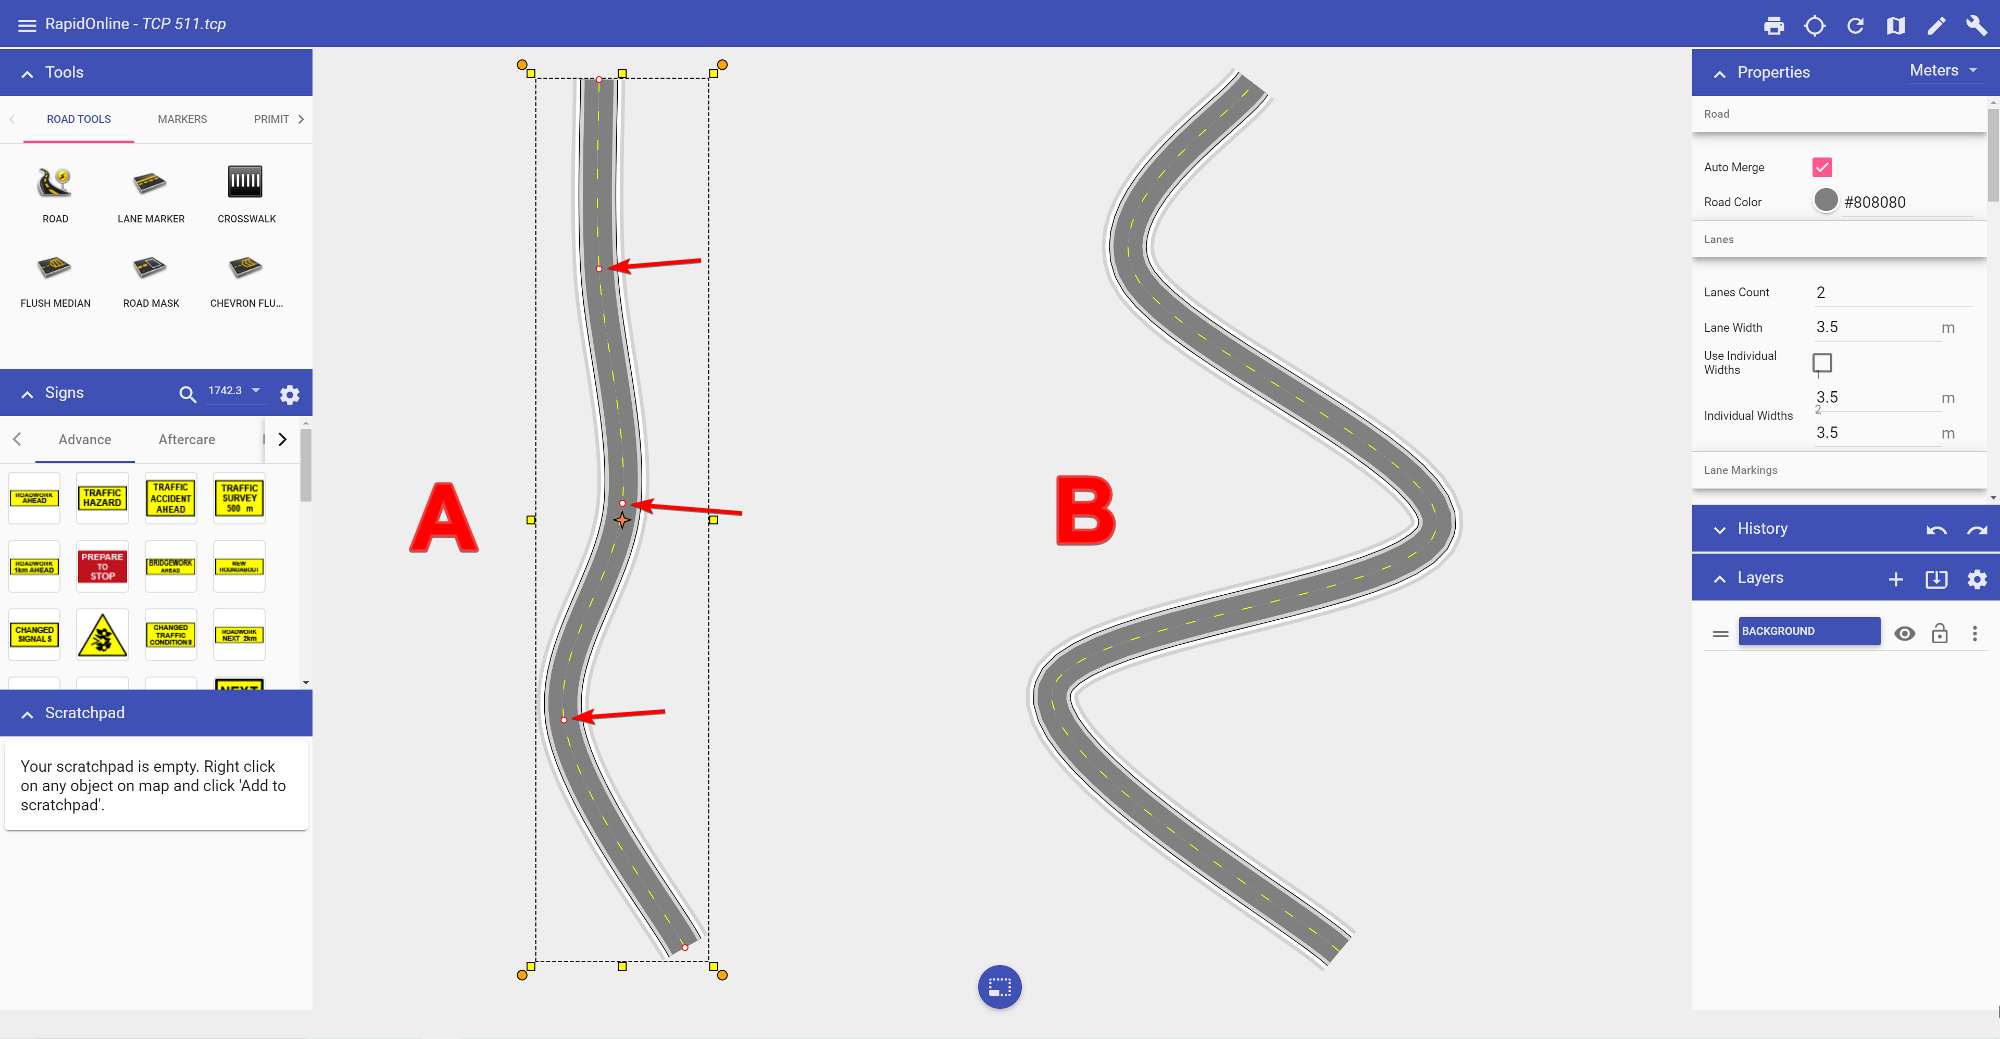
In Resources/Adjusted_Road.png below, Road A is the original road. Road B has had the 1st, 2nd and 3rd control points moved to change the shape of the road.
6.4 Road properties
Road objects are fully customizable. Elements that can be adjusted include:
- Road color, geometry and auto merge
- Lane number, width, color and lane markings
- Left side/right side edge line, shoulder and sidewalk widths and colors
- Legend and manifest preferences
All of these properties can be adjusted by clicking the objects, then navigating to the Properties palette, as shown in Resources/Road_Properties.png below.

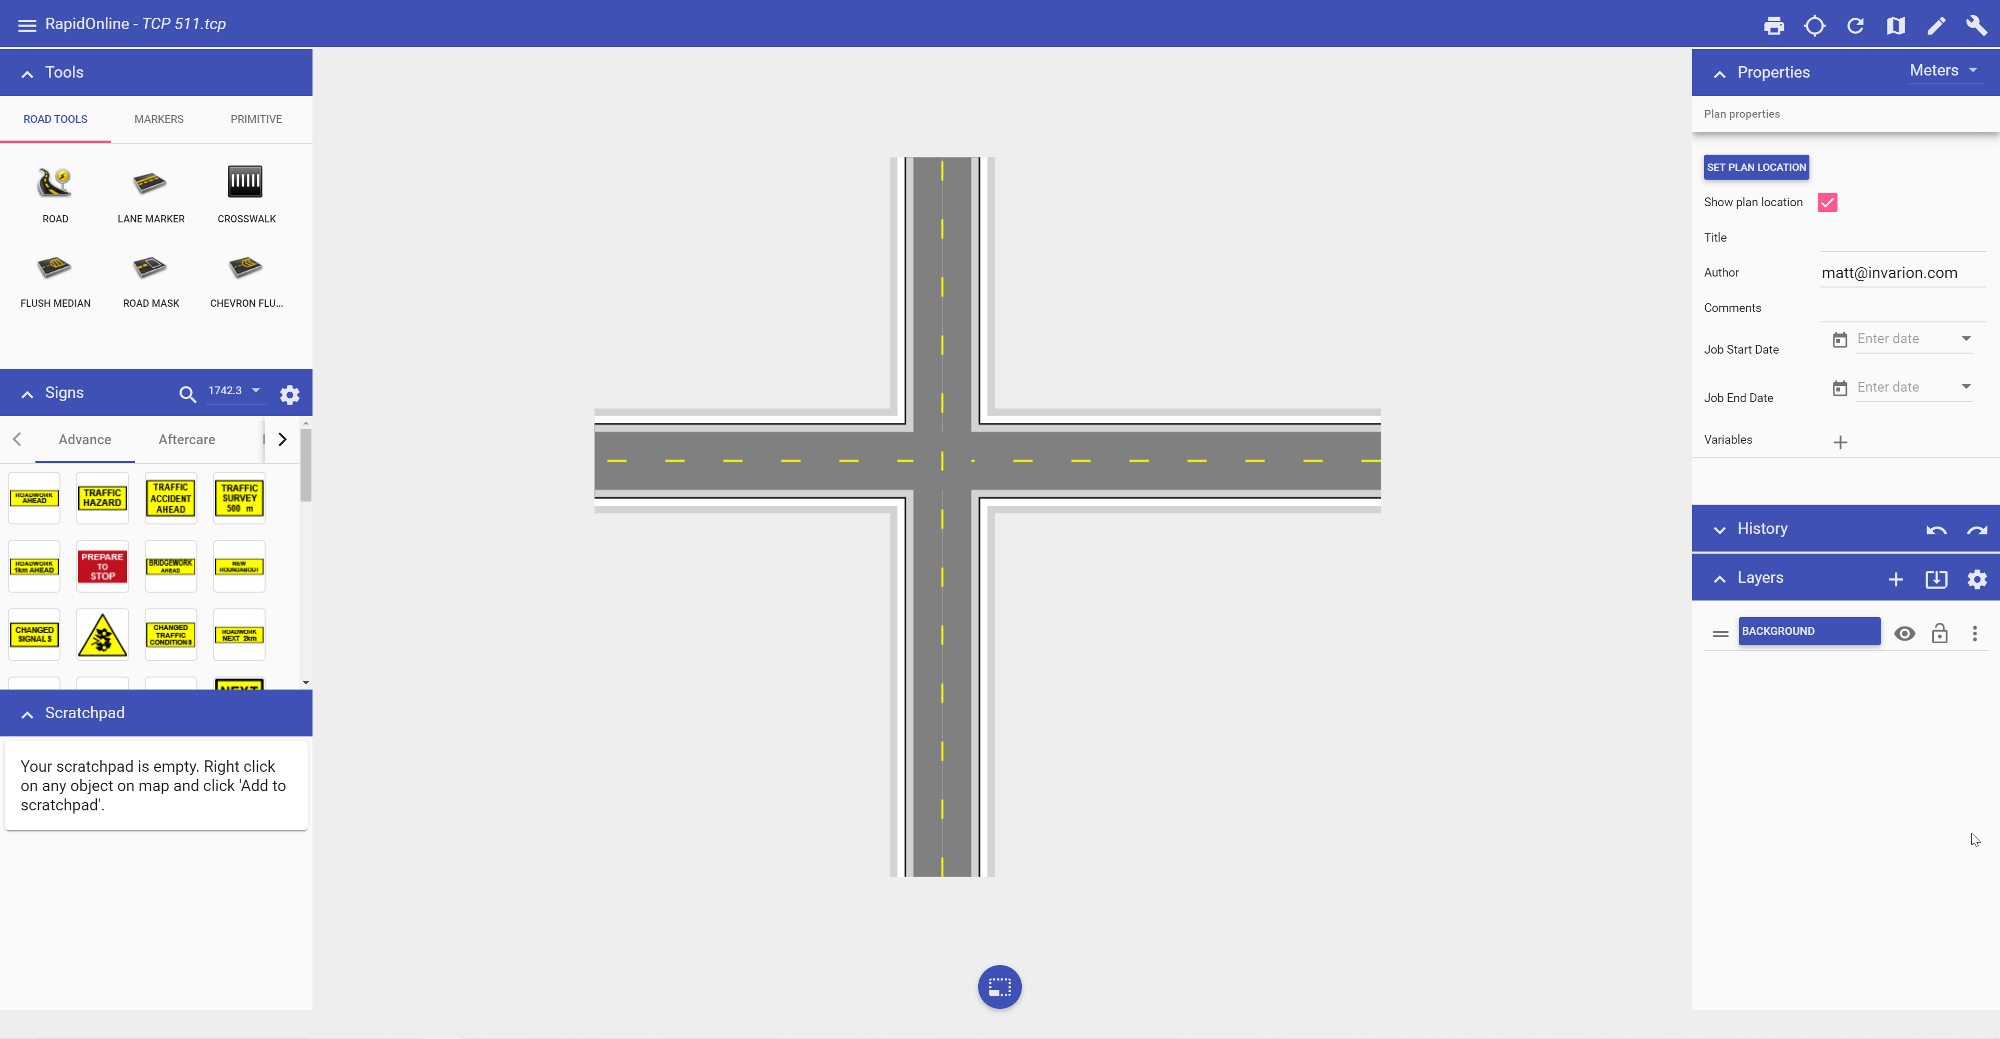
6.5 Creating intersections
The real power of RapidPlan Online lies in its ability to quickly create intersections. They are formed by "adding" new roads to existing ones. RapidPlan Online will automatically remove edge lines, shoulders, and sidewalks to blend at the intersecting point where a road is overlapping another road.
To form an intersection:
Select the Road tool from the Tools palette;
Draw your first road;
Now draw a second road overlapping the first road.
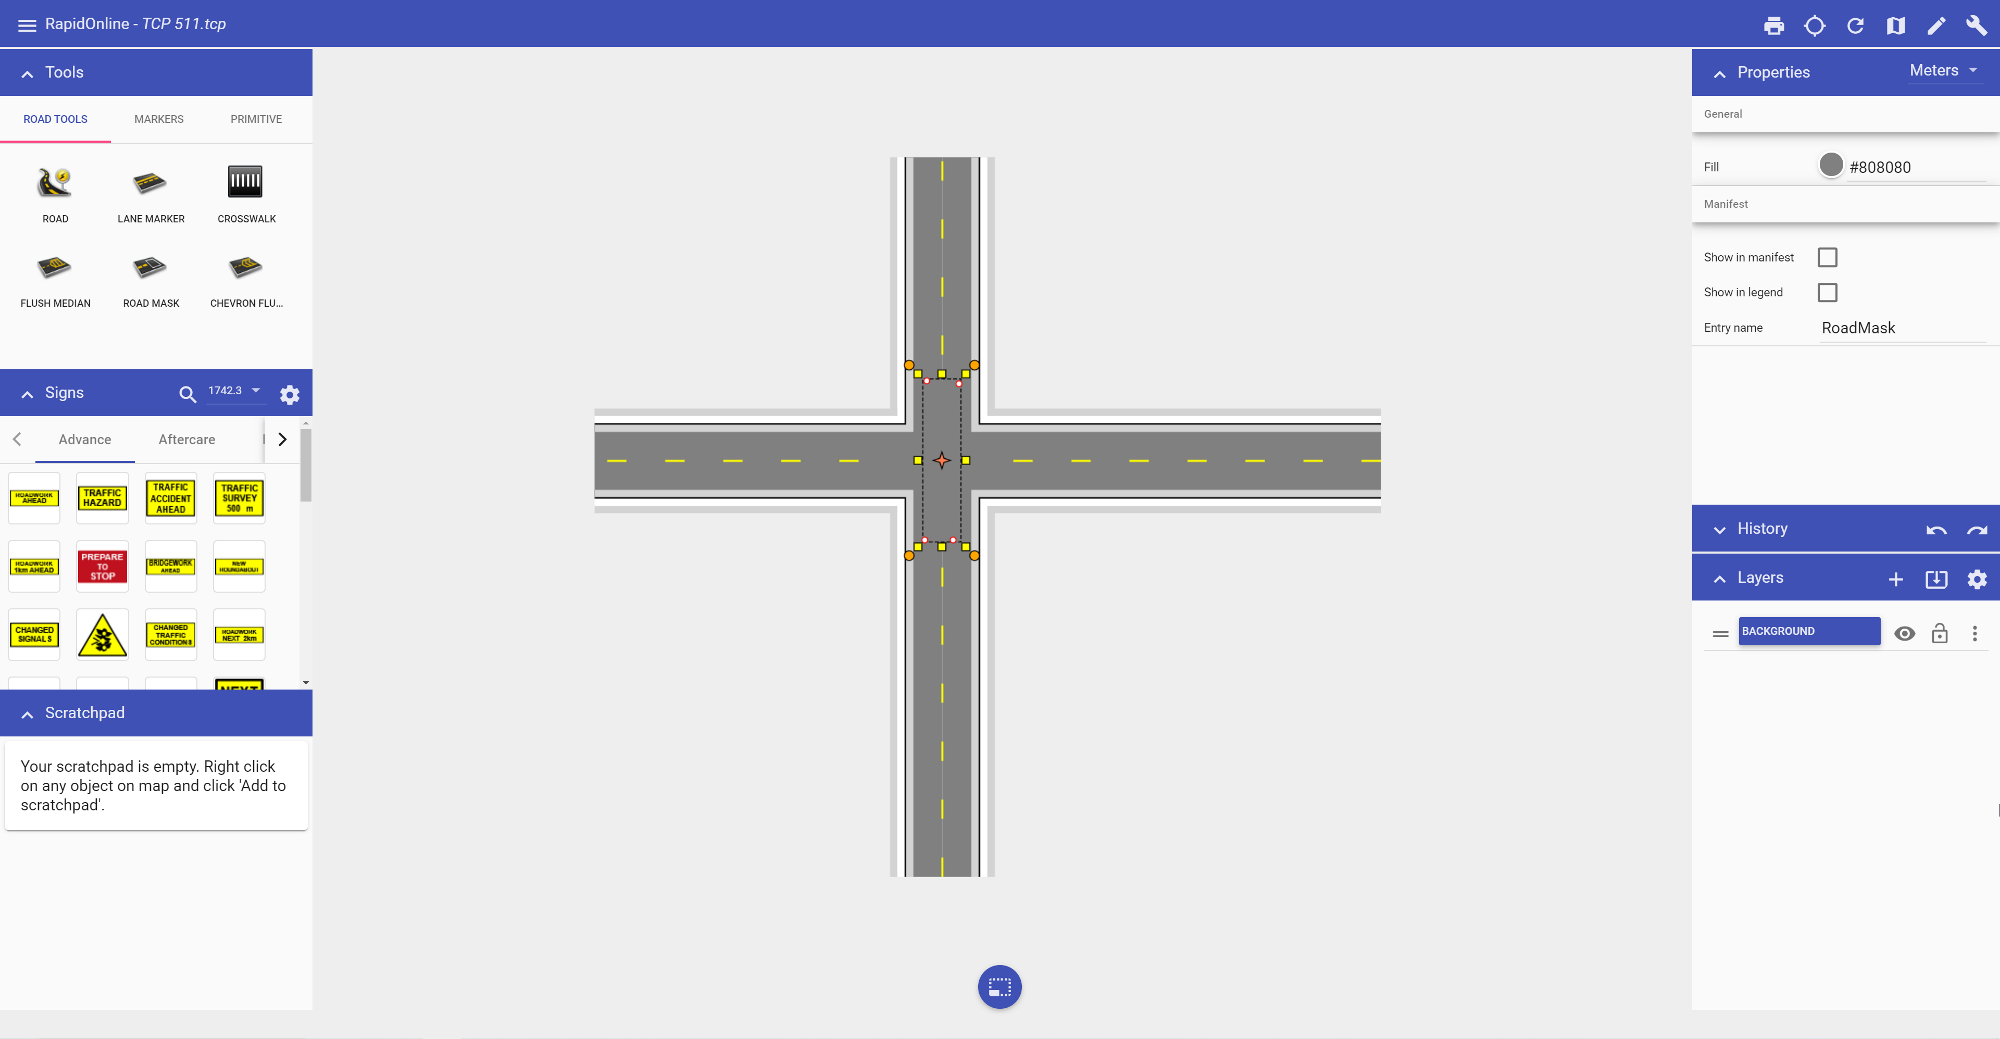
To cover up lane markings:
- Select the road mask tool from the Road tools in the Tools palette;
- Start using the tool as you would use the Work zone tool drawing a perimeter of the road mask enclosing all the lane markers you want;
- Right click to finish.
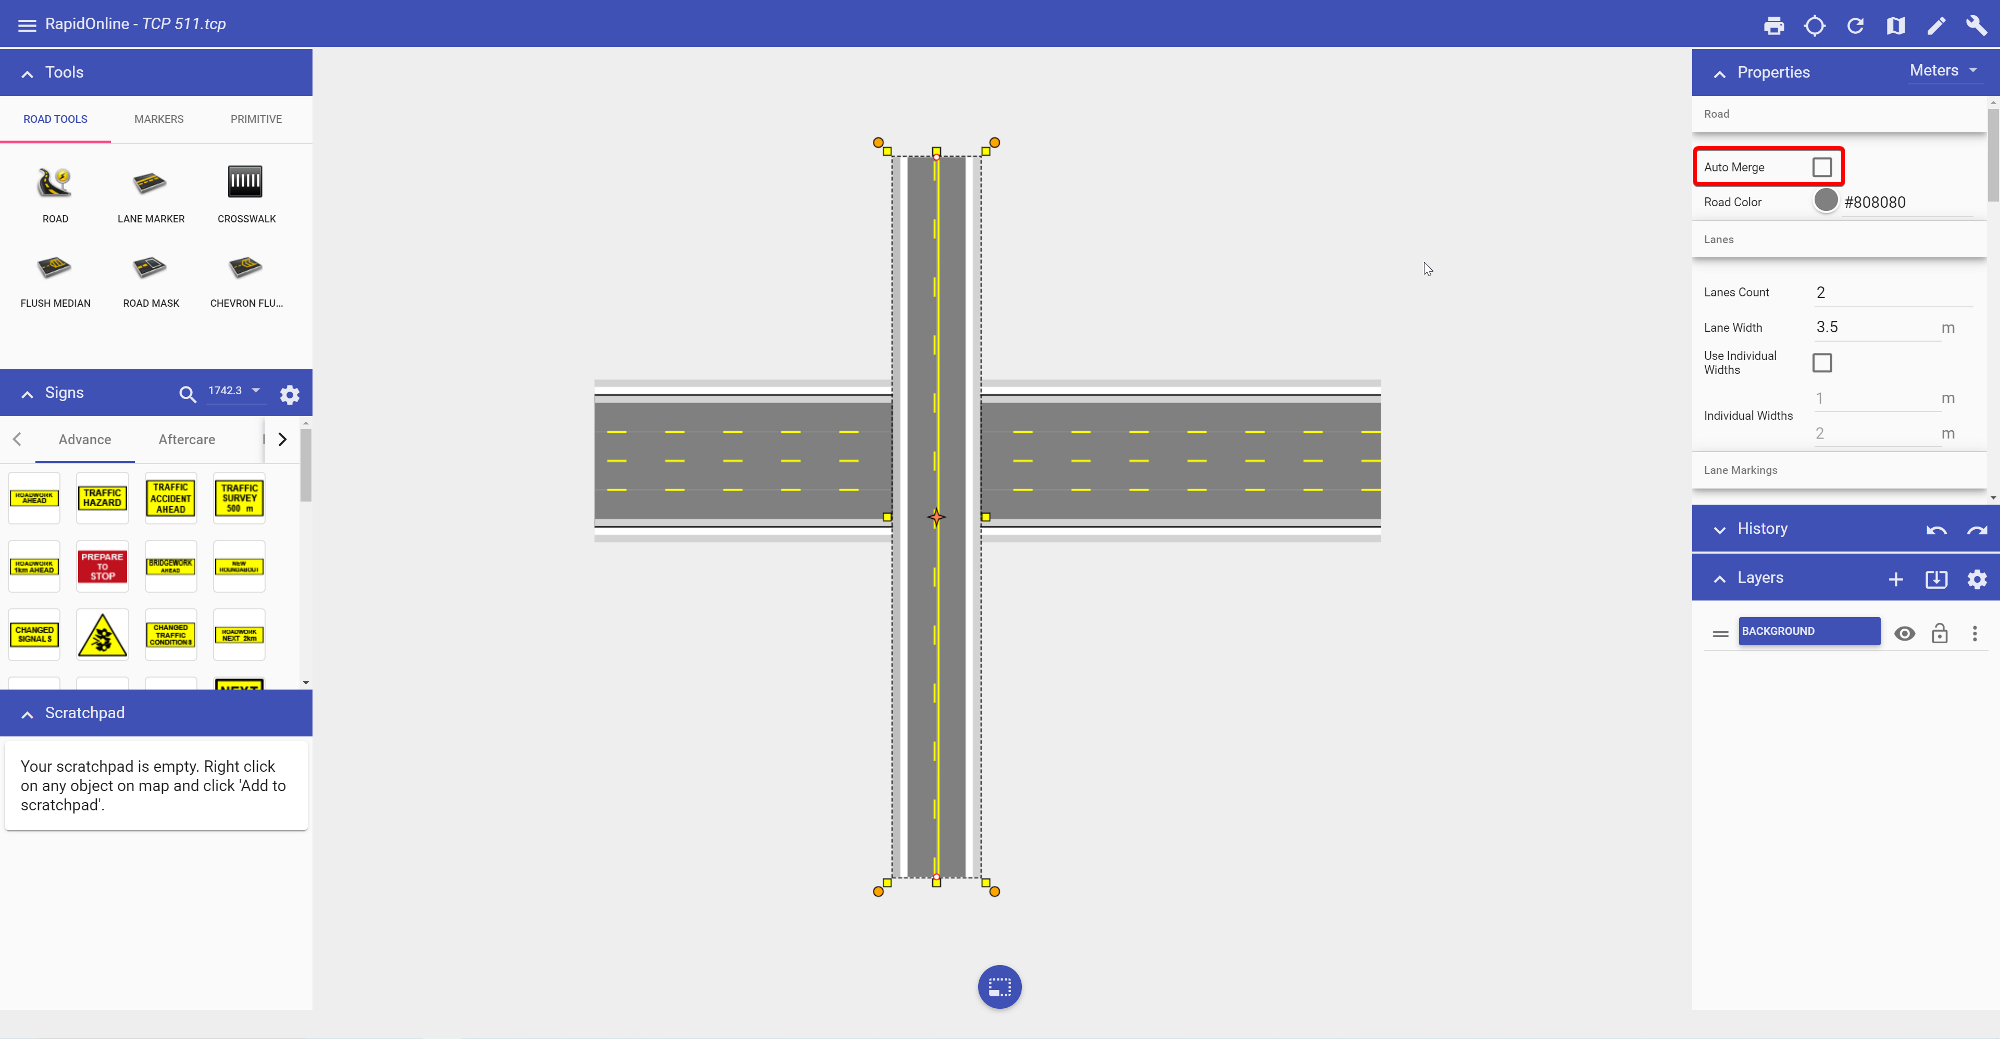
To create an overpass:
- Select the road you want as the overpass;
- In the Properties of the selected road, uncheck Auto merge;
- Style the overpass road as required.
6.6 Creating a crosswalk
The Crosswalk tool is a handy tool that creates crosswalks on any road that you draw. There are a few options available when editing the crosswalk. You can change the crosswalk width and type to parallel or hatched. The stripe width and spacing can also be changed to accommodate your specifications. All of this can be changed in the crosswalk Properties.
To create a crosswalk:
- Draw your road;
- Select the Crosswalk tool from the Road tab in the Tools palette;
- Place your cursor where you want the crosswalk to start and left click your mouse once to start drawing;
- Right click to finish drawing.
Chapter 7: The Marker Tools
Along with the sign tools, the marker tools are the second traffic plan specific toolset included in RapidPlan Online. These essential items are used to mark important information items on your scheme in short spaces of time.
7.1 Delineators
Traditionally, one of the most difficult things to do when creating a traffic plan was run out lines of bollards, cones, barrels, etc. The RapidPlan Online delineator tool allows you to drag out lines of devices in seconds.
Types of delineators available:
There are thirteen standard types of delineators available:
| Name | Delineator |
|---|---|
| Barrel |  |
| Barrier |  |
| Bollard |  |
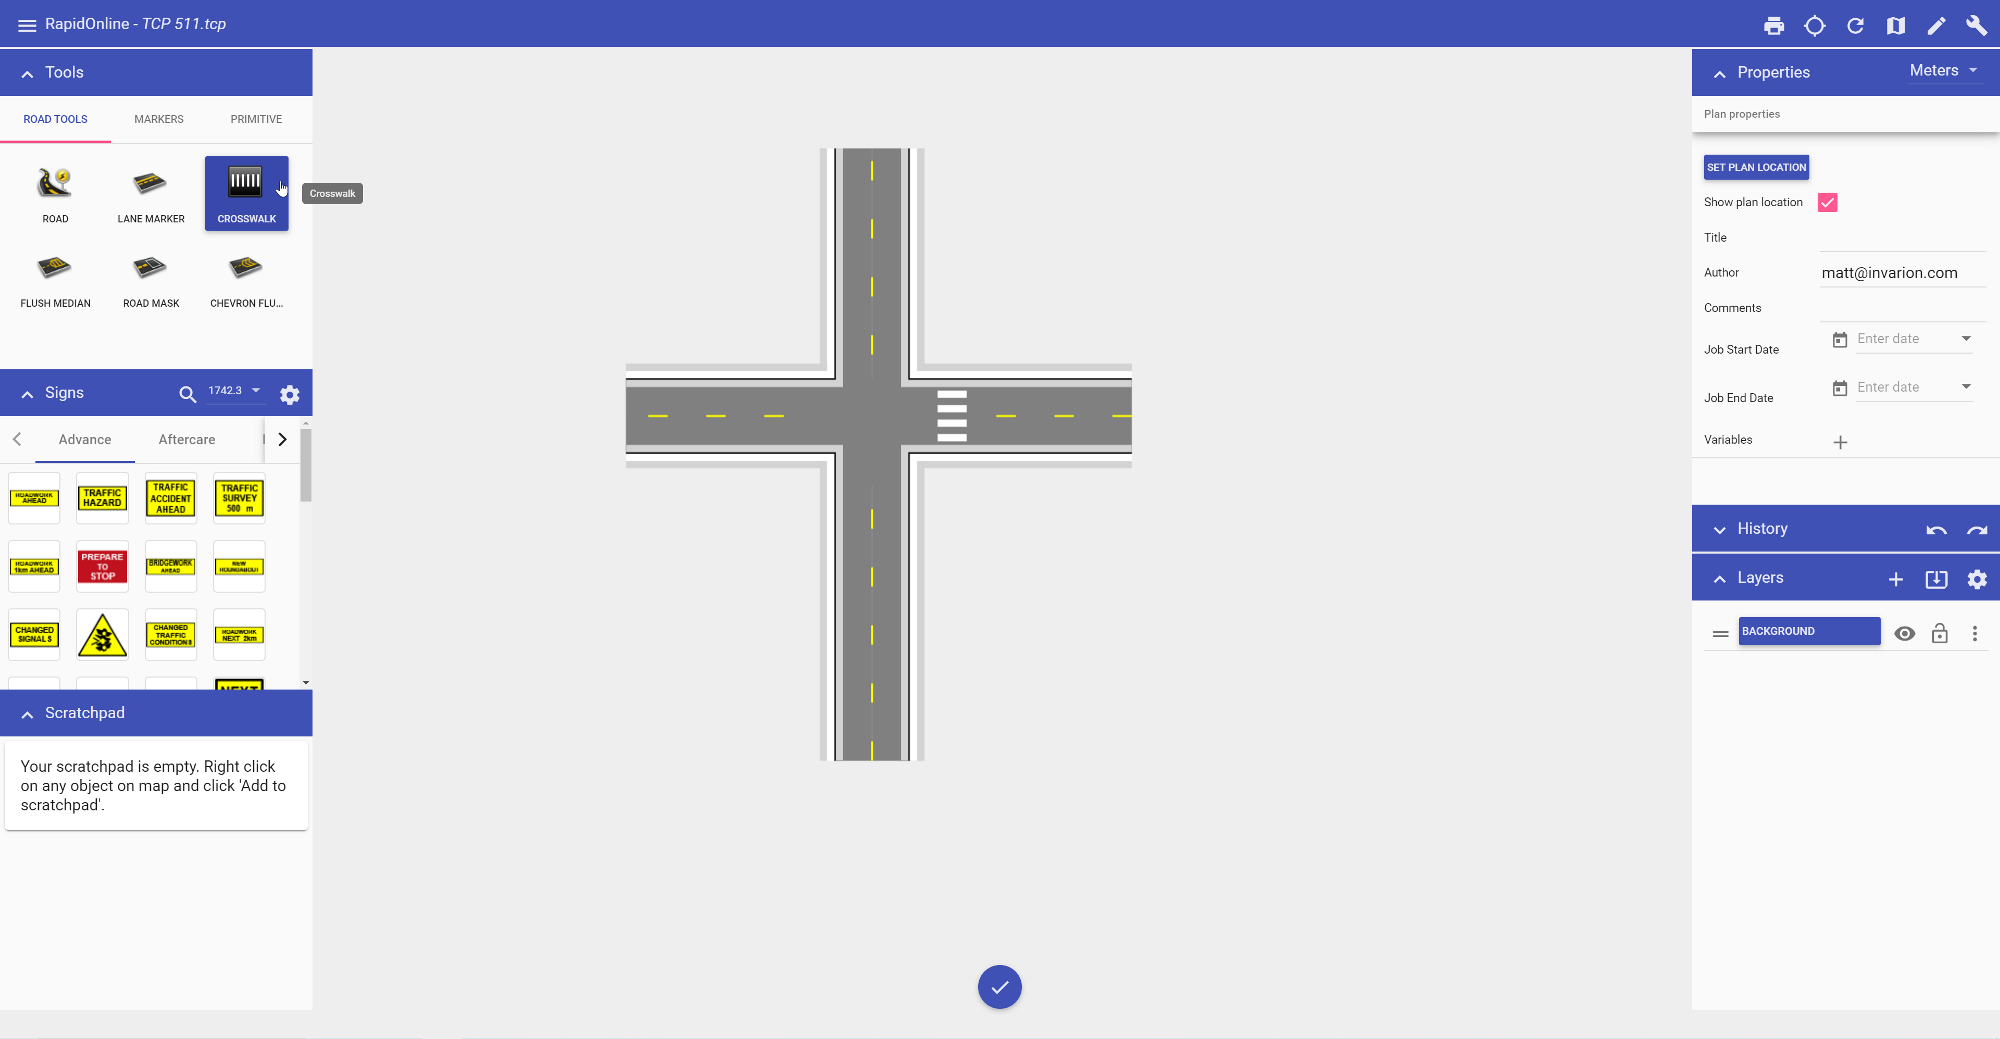
| Cone |  |
| Jersey |  |
| Para webbing |  |
| Pedestrian tape |  |
| Safety barrier |  |
| Tubular |  |
| Type 1 Barricade |  |
| Type 2 Barricade |  |
| Vertical faced panel |  |
| Water filled barrier |  |
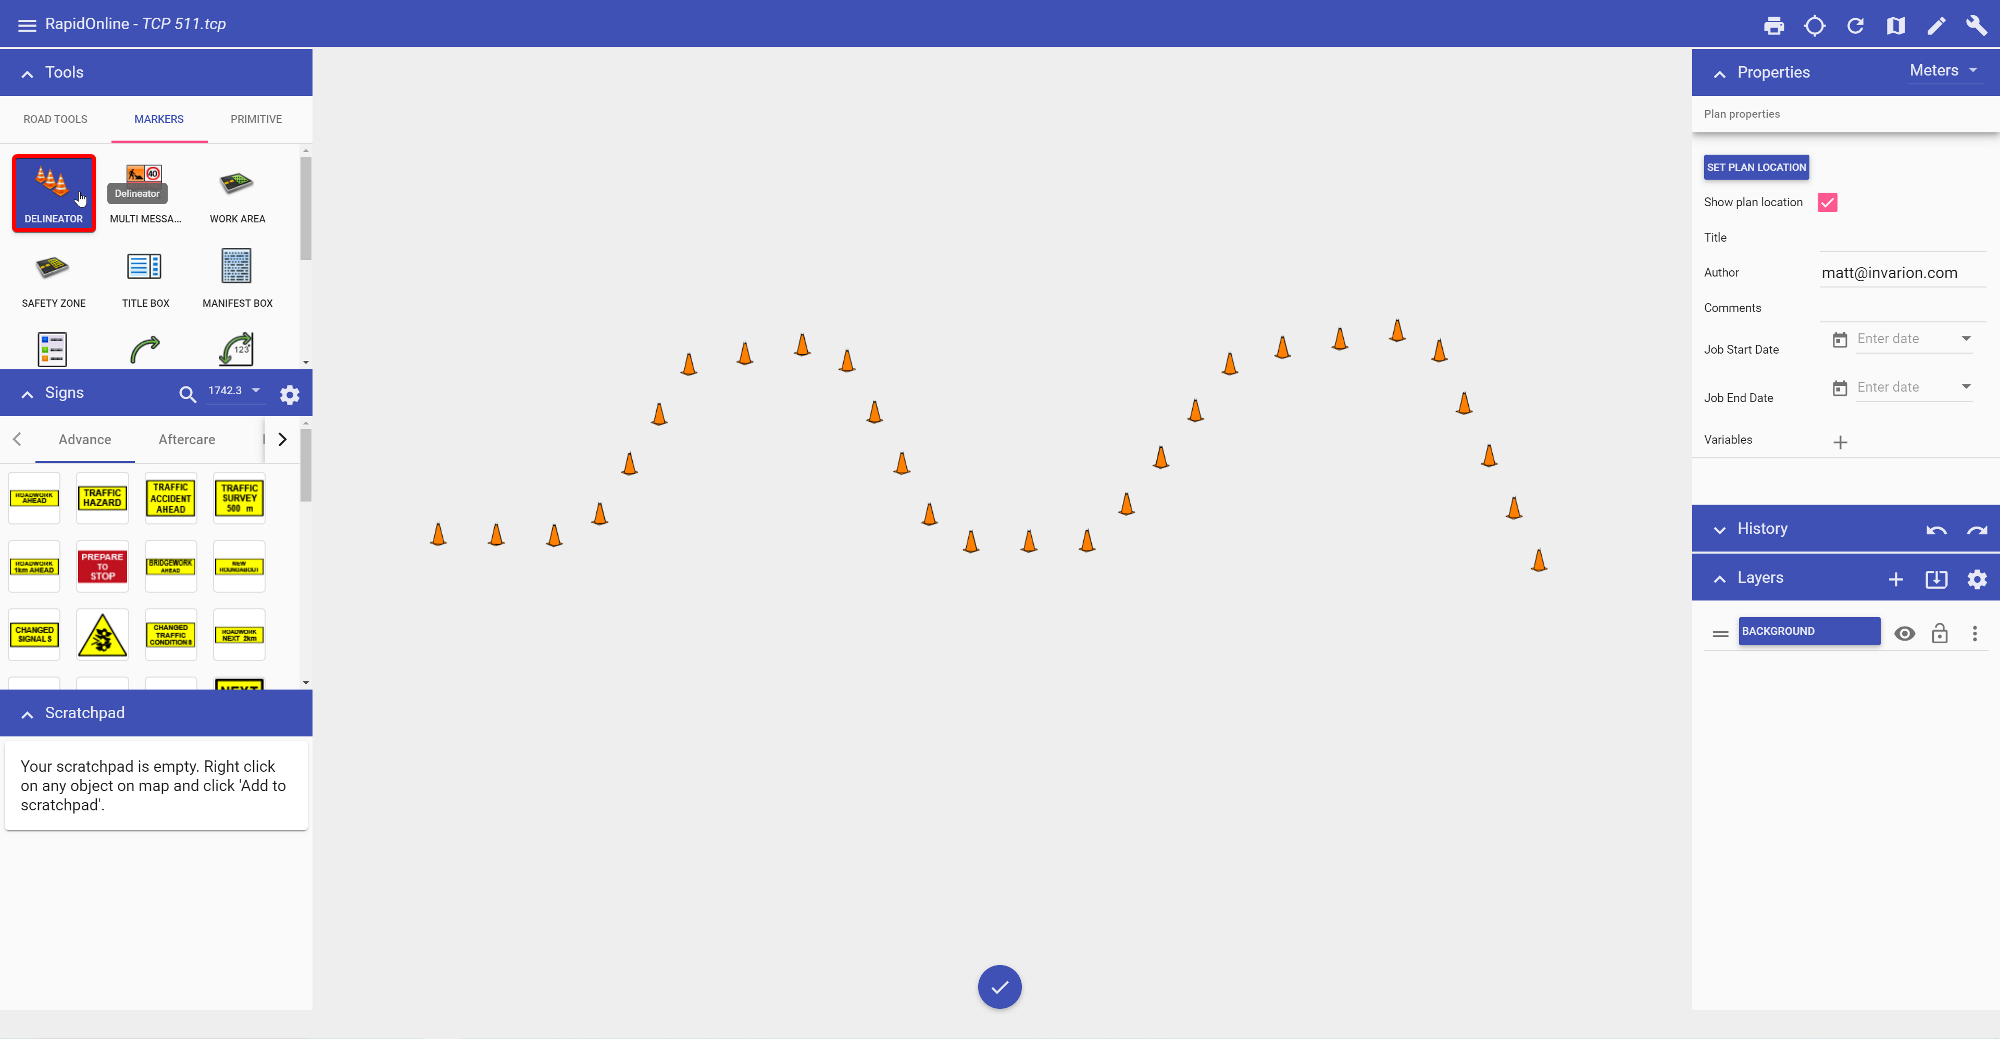
7.1.1 Creating a basic delineator line
All delineator lines start by default as Cones. They can then be changed into the required type after placement on the plan. You can also set new values for the spacing and size of the delineator from the Properties palette.
To create a basic delineator line:
- Select the Delineator from the Markers tab in the Tools Palette;
- Click once where you wish to start drawing (don't hold);
- Click at each corner for your line, to drop a control point;
- After you have placed the end point, right click to stop drawing;
- Right click to clear the cursor.
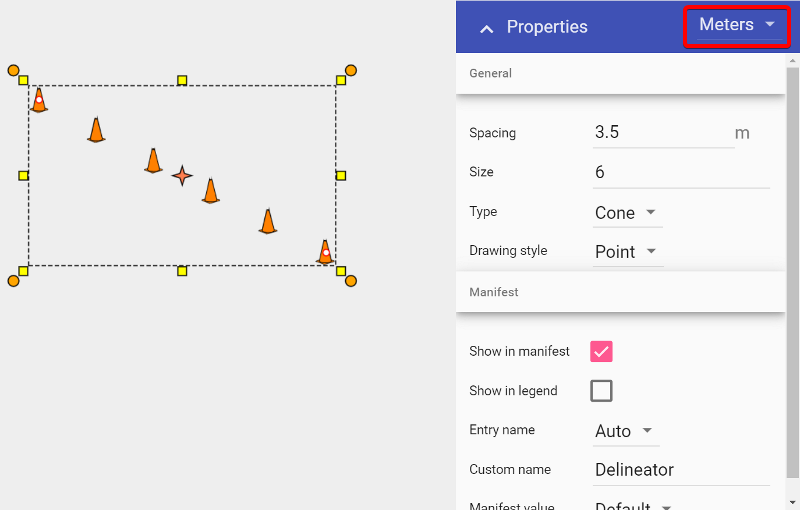
7.1.2 Changing the properties of your delineator
Once your line is on the plan, you can change the various Properties of your delineator.
To change delineator types:
- Select the delineator line on the plan and observe the Properties Palette;
- Click on the Type drop down box and choose the type of delineator required from the Type drop down box.
To change size and spacing:
- Chance spacing by entering value in the spacing box;
- Change your size in the size box by entering a value, by default it will be set at 6;
- The drawing style of the delineator can also be changed (Point, Contiguous, Parallel).
Note: To change your unit of measurement, click the drop down box highlighted in Resources/Delineator_Properties.png
7.2 Creating a distance marker
There are four distance markers used for indicating spatial information on your plan, the Distance Marker, the Combined Distance Marker, the Offset Distance Marker and the Angle Marker.
In essence, all of these distance markers do exactly the same thing - they indicate to a reader the distance between elements. They all automatically calculate the distance and enter its amount. You can also enter your own values if needed.
Irrespective of which distance marker you are using, the technique for creating it is much the same.
To place a Distance Marker:
- Select your Distance Marker tool from the Markers tab in the Tools Palette;
- Click once to start drawing the distance marker, click a second time to mark the end point;
- Right click to finish.
Quick Tip: It is helpful to hold Shift whilst drawing the distance marker to keep it straight.
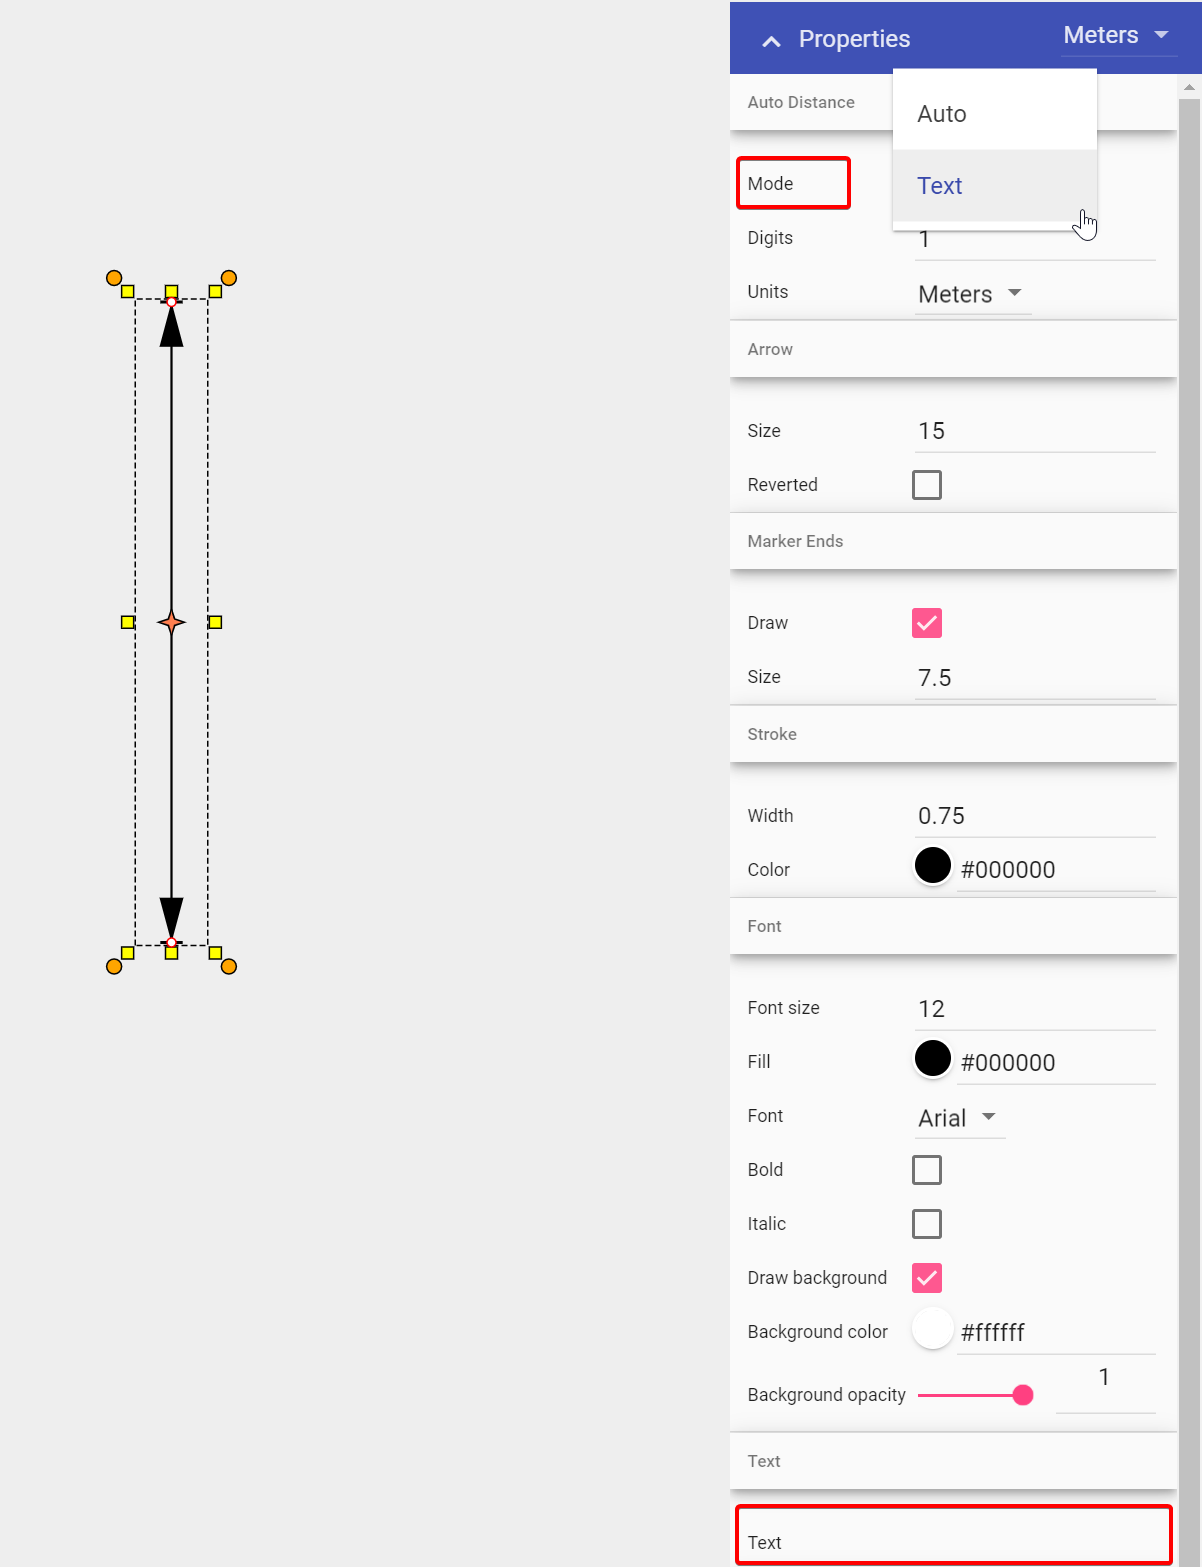
7.2.1 Editing the distance on the marker
If you wish to define your own distance on the marker, simply follow the steps in Resources/Setting_Distance.png below.
- Select the Marker;
- Navigate to the Properties palette;
- Change mode from Auto to Text, enter desired Distance in Text heading;
- Click anywhere on your plan to finish.
7.3 Work zone tool
The work zone tools are designed to show where the site works are going to take place. In RapidPlan Online these are simple polygon drawing tools which are easy to apply to your plan.
7.3.2 Drawing a work zone
- Select the appropriate tool (Work zone, Safety zone) from the Markers tab in the Tools palette;
- Click at the first corner point of your required area and continue clicking to set corner points;
- When the final point is placed, right click to stop drawing;
- Right click to clear the cursor.
An example work zone is shown in Resources/Work_Zone_Tool.png below.

7.4 Legend/Manifest tool
The Legend and Manifest tools are used as object references for your plan. The Legend box is a visual representation of any objects you have displayed. The Manifest box will give you a running total of objects placed on your plan.
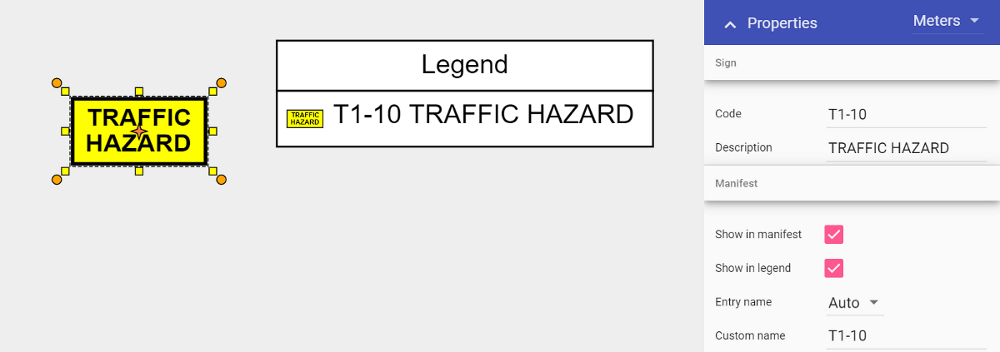
7.4.1 Adding a legend box
- Select the Legend Tool from the Markers tab in the Tools palette;
- Place this in the desired location on your plan;
- Select an item on your plan that you want to appear in the Legend Box by clicking on it once;
- Under the Legend & Manifest tab in the Properties palette make sure the Show in Legend section is set to True;
- Do this for any other items on your plan you wish to appear in the legend.
Note: If you change Entry name from Auto to Custom, you can edit the sign entry name that displays in the Legend box.
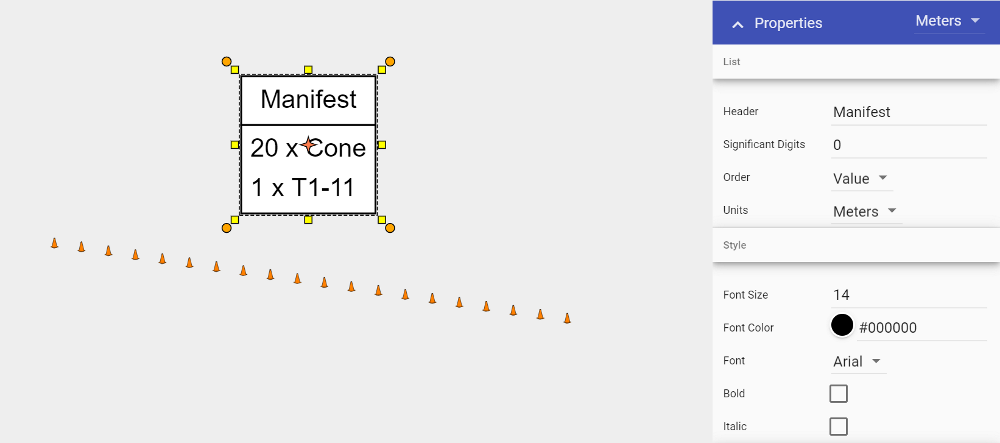
7.4.2 Adding a manifest box
The manifest box works the same as the Legend box when adding, you can also determine what appears in the manifest by selecting an object and then adjusting its properties.
You can order your manifest by Value or Name, by toggling the selection under the Order subheading.
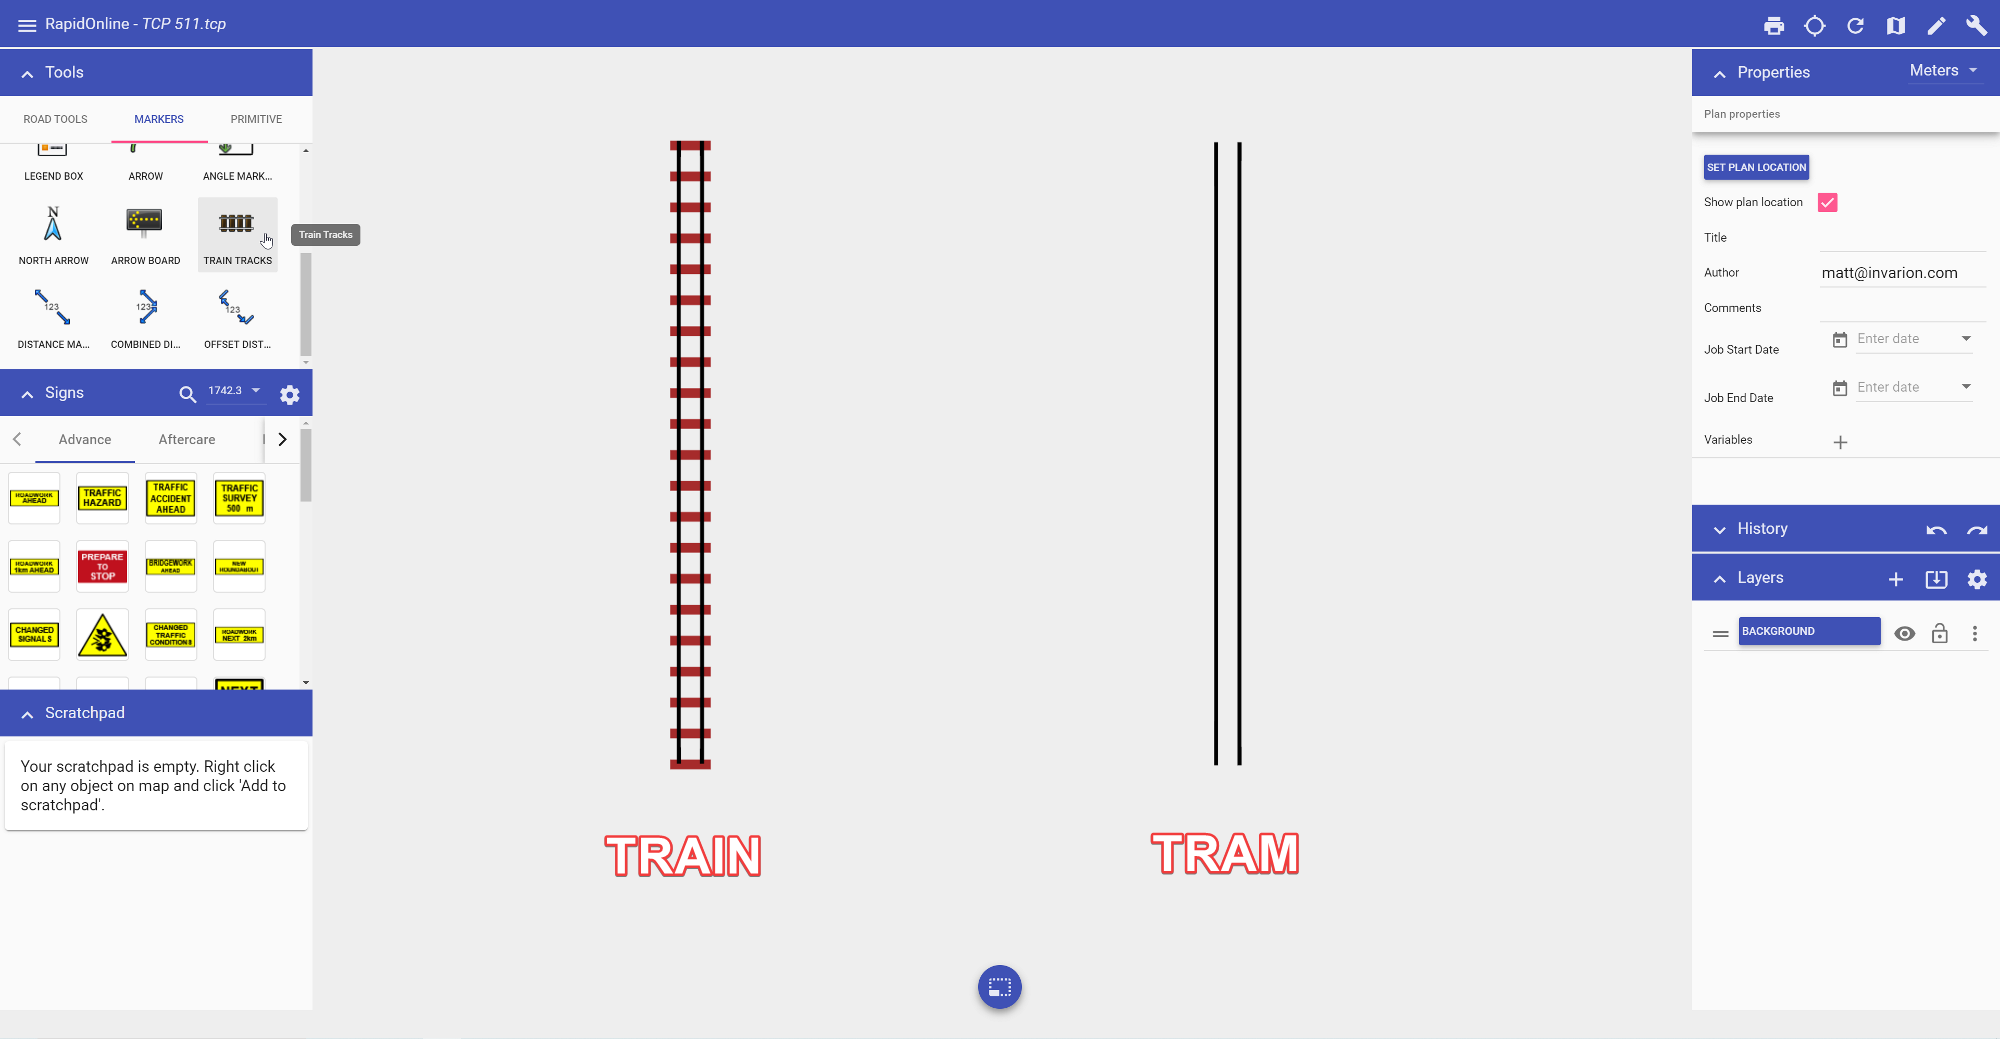
7.5 Train track tool
The Train Tracks tool allows you to quickly add train or tram (light rail) lines to your plan.
To place a train line:
- Select the Train Tracks tool from the Markers tab in the Tools Palette;
- Click once to start your rail line;
- Click at each turn point;
- Right click to stop drawing.
To place a tram line, once the tool is selected, navigate to in the Properties palette and change the Type value from Train to Tram.
Examples of train and tram tracks are show in Resources/Train_Tracks_Tool.png below.
7.6 Arrow board tool
They come by many names, flashing arrow boards, sequential arrow boards, arrow trailers or even illuminated trailer mounted sequential flashing arrow systems. In RapidPlan Online they are referred to as Arrow Boards. They are simple to place and use and come with various configurations for the required site setting.
There are six different Arrow Board patterns available, as shown below.
| Patterns | |||
|---|---|---|---|
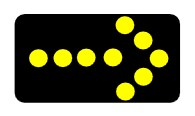 |
Single |  |
Double |
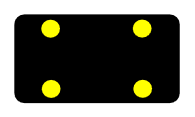 |
Warning | 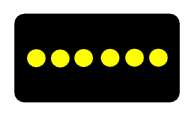 |
Cautionary |
| Chevron |  |
Diamonds |
Placing an Arrow Board:
Select the Arrow Board from the Devices tab in the Tools Palette;
Drop it into position on the plan;
Rotate it as necessary.
Note: by default the Arrow board appears as a Right flash. If you require a Left flash, use the context menu to flip the object.
![]()
7.7 Multi-message marker (Australian version only)
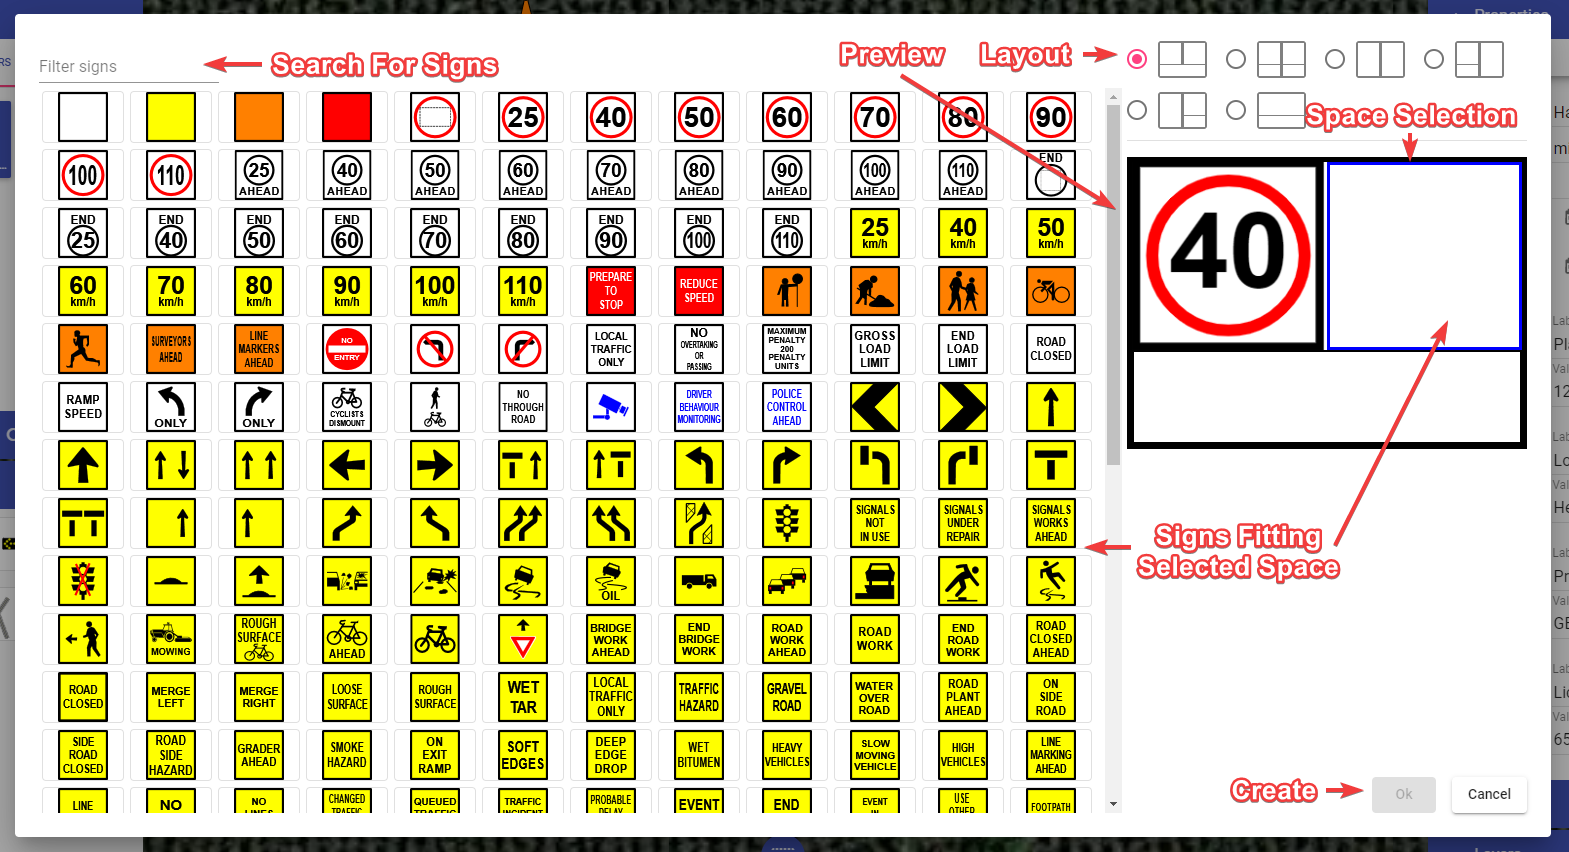
When this tool is selected, a Multi Message Sign the multi-message sign creator window appears (shown in Resources/Sign_Editor.png). Here you make all the necessary adjustments to the message board you will be utilizing in your plan. You will have many different signs to choose from and can select up to three signs for the message board.
Multi Message sign placement:
- Select the Multi Message Sign tool from the Devices tab in the Tools palette. New dialogue will appear.
- Choose the right layout for your multi-message sign in the top-right corner of the dialogue.
- Choose a the space you want to fill out by clicking on it in preview. A signs with proper size will appear on the left.
- Browse through the available signs or use the filter input to search for the desired one.
- Click on the sign to populate the selected space in the MMS frame. Space selection will automatically move to the next space.
- When multi-message sign is finished click OK and drop the created sign on your canvas area.
Quick tips:
- Once created, save the multi-message sign to your Scratchpad for later use.
- You can edit already creates multi-message signs. To do this, click on "Edit MMS" button inside sign's properties.
To list multi-message sign in the manifest select the multi-message sign you want to appear in the manifest and check the "Show in manifest" checkbox in its properties. You have different options for displaying multi-message sign in the manifest:
Default - The multi-message sign occupies a single position (row) in the manifest, listing all the signs in the entry name.
Panels - Each sign that builds multi-message sign occupies a different position in the manifest.
Panels & Frame - Same as above. But, additionally to the signs, the manifest will also list the multi-message frame.
Choose desirable option in multi-message sign's properties, this setting is called "Manifest entries".
Chapter 8: Using the Signage
The layout of the Signs palette was discussed in Chapter 4.4. This Chapter details using the signing on your canvas area.
8.1 Placing signs
Placing signs is simple. Once your sign is placed you can move, resize and rotate it.
To place a sign:
Select the desired sign from the The Signs Palette by clicking on it;
Float the sign out onto the canvas with the mouse. Note that you don't have to hold the mouse button while you drag your sign;
Click to drop the sign on the canvas.
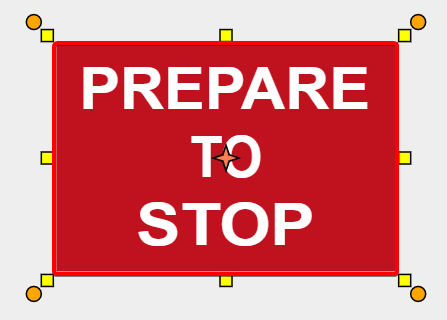
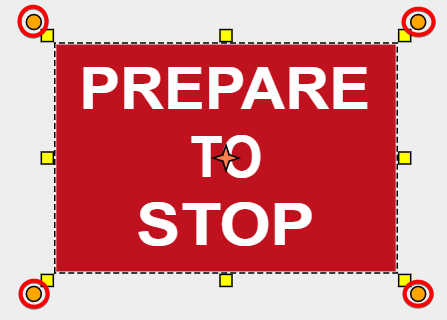
8.2 Adjusting signs
Once a sign is placed on the canvas area, there are a couple of ways you can adjust it.
To Flip by 90 degree increments:
Right click on selected sign, go to Flip, then select Horizontally or Vertically.
To Rotate freely
The orange handles on the exterior of the sign allow you to freely adjust the orientation of the sign. Simply left click and hold to move the sign at any angle.
To Resize signs
The yellow handles on the outer of the sign allow you to adjust the signs size, simply left click and drag out to desired size. To resize the sign uniformly, simply hold down the Ctrl key while resizing it.
8.3 Editing signs
All signs are made up of basic objects (text, shapes, etc). Not only does this make it easy to adjust the speed on a sign, for instance, it also makes each sign object completely customizable.
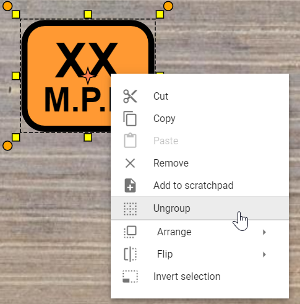
To edit a sign, simply select it on your canvas area, right click, then select Ungroup. This will separate the sign into it's basic objects.
Note: Some signs with multiple objects may require more than one ungroup.
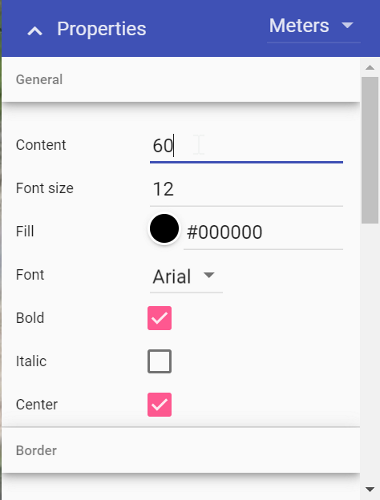
Once you have ungrouped the objects, you will be able to edit, move and change the individual properties of each object within the sign.
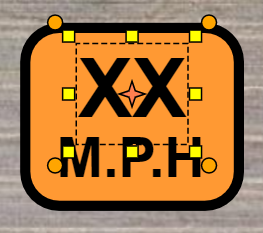
For example, in Resources/Ungrouped_Sign.png above, the first text object is selected. In its properties you can then change the value to a specific amount.
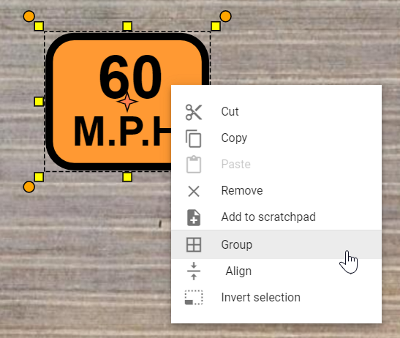
To regroup the sign objects, simply select all of the objects by using a (click and drag) selection window. Then, right click and select Group, as shown below. You have now edited and created a new sign.
Quick tip: Add the new sign to your Scratchpad for later use, by selecting ''Add to scratchpad'' in the context menu. For more information on using the Scratchpad, see Chapter 4.4.3.
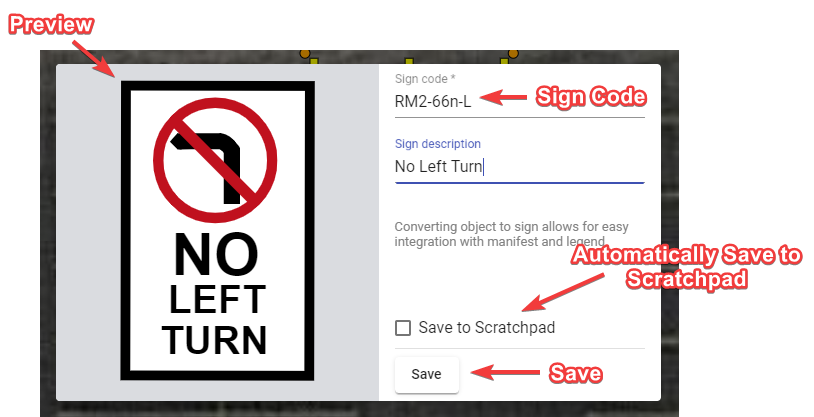
8.3 Creating custom signs
You can create a custom sign from primitives and/or parts of other signs (each sign can be ungrouped into basic shapes). When you finish preparing your sing, click the right mouse button on your object/objects and choose the "Convert to sign" option from the context menu. In the dialogue that will show up fill up the sign code and the sign description fields, and press "save". Your object/objects will be converted to a sign. This will allow for easy integration with the manifest and the legend, as your custom sign will have proper sign properties ("show in manifest", "show in legend", etc.). The sign you created will not appear in the signs library, but you can save it to the scratchpad for later use.
Chapter 9: Printing and Exporting
Completed plans can be printed directly from the application, or exported as a PDF and Image file.
9.1 Printing dialogue
When your plan is ready for Printing or Exporting, simply select the Print option in the Main Menu, or click the printer icon ( ) in the toolbar. Once selected, the following print dialogue window opens, containing several options to customize your document.
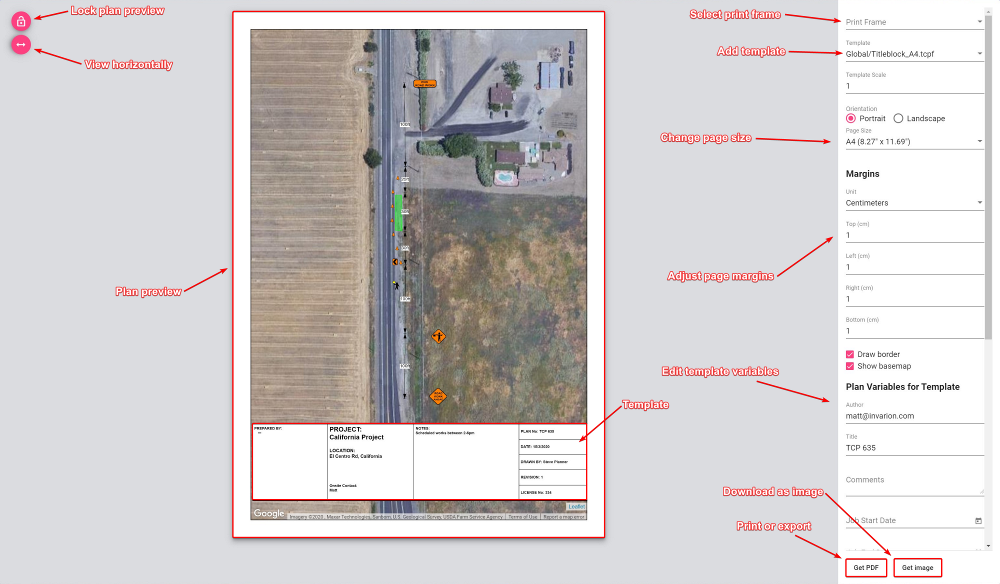
These options include:
Plan preview: The preview of your plan in the center shows how your plan will print out. In this preview window you can adjust the plan to fit the page size, by simply clicking and moving the map around, or by simply scrolling up and down to zoom in and out on the map area.
Lock plan preview: The lock plan preview button locks the ability to adjust the plan preview.
View horizontally: The view horizontally button adjusts the view of the plan for different screen sizes. For example, a laptop screen is quite often smaller - this button adjusts the view so that you can view the plan appropriately on your screen.
Print frame: Select a print frame from this box. You can select multiple print frames for multi-page print. Refer to Chapter 4.2.3 for adding print frames to your canvas area.
Template: Here you can select a template for your desired page size. Templates include generic title blocks where plan information can be added.
Plan variables for template: Add and edit the information in the title block.
Page size and orientation: Change the page size and orientation to suit your printout. When selected you will also need to make sure, if you have added a template, that it matches the page size/orientation you have chosen.
Page margins: Adjust the page margins.
Print or export: When ready to print, simply select the Get PDF button to download your plan as a .PDF file, or select Get Image to download the plan as a .PNG file.
9.2 Printing and exporting plans
Once the Get PDF button has been selected, you will be able to Print or Download your plan to PDF.
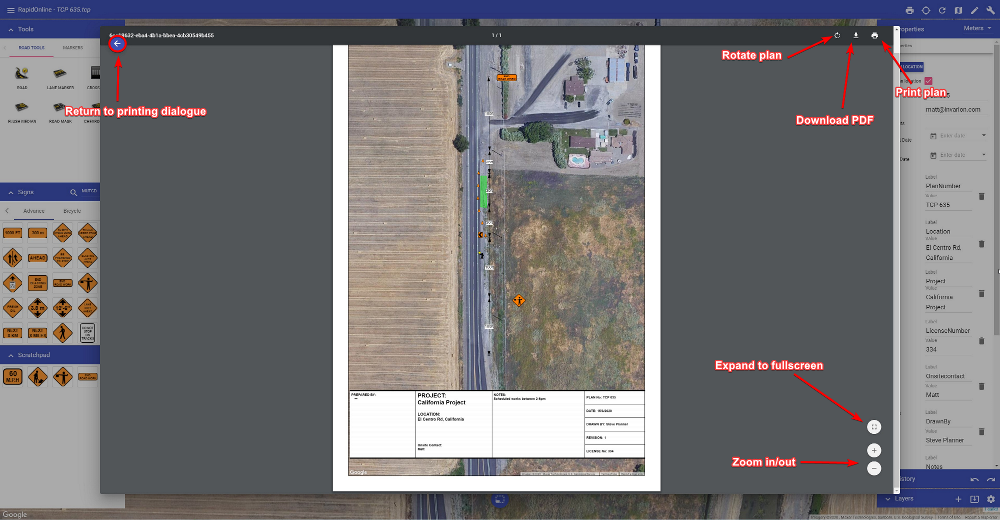
As shown in Resources/Print_Output.png above, clicking the Download PDF button will allow you to save your plan as a PDF file. This will then open your default PDF application and show you a preview of your downloaded plan. Clicking Print plan will open your default printer dialogue.
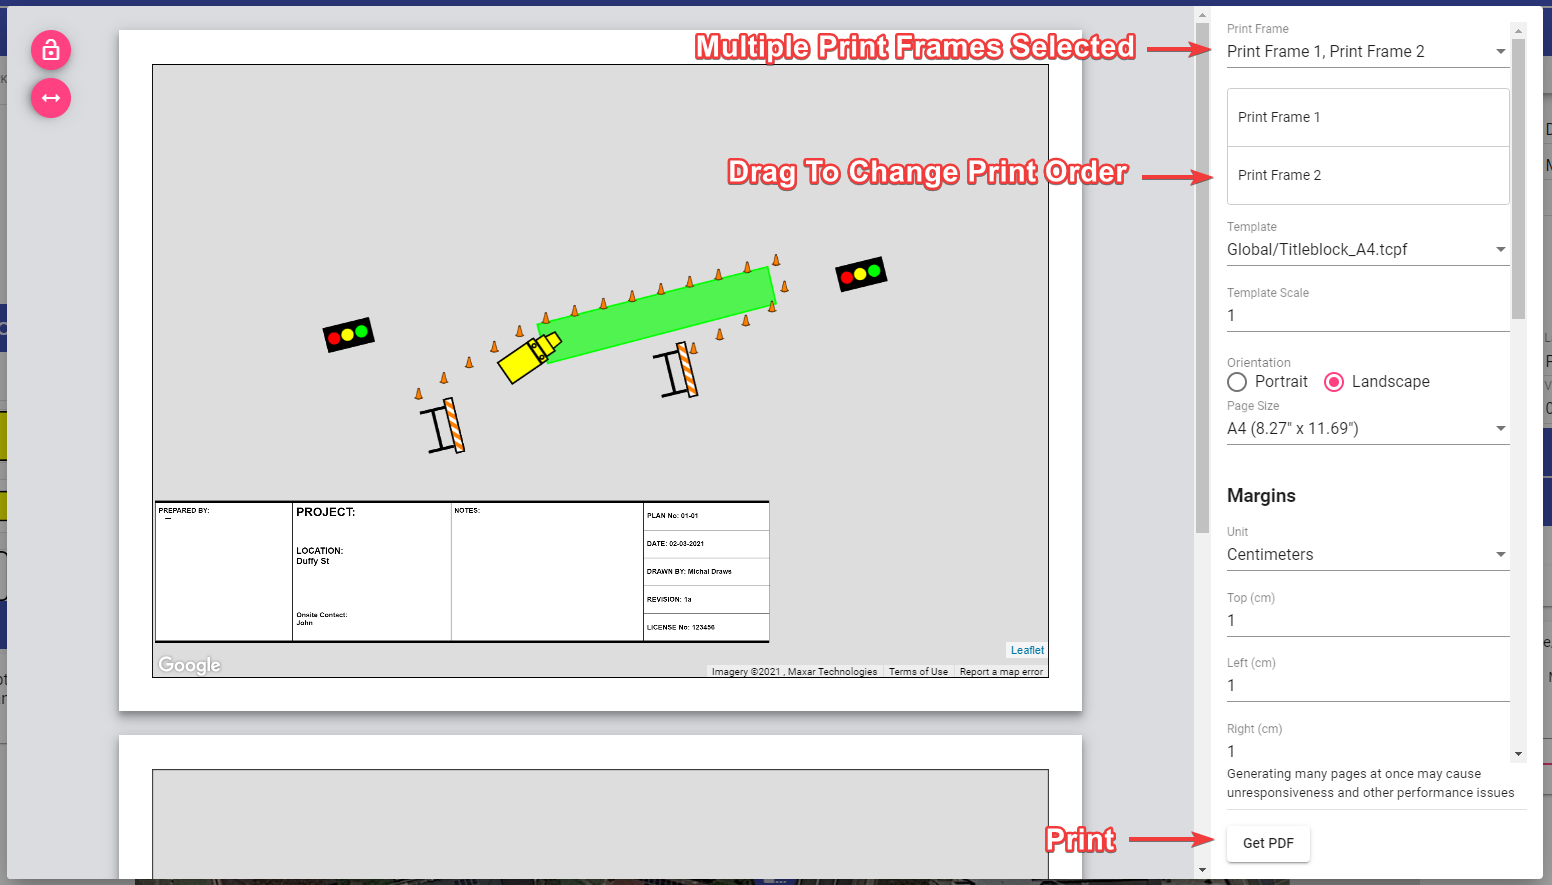
9.3 Multi-Page Export/Print
To export or print multiple pages at once you need to create a print frame for each page. Then, select them in the print dialogue. The order of print frames depends on the sequence in which the print frames were added to the plan. It can be changed in the "Print Frames" section of the layers palette or in the print dialogue itself.
When using multi-page print, template and page options apply to all pages. Options associated with the first print frame in order will be passed to the other pages.
Chapter 10: Location-based Features
RapidPlan Online has two basic location features:
Go to my location - Moves map to your current location.
Toggle my location marker - Shows/hides marker of your current location.
They may come useful when creating the plan or making amends to the plan while being on site. You can find them in the top-bar, under the "location" icon.
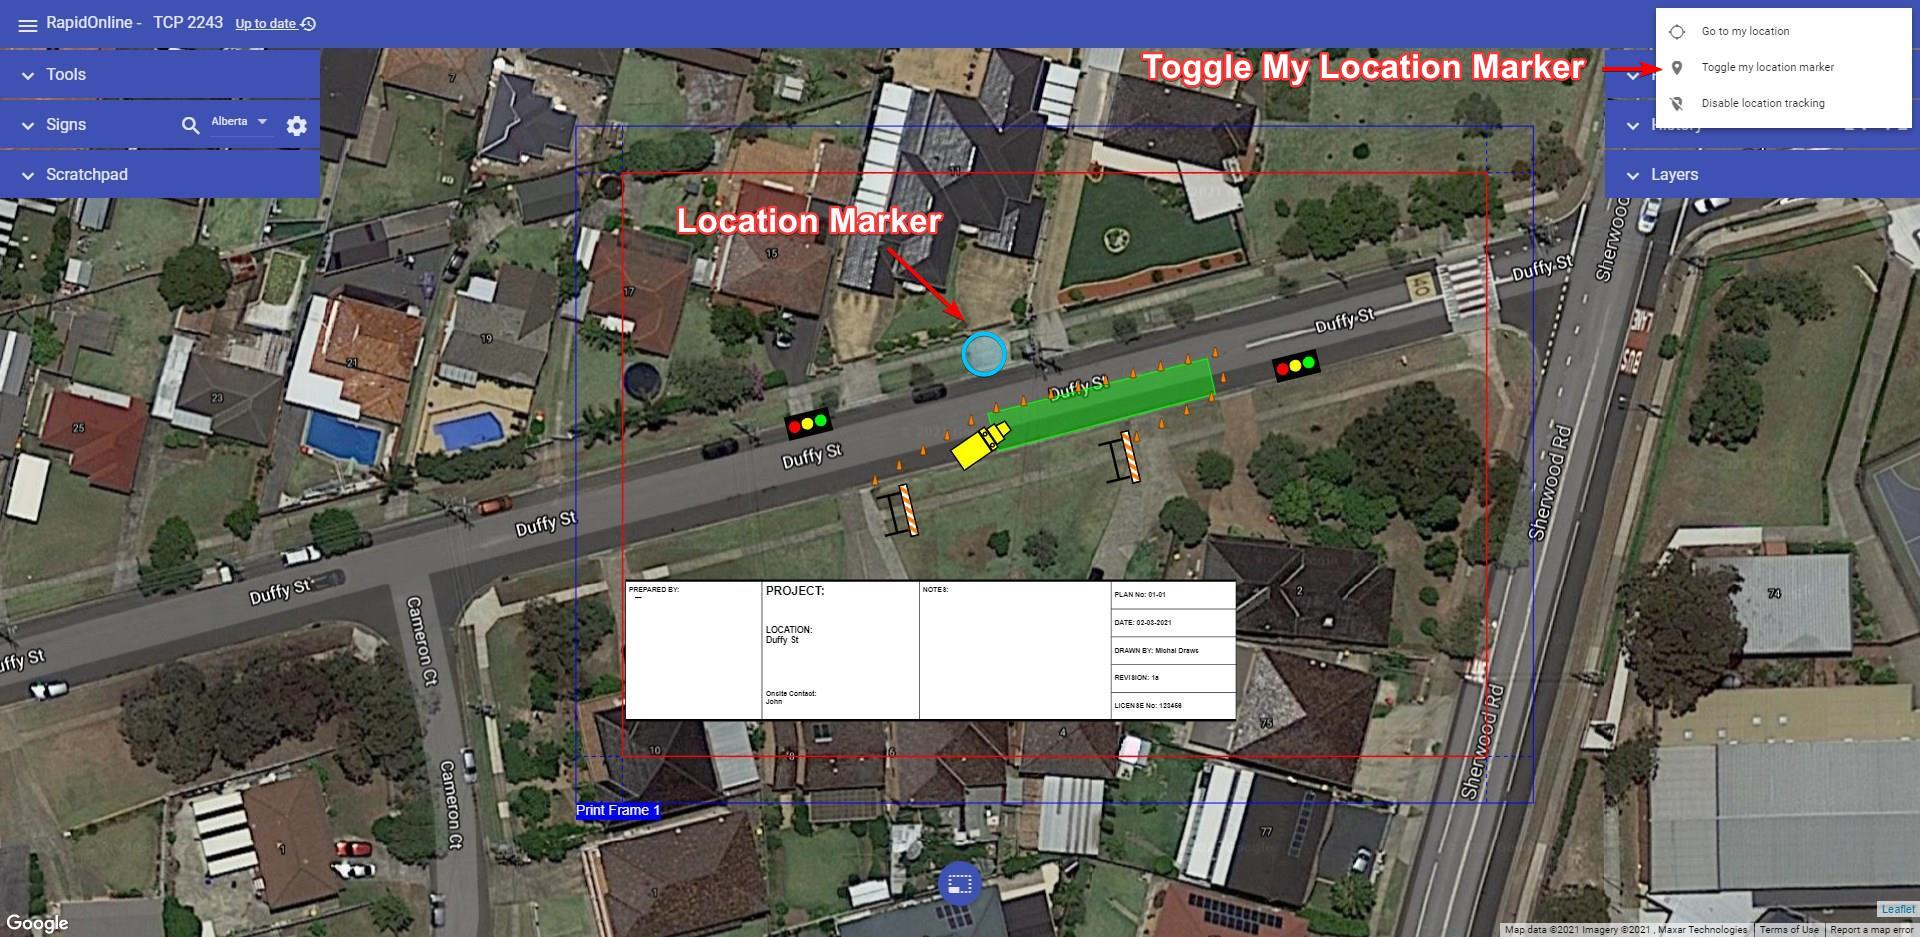
To disable location tracking in RapidPlan Online click on the "Location" button and choose "Disable location tracking".
Note: For the ''Go to my location'' and ''Toggle my location marker'' functions to operate, location services must be enabled on your device.
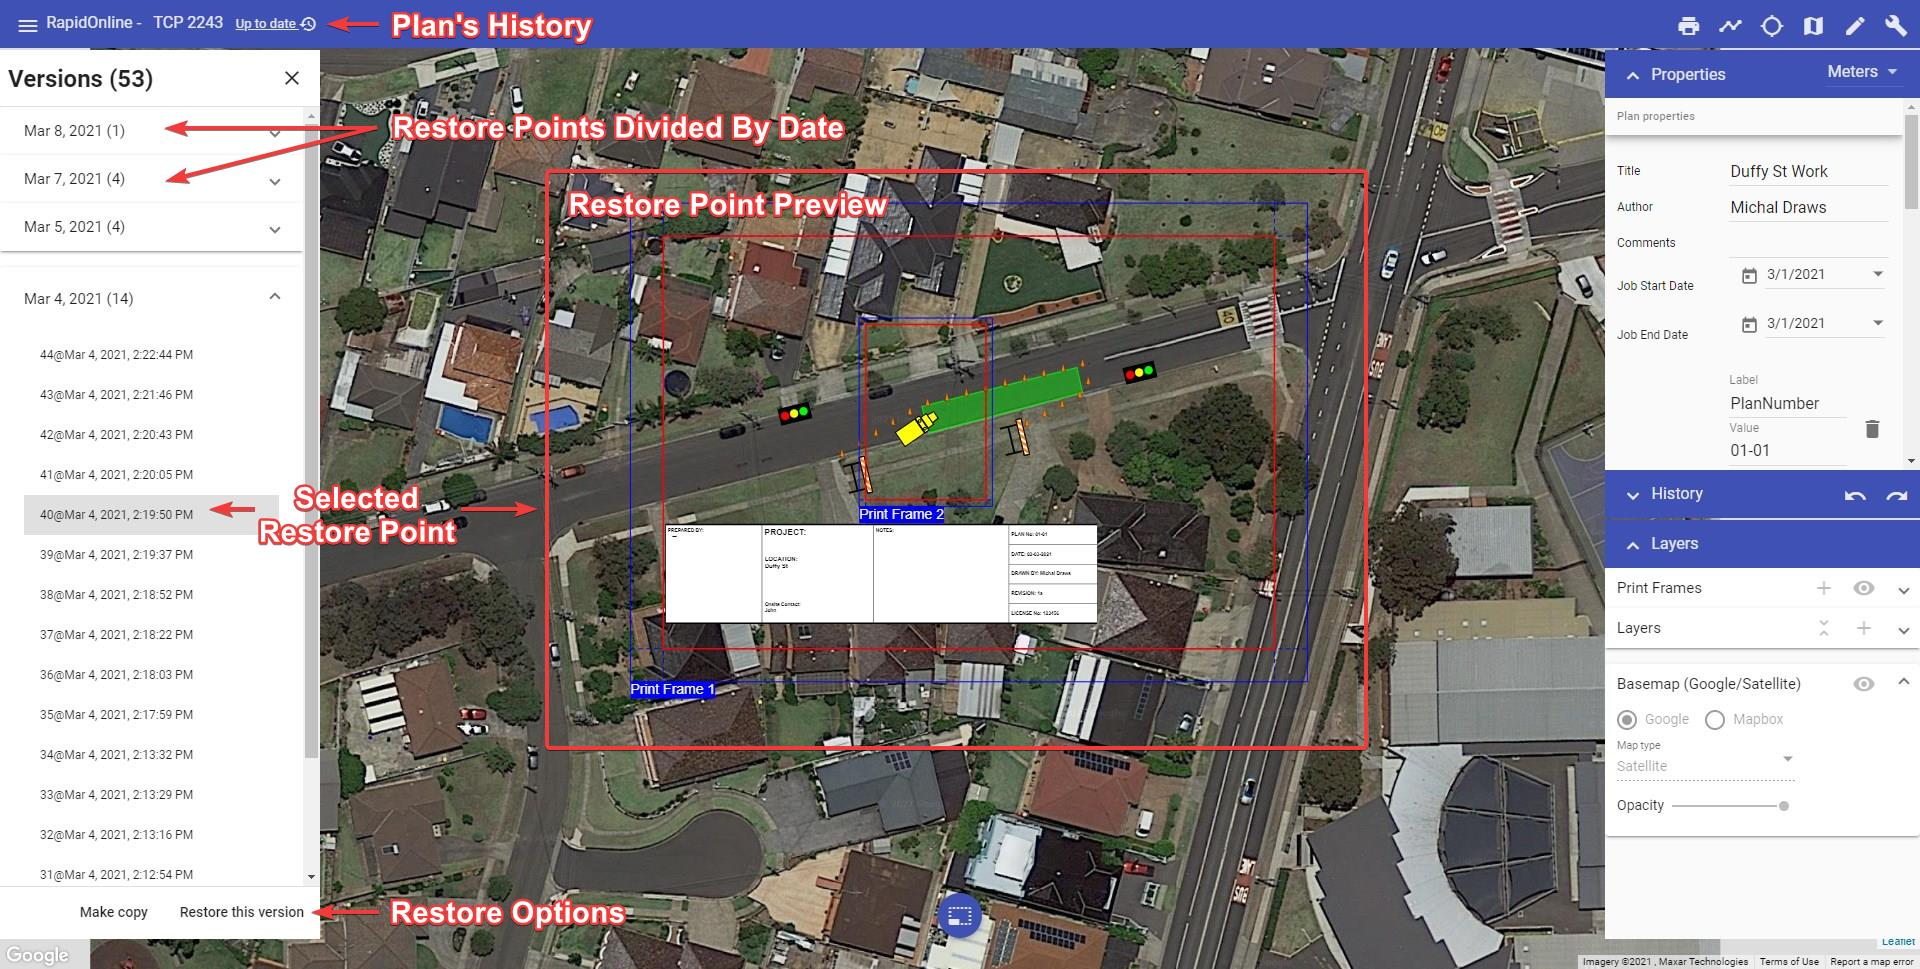
Chapter 11: Restoring Previous Version of the Plan
Anytime the plan autosaves a new recovery point is made. Thanks to this you can easily go back to any previous version of the plan undoing some unwanted changes made by yourself or other collaborators. It is like turning back the clock.
To recover a previous version of the plan click on the plan's "Save Status" on the top bar. A new dialogue will appear listing all the possible recovery points for this plan. They are divided by date and each has a unique number and timestamp. When switching between different revisions you can see your plan changing. This is live preview This will help find a right moment in the history.When you select a revision it will show up on your canvas as a preview. You can then visually decide if that is the version you want to restore. Once you selected the version you are interested in, choose one of two options at the bottom of the dialogue, "Restore this version" or "Create copy". The former restores the original plan to the selected previous version. The latter creates a new plan from information saved in the selected recovery point.
Notes:
- If you restore a previous version of the plan, you will still have access to the later versions of the document. So, no risk is involved.
- You can also restore the previous version of the plan from the Invarion Cloud level. Refer to Chapter 3.9 for more information.
Chapter 12: Using mobile devices
RapidPlan Online can be used on any mobile device that has an web browser. The application will simply adjust the screen to fit, based on the device you are using.
The important thing in using RapidPlan Online on mobile devices is the Canvas button. It will work as confirm button when using the tool, and when no tool is currently used it switches between Select and Pan mode. The former is for selecting and manipulating objects on the plan. The latter allows for easier panning, by one finger drag.
12.1 Creating and selecting objects
12.1.1 Creating objects
To use tools on a mobile device, simply tap the tool you wish to use. Tapping on your screen is the same action as a left mouse click.
Tap on to your canvas area to begin using the selected tool. Each tap on the canvas area will then create a new control point. When you have finished your last point, tap the Confirm selection on the Canvas button.
Note: You can also tap, hold and drag when using a tool to control the direction of the next object control point.
12.1.2 Selecting objects
To select an object, simply tap on the object.
To select multiple objects, simply tap, hold and drag across the objects you wish to select and create a selection box.
To access the Context menu, tap and hold on the selected object/s, then the menu will appear.
12.2 Panning
The panning works differently depending on the current mode (Select mode/Pan mode). In Select mode you can pan by dragging with two fingers. If you want to pan with a single finger, you need to switch to Pan mode. To switch between the modes (Select mode/Pan mode) click on the Canvas button when no tool is selected.
12.3 Zooming
To zoom in, pinch inwards on the canvas area.
To zoom out, pinch outwards on the canvas area.
You can zoom in and zoom out regardless of the current mode (Select mode/Pan mode).
Chapter 13: Additional Information
13.1 Contact information
Please see our contact phone numbers below.
US/Canada
(617) 936 8326
Australia
(03) 8657 0228
New Zealand
09 8879253
United Kingdom
01134 679022
Ireland
076 888 9192
13.2 Video tutorials
For further instruction of how to use certain features or tools in RapidPlan Online, visit our YouTube Channel for Tutorial Videos.